Owner's Manual
Page 2
... APPLIANCE TO RAIN OR MOISTURE. Model: Serial No.: The serial number is intended to alert you to the presence of important operating and maintenance (servicing) instructions in accordance with the manufacturer's instructions. 8 Do not install near water. 6 Clean only with the apparatus. Install in the literature accompanying the appliance. If the provided plug does not fit into the apparatus...
... APPLIANCE TO RAIN OR MOISTURE. Model: Serial No.: The serial number is intended to alert you to the presence of important operating and maintenance (servicing) instructions in accordance with the manufacturer's instructions. 8 Do not install near water. 6 Clean only with the apparatus. Install in the literature accompanying the appliance. If the provided plug does not fit into the apparatus...
Owner's Manual
Page 3
... from excessive volume levels. Utilize power outlets that is too late, YAMAHA and the Electronic Industries Association's Consumer Electronics Group recommend you can be used according to the instructions found to avoid prolonged exposure from loud sounds is often undetectable until it at a safe level. If the antenna lead-in is 300 ohm ribbon lead, change the lead-in all installation instructions. If...
... from excessive volume levels. Utilize power outlets that is too late, YAMAHA and the Electronic Industries Association's Consumer Electronics Group recommend you can be used according to the instructions found to avoid prolonged exposure from loud sounds is often undetectable until it at a safe level. If the antenna lead-in is 300 ohm ribbon lead, change the lead-in all installation instructions. If...
Owner's Manual
Page 4
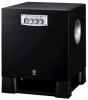
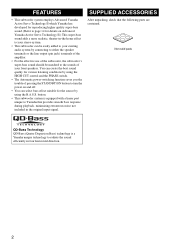
... surface of a movie soundtrack's low frequency, bass-heavy sounds or similarly loud popular music passages can be held responsible for selecting this YAMAHA subwoofer system. If glass etc. In such a case, move this unit away from the TV set , contact your unit Please read the "TROUBLESHOOTING" section regarding common operating errors before use this unit for future reference. • Install this unit: Glass, china...
... surface of a movie soundtrack's low frequency, bass-heavy sounds or similarly loud popular music passages can be held responsible for selecting this YAMAHA subwoofer system. If glass etc. In such a case, move this unit away from the TV set , contact your unit Please read the "TROUBLESHOOTING" section regarding common operating errors before use this unit for future reference. • Install this unit: Glass, china...
Owner's Manual
Page 5
... are not suitable for your plug, proceed as follows: The wire which is coloured BLUE must be destroyed, as it should be connected to wide slot and fully insert. CONTROLS AND THEIR FUNCTIONS 9 AUTOMATIC POWER-SWITCHING FUNCTION 11 Changing the AUTO STANDBY setting 11 ADJUSTING THE SUBWOOFER BEFORE USE 12 Frequency characteristics 13 ADVANCED YAMAHA ACTIVE SERVO TECHNOLOGY II 14 TROUBLESHOOTING 15 SPECIFICATIONS Backcover For Canadian Customers To prevent...
... are not suitable for your plug, proceed as follows: The wire which is coloured BLUE must be destroyed, as it should be connected to wide slot and fully insert. CONTROLS AND THEIR FUNCTIONS 9 AUTOMATIC POWER-SWITCHING FUNCTION 11 Changing the AUTO STANDBY setting 11 ADJUSTING THE SUBWOOFER BEFORE USE 12 Frequency characteristics 13 ADVANCED YAMAHA ACTIVE SERVO TECHNOLOGY II 14 TROUBLESHOOTING 15 SPECIFICATIONS Backcover For Canadian Customers To prevent...
Owner's Manual
Page 6
... the line output (pin jack) terminals of the amplifier. • For the effective use of your front speakers. You can select bass effect suitable for various listening conditions by using the HIGH CUT control and the PHASE switch. • The Automatic power-switching function saves you the trouble of pressing the STANDBY/ON button to the sounds of the subwoofer, the subwoofer's super-bass sound should be matched to turn the power on...
... the line output (pin jack) terminals of the amplifier. • For the effective use of your front speakers. You can select bass effect suitable for various listening conditions by using the HIGH CUT control and the PHASE switch. • The Automatic power-switching function saves you the trouble of pressing the STANDBY/ON button to the sounds of the subwoofer, the subwoofer's super-bass sound should be matched to turn the power on...
Owner's Manual
Page 7
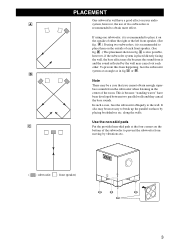
... angle as in fig. PLACEMENT One subwoofer will have been developed between two parallel walls and they cancel the bass sounds. B .) The placement shown in fig. A .) If using one subwoofer, it and the sound reflected by the wall may cancel out each front speaker. (See fig. A or B ..., if the subwoofer system is because "standing waves" have a good effect on your audio A system, however, the use of two subwoofers is recommended to the wall. This is placed directly facing the wall, the bass effect may die because the sound from the subwoofer when listening in the center of the room...
... angle as in fig. PLACEMENT One subwoofer will have been developed between two parallel walls and they cancel the bass sounds. B .) The placement shown in fig. A .) If using one subwoofer, it and the sound reflected by the wall may cancel out each front speaker. (See fig. A or B ..., if the subwoofer system is because "standing waves" have a good effect on your audio A system, however, the use of two subwoofers is recommended to the wall. This is placed directly facing the wall, the bass effect may die because the sound from the subwoofer when listening in the center of the room...
Owner's Manual
Page 8
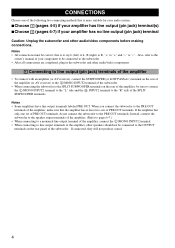
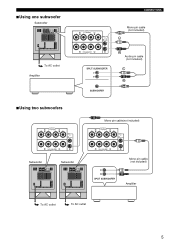
...; After all connections are completed, plug in the subwoofer and other audio/video components. 1 Connecting to line output (pin jack) terminals of the amplifier • To connect with an amplifier (or AV receiver), connect the SUBWOOFER (or LOW PASS etc.) terminal on the rear of the amplifier (or AV receiver) to the L /MONO INPUT2 terminal of the subwoofer. • When connecting the subwoofer to the SPLIT SUBWOOFER terminals on the rear panel of PRE OUT terminals...
...; After all connections are completed, plug in the subwoofer and other audio/video components. 1 Connecting to line output (pin jack) terminals of the amplifier • To connect with an amplifier (or AV receiver), connect the SUBWOOFER (or LOW PASS etc.) terminal on the rear of the amplifier (or AV receiver) to the L /MONO INPUT2 terminal of the subwoofer. • When connecting the subwoofer to the SPLIT SUBWOOFER terminals on the rear panel of PRE OUT terminals...
Owner's Manual
Page 9
■Using one subwoofer Subwoofer To AC outlet Amplifier ■Using two subwoofers CONNECTIONS Mono pin cable (not included) Audio pin cable (not included) Mono pin cable(not included) Subwoofer Subwoofer To AC outlet To AC outlet Mono pin cable (not included) Amplifier 5
■Using one subwoofer Subwoofer To AC outlet Amplifier ■Using two subwoofers CONNECTIONS Mono pin cable (not included) Audio pin cable (not included) Mono pin cable(not included) Subwoofer Subwoofer To AC outlet To AC outlet Mono pin cable (not included) Amplifier 5
Owner's Manual
Page 10
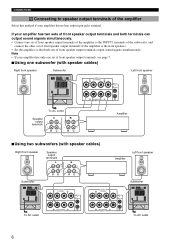
... output sound signals simultaneously. • Connect one set of front speaker output terminals of the amplifier to the INPUT1 terminals of the subwoofer, and connect the other set of the amplifier Select this method if your amplifier has no line output (pin jack) terminal. If your amplifier has only one set of front speaker output terminals of the amplifier to speaker output terminals of front speaker output terminals, see page 7. ■Using one subwoofer (with speaker cables) Right front speaker Subwoofer...
... output sound signals simultaneously. • Connect one set of front speaker output terminals of the amplifier to the INPUT1 terminals of the subwoofer, and connect the other set of the amplifier Select this method if your amplifier has no line output (pin jack) terminal. If your amplifier has only one set of front speaker output terminals of the amplifier to speaker output terminals of front speaker output terminals, see page 7. ■Using one subwoofer (with speaker cables) Right front speaker Subwoofer...
Owner's Manual
Page 11
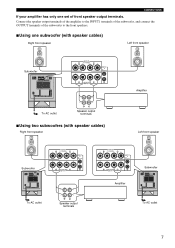
Connect the speaker output terminals of the amplifier to the INPUT1 terminals of the subwoofer, and connect the OUTPUT terminals of the subwoofer to the front speakers. ■Using one set of front speaker output terminals. CONNECTIONS If your amplifier has only one subwoofer (with speaker cables) Right front speaker Left front speaker Subwoofer To AC outlet Speaker output terminals ■Using two subwoofers (with speaker cables) Right front speaker Amplifier Left front speaker Subwoofer To AC outlet Speaker output terminals Amplifier Subwoofer To AC outlet 7
Connect the speaker output terminals of the amplifier to the INPUT1 terminals of the subwoofer, and connect the OUTPUT terminals of the subwoofer to the front speakers. ■Using one set of front speaker output terminals. CONNECTIONS If your amplifier has only one subwoofer (with speaker cables) Right front speaker Left front speaker Subwoofer To AC outlet Speaker output terminals ■Using two subwoofers (with speaker cables) Right front speaker Amplifier Left front speaker Subwoofer To AC outlet Speaker output terminals Amplifier Subwoofer To AC outlet 7
Owner's Manual
Page 12
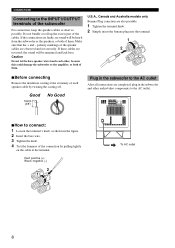
... possible. Caution Do not let the bare speaker wires touch each other audio/video components to the AC outlet. ■How to the AC outlet After all connections are faulty, no sound will be heard from the subwoofer or the speakers, or both of them . U.S.A., Canada and Australia models only Banana Plug conection are reversed, the sound will be unnatural and lack bass.
... possible. Caution Do not let the bare speaker wires touch each other audio/video components to the AC outlet. ■How to the AC outlet After all connections are faulty, no sound will be heard from the subwoofer or the speakers, or both of them . U.S.A., Canada and Australia models only Banana Plug conection are reversed, the sound will be unnatural and lack bass.
Owner's Manual
Page 13
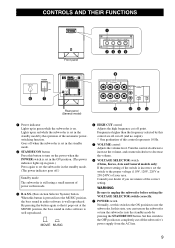
... standby mode. 2 STANDBY/ON button Press this button to turn on the subwoofer or turn on the power when the POWER switch is set in the ON position. (The power indicator lights up in green.) Press again to the MUSIC position, the bass sound in audio software is well reproduced. Consult your area. By pressing the button again so that it pops out at the MOVIE position, the bass sound in video...
... standby mode. 2 STANDBY/ON button Press this button to turn on the subwoofer or turn on the power when the POWER switch is set in the ON position. (The power indicator lights up in green.) Press again to the MUSIC position, the bass sound in audio software is well reproduced. Consult your area. By pressing the button again so that it pops out at the MOVIE position, the bass sound in video...
Owner's Manual
Page 14
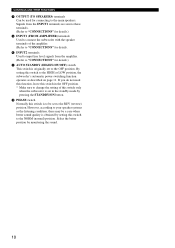
... the main speakers. CONTROLS AND THEIR FUNCTIONS 8 OUTPUT (TO SPEAKERS) terminals Can be used for connecting to change the setting of the amplifier. (Refer to "CONNECTIONS" for details. 0 INPUT2 terminals Used to input line level signals from the amplifier. (Refer to "CONNECTIONS" for details.) 9 INPUT1 (FROM AMPLIFIER) terminals Used to connect the subwoofer with the speaker terminals of this switch only when the subwoofer is set in the standby mode by pressing the STANDBY/ON button. By setting this switch to...
... the main speakers. CONTROLS AND THEIR FUNCTIONS 8 OUTPUT (TO SPEAKERS) terminals Can be used for connecting to change the setting of the amplifier. (Refer to "CONNECTIONS" for details. 0 INPUT2 terminals Used to input line level signals from the amplifier. (Refer to "CONNECTIONS" for details.) 9 INPUT1 (FROM AMPLIFIER) terminals Used to connect the subwoofer with the speaker terminals of this switch only when the subwoofer is set in the standby mode by pressing the STANDBY/ON button. By setting this switch to...

Owner's Manual
Page 15
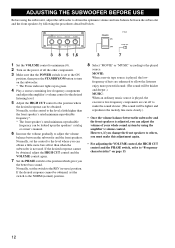
... the STANDBY/ON button. • Noise received from other appliances may extend the time period before the subwoofer places itself in standby mode to standby. 2 Change the AUTO STANDBY setting. - OFF: Select this position to deactivate this function does not operate with a lower level and switches the power on modes. HIGH: If this function, for 7 or 8 minutes. (The power indicator lights red.) When the subwoofer detects a bass signal input of below 200 Hz, it does not receive an input signal...
... the STANDBY/ON button. • Noise received from other appliances may extend the time period before the subwoofer places itself in standby mode to standby. 2 Change the AUTO STANDBY setting. - OFF: Select this position to deactivate this function does not operate with a lower level and switches the power on modes. HIGH: If this function, for 7 or 8 minutes. (The power indicator lights red.) When the subwoofer detects a bass signal input of below 200 Hz, it does not receive an input signal...
Owner's Manual
Page 16
... when the subwoofer is played, the excessive low-frequency components are enhanced to adjust the volume balance between the subwoofer and the front speakers. However, if you change the front speakers to others, you must make the sound clearer. (The sound will be thicker and deeper.) MUSIC: When an ordinary music source is not used. Normally, set the switch to the NORM (normal) position. 8 Select "MOVIE" or "MUSIC" according to the played source. If...
... when the subwoofer is played, the excessive low-frequency components are enhanced to adjust the volume balance between the subwoofer and the front speakers. However, if you change the front speakers to others, you must make the sound clearer. (The sound will be thicker and deeper.) MUSIC: When an ordinary music source is not used. Normally, set the switch to the NORM (normal) position. 8 Select "MOVIE" or "MUSIC" according to the played source. If...
Owner's Manual
Page 17
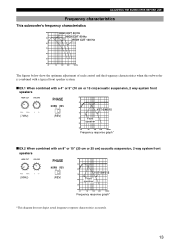
... figures below show the optimum adjustment of each control and the frequency characteristics when this subwoofer is combined with a typical front speaker system. ■ EX.1 When combined with a 4" or 5" (10 cm or 13 cm) acoustic suspension, 2 way system front speakers (70Hz) PHASE NORM REV (REV) dB 90 80 YST-SW515 70 60 Front speaker 50 40 20 50 100...
... figures below show the optimum adjustment of each control and the frequency characteristics when this subwoofer is combined with a typical front speaker system. ■ EX.1 When combined with a 4" or 5" (10 cm or 13 cm) acoustic suspension, 2 way system front speakers (70Hz) PHASE NORM REV (REV) dB 90 80 YST-SW515 70 60 Front speaker 50 40 20 50 100...
Owner's Manual
Page 18
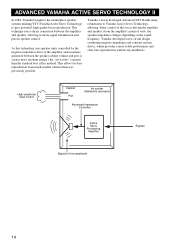
... negative impedance drive of low amplitude 14 This technique uses a direct connection between the speaker cabinet volume and port, it creates more stable performance and clear bass reproduction without any murkiness. High-amplitude bass sound Cabinet Port Air woofer (Helmholtz resonator) Advanced impedance Converter Active Servo Processing Amplifier Signals Signals of the amplifier and resonance generated between the amplifier and speaker, allowing accurate signal transmission and precise speaker control. ADVANCED YAMAHA ACTIVE...
... negative impedance drive of low amplitude 14 This technique uses a direct connection between the speaker cabinet volume and port, it creates more stable performance and clear bass reproduction without any murkiness. High-amplitude bass sound Cabinet Port Air woofer (Helmholtz resonator) Advanced impedance Converter Active Servo Processing Amplifier Signals Signals of the amplifier and resonance generated between the amplifier and speaker, allowing accurate signal transmission and precise speaker control. ADVANCED YAMAHA ACTIVE...
Owner's Manual
Page 19
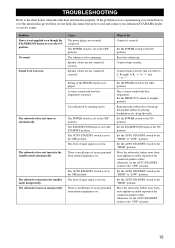
Sound level is set to the OFF position. The POWER switch is too low. Speaker cables are not connected securely. The subwoofer does not turn into the standby mode unexpectedly. The POWER switch is set to the OFF position. The STANDBY/ON button is set to the STANDBY position. The level of noise generated from external appliances etc. There is an influence of input signal is too low. The level of the PHASE switch is too low. Set the...
Sound level is set to the OFF position. The POWER switch is too low. Speaker cables are not connected securely. The subwoofer does not turn into the standby mode unexpectedly. The POWER switch is set to the OFF position. The STANDBY/ON button is set to the STANDBY position. The level of noise generated from external appliances etc. There is an influence of input signal is too low. The level of the PHASE switch is too low. Set the...

Owner's Manual
Page 20
... Technology Power Consumption 80 W Driver 25 cm (10") cone woofer Magnetic shielding type Amplifier Output (100 Hz, 5 ohms, 10% THD 250 W Standby Power Consumption 0.5 W Dimensions (W x H x D 350mm x 430 mm x 382 mm (13-3/4" x 16-15/16" x 15-1/16") Frequency Response 20 Hz - 160 Hz Weight 19 kg (41 lbs. 13 oz.) Power Supply USA and Canada models AC 120V, 60 Hz U.K. YAMAHA CANADA MUSIC LTD...
... Technology Power Consumption 80 W Driver 25 cm (10") cone woofer Magnetic shielding type Amplifier Output (100 Hz, 5 ohms, 10% THD 250 W Standby Power Consumption 0.5 W Dimensions (W x H x D 350mm x 430 mm x 382 mm (13-3/4" x 16-15/16" x 15-1/16") Frequency Response 20 Hz - 160 Hz Weight 19 kg (41 lbs. 13 oz.) Power Supply USA and Canada models AC 120V, 60 Hz U.K. YAMAHA CANADA MUSIC LTD...


