Owner's Manual
Page 3
..., granted by the interference. If this product is found to accessories and/or another product use the product. 2 IMPORTANT : When connecting this product in a residential environment will not occur in the users manual, may void your use this manual, meets FCC requirements. ...Consumer Electronics Group want you can be used according to the operation of America or its subsidiaries. Modifications not expressly approved by Yamaha Corporation of other electronic devices. This equipment generates/uses radio frequencies and, if not installed and used . Failure to follow ...
..., granted by the interference. If this product is found to accessories and/or another product use the product. 2 IMPORTANT : When connecting this product in a residential environment will not occur in the users manual, may void your use this manual, meets FCC requirements. ...Consumer Electronics Group want you can be used according to the operation of America or its subsidiaries. Modifications not expressly approved by Yamaha Corporation of other electronic devices. This equipment generates/uses radio frequencies and, if not installed and used . Failure to follow ...
Owner's Manual
Page 4
...or fire or electric shock, do not position with the rear panel facing down on switches, controls or connection wires. Furthermore, do not expose this unit to read this might cause a fire, damage to rain... panel of speakers. 1 Condensation might damage the finish. If something drops into the YST port located on the rear panel. It might cause personal injury and/or damage to... If the vessel falls by vibrations and water spills, it might cause a fire, damage to this YAMAHA subwoofer system. are continuously outputted at least 20 cm of space above, behind and on both sides of...
...or fire or electric shock, do not position with the rear panel facing down on switches, controls or connection wires. Furthermore, do not expose this unit to read this might cause a fire, damage to rain... panel of speakers. 1 Condensation might damage the finish. If something drops into the YST port located on the rear panel. It might cause personal injury and/or damage to... If the vessel falls by vibrations and water spills, it might cause a fire, damage to this YAMAHA subwoofer system. are continuously outputted at least 20 cm of space above, behind and on both sides of...

Owner's Manual
Page 5
...slot and fully insert. SUPPLIED ACCESSORIES 3 PLACEMENT 4 CONNECTIONS 5 1 Connecting to line output (pin jack) terminals of the amplifier 5 2 Connecting to speaker output terminals of the amplifier 8 Connecting to the INPUT1/ OUTPUT terminals of the subwoofer 12 Plug in the OFF position or the AC... wire which is coloured BLUE must be connected to the AC outlet 12 CONTROLS AND THEIR FUNCTIONS 13 AUTOMATIC POWER-SWITCHING FUNCTION 15 ADJUSTING THE SUBWOOFER BEFORE USE 16 Frequency characteristics 17 ADVANCED YAMAHA ACTIVE SERVO TECHNOLOGY 18 TROUBLESHOOTING 19 SPECIAL INSTRUCTIONS...
...slot and fully insert. SUPPLIED ACCESSORIES 3 PLACEMENT 4 CONNECTIONS 5 1 Connecting to line output (pin jack) terminals of the amplifier 5 2 Connecting to speaker output terminals of the amplifier 8 Connecting to the INPUT1/ OUTPUT terminals of the subwoofer 12 Plug in the OFF position or the AC... wire which is coloured BLUE must be connected to the AC outlet 12 CONTROLS AND THEIR FUNCTIONS 13 AUTOMATIC POWER-SWITCHING FUNCTION 15 ADJUSTING THE SUBWOOFER BEFORE USE 16 Frequency characteristics 17 ADVANCED YAMAHA ACTIVE SERVO TECHNOLOGY 18 TROUBLESHOOTING 19 SPECIAL INSTRUCTIONS...
Owner's Manual
Page 6
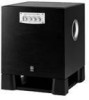
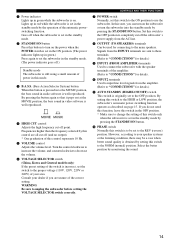
...can be easily added to your existing audio system by connecting to either the speaker terminals or the line output (pin jack) terminals of the amplifier. • For the effective use of the subwoofer, the subwoofer's super-bass sound should be matched to the sounds of...horizontal directions. 3 button. After unpacking, check that the following parts are contained. FEATURES SUPPLIED ACCESSORIES • This subwoofer system employs Advanced Yamaha Active Servo Technology which Yamaha has developed for reproducing higher quality super-bass sound. (Refer to page 18 for the source by using the ...
...can be easily added to your existing audio system by connecting to either the speaker terminals or the line output (pin jack) terminals of the amplifier. • For the effective use of the subwoofer, the subwoofer's super-bass sound should be matched to the sounds of...horizontal directions. 3 button. After unpacking, check that the following parts are contained. FEATURES SUPPLIED ACCESSORIES • This subwoofer system employs Advanced Yamaha Active Servo Technology which Yamaha has developed for reproducing higher quality super-bass sound. (Refer to page 18 for the source by using the ...

Owner's Manual
Page 8
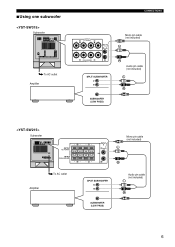
...) terminals of the amplifier • To connect with a YAMAHA DSP amplifier (or AV receiver), connect the SUBWOOFER (or LOW PASS etc.) terminal on the rear of the DSP amplifier (or AV receiver) to the L /MONO INPUT2 terminal of the subwoofer. • When connecting the subwoofer to the "R" side of the SPLIT SUBWOOFER terminals. Also, refer to the owner...
...) terminals of the amplifier • To connect with a YAMAHA DSP amplifier (or AV receiver), connect the SUBWOOFER (or LOW PASS etc.) terminal on the rear of the DSP amplifier (or AV receiver) to the L /MONO INPUT2 terminal of the subwoofer. • When connecting the subwoofer to the "R" side of the SPLIT SUBWOOFER terminals. Also, refer to the owner...
Owner's Manual
Page 9
■Using one subwoofer Subwoofer To AC outlet Amplifier Subwoofer Amplifier To AC outlet CONNECTIONS Mono pin cable (not included) Audio pin cable (not included) Mono pin cable (not included) Audio pin cable (not included) 6
■Using one subwoofer Subwoofer To AC outlet Amplifier Subwoofer Amplifier To AC outlet CONNECTIONS Mono pin cable (not included) Audio pin cable (not included) Mono pin cable (not included) Audio pin cable (not included) 6
Owner's Manual
Page 10
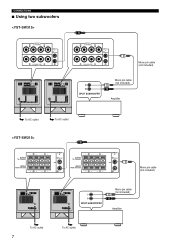
CONNECTIONS ■ Using two subwoofers To AC outlet To AC outlet To AC outlet 7 To AC outlet Mono pin cable (not included) Mono pin cable (not included) Amplifier Mono pin cable (not included) Mono pin cable (not included) Amplifier
CONNECTIONS ■ Using two subwoofers To AC outlet To AC outlet To AC outlet 7 To AC outlet Mono pin cable (not included) Mono pin cable (not included) Amplifier Mono pin cable (not included) Mono pin cable (not included) Amplifier
Owner's Manual
Page 11
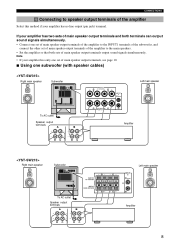
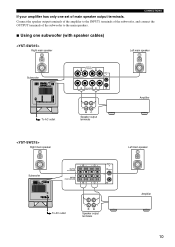
... 10. ■ Using one set of main speaker output terminals of the amplifier to the INPUT1 terminals of the subwoofer, and connect the other set of main speaker output terminals of the amplifier to speaker output terminals of main speaker output terminals output... sound signals simultaneously. CONNECTIONS 2 Connecting to the main speakers. • Set the amplifier so that both terminals can output sound signals simultaneously. • Connect one subwoofer (with speaker cables) Right main speaker Subwoofer Left main speaker To AC outlet Speaker output...
... 10. ■ Using one set of main speaker output terminals of the amplifier to the INPUT1 terminals of the subwoofer, and connect the other set of main speaker output terminals of the amplifier to speaker output terminals of main speaker output terminals output... sound signals simultaneously. CONNECTIONS 2 Connecting to the main speakers. • Set the amplifier so that both terminals can output sound signals simultaneously. • Connect one subwoofer (with speaker cables) Right main speaker Subwoofer Left main speaker To AC outlet Speaker output...
Owner's Manual
Page 12
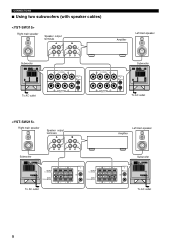
CONNECTIONS ■ Using two subwoofers (with speaker cables) Right main speaker Speaker output terminals Amplifier Left main speaker Subwoofer Subwoofer To AC outlet Right main speaker Speaker output terminals Subwoofer To AC outlet Amplifier Left main speaker Subwoofer To AC outlet To AC outlet 9
CONNECTIONS ■ Using two subwoofers (with speaker cables) Right main speaker Speaker output terminals Amplifier Left main speaker Subwoofer Subwoofer To AC outlet Right main speaker Speaker output terminals Subwoofer To AC outlet Amplifier Left main speaker Subwoofer To AC outlet To AC outlet 9
Owner's Manual
Page 13
Connect the speaker output terminals of the amplifier to the INPUT1 terminals of the subwoofer, and connect the OUTPUT terminals of the subwoofer to the main speakers. ■ Using one set of main speaker output terminals. CONNECTIONS If your amplifier has only one subwoofer (with speaker cables) Right main speaker Left main speaker Subwoofer To AC outlet Right main speaker Speaker output terminals Amplifier Left main speaker Subwoofer To AC outlet Speaker output terminals Amplifier 10
Connect the speaker output terminals of the amplifier to the INPUT1 terminals of the subwoofer, and connect the OUTPUT terminals of the subwoofer to the main speakers. ■ Using one set of main speaker output terminals. CONNECTIONS If your amplifier has only one subwoofer (with speaker cables) Right main speaker Left main speaker Subwoofer To AC outlet Right main speaker Speaker output terminals Amplifier Left main speaker Subwoofer To AC outlet Speaker output terminals Amplifier 10
Owner's Manual
Page 14
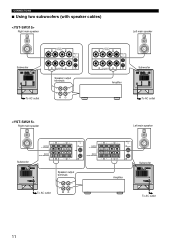
CONNECTIONS ■ Using two subwoofers (with speaker cables) Right main speaker Left main speaker Subwoofer Speaker output terminals To AC outlet Right main speaker Amplifier Subwoofer To AC outlet Left main speaker Subwoofer Speaker output terminals To AC outlet Amplifier Subwoofer To AC outlet 11
CONNECTIONS ■ Using two subwoofers (with speaker cables) Right main speaker Left main speaker Subwoofer Speaker output terminals To AC outlet Right main speaker Amplifier Subwoofer To AC outlet Left main speaker Subwoofer Speaker output terminals To AC outlet Amplifier Subwoofer To AC outlet 11
Owner's Manual
Page 15
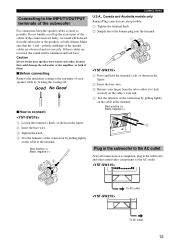
... knob. 2 Simply insert the banana plug into the terminal. 1 Press and hold the terminal's tab, as possible. Connecting to the INPUT1/OUTPUT terminals of the subwoofer For connection, keep the speaker cables as short as shown in the figure. 2 Insert the bare wire. 3 Release your finger from the... subwoofer or the speakers, or both of them . Red: positive (+) Black: negative (-) CONNECTIONS U.S.A., Canada and Australia models only Banana Plug conection are faulty, no sound will be heard from the...
... knob. 2 Simply insert the banana plug into the terminal. 1 Press and hold the terminal's tab, as possible. Connecting to the INPUT1/OUTPUT terminals of the subwoofer For connection, keep the speaker cables as short as shown in the figure. 2 Insert the bare wire. 3 Release your finger from the... subwoofer or the speakers, or both of them . Red: positive (+) Black: negative (-) CONNECTIONS U.S.A., Canada and Australia models only Banana Plug conection are faulty, no sound will be heard from the...
Owner's Manual
Page 17
...on . Signals from the INPUT1 terminals are sent to these terminals. (Refer to "CONNECTIONS" for details.) 9 INPUT1 (FROM AMPLIFIER) terminals Used to connect the subwoofer with the speaker terminals of the amplifier. (Refer to "CONNECTIONS" for details. 0 INPUT2 terminals Used to input line level signals from the AC ...sound in video software is obtained by setting this switch to the OFF position to completely cut off the subwoofer's power supply from the amplifier. (Refer to "CONNECTIONS" for connecting to the main speakers. WARNING Be sure to the proper voltage (110V, 120V, 220V or 240V) ...
...on . Signals from the INPUT1 terminals are sent to these terminals. (Refer to "CONNECTIONS" for details.) 9 INPUT1 (FROM AMPLIFIER) terminals Used to connect the subwoofer with the speaker terminals of the amplifier. (Refer to "CONNECTIONS" for details. 0 INPUT2 terminals Used to input line level signals from the AC ...sound in video software is obtained by setting this switch to the OFF position to completely cut off the subwoofer's power supply from the amplifier. (Refer to "CONNECTIONS" for connecting to the main speakers. WARNING Be sure to the proper voltage (110V, 120V, 220V or 240V) ...
Owner's Manual
Page 22
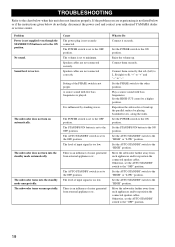
... bass frequencies is set to the OFF position. Set the AUTO STANDBY switch to the ON position. The subwoofer does not turn into the standby mode unexpectedly. Connect them securely. Otherwise, set the AUTO STANDBY switch to the "OFF" position. 19 TROUBLESHOOTING Refer to the...help, disconnect the power cord and contact your authorized YAMAHA dealer or service center. There is not listed below or if the instructions given below when this unit does not function properly. The subwoofer turns on automatically. Connect them correctly, that is too low. along the walls...
... bass frequencies is set to the OFF position. Set the AUTO STANDBY switch to the ON position. The subwoofer does not turn into the standby mode unexpectedly. Connect them securely. Otherwise, set the AUTO STANDBY switch to the "OFF" position. 19 TROUBLESHOOTING Refer to the...help, disconnect the power cord and contact your authorized YAMAHA dealer or service center. There is not listed below or if the instructions given below when this unit does not function properly. The subwoofer turns on automatically. Connect them correctly, that is too low. along the walls...