

Owner's Manual
Page 5
... this unit or avoiding excess humidification. The wire which is coloured BROWN must be connected to the terminal which is connected to read this YAMAHA Subwoofer System. When moving the unit, first disconnect the power plug and the wires connected to obstruct heat radiation. G Do not place this ... and/or damage to this unit to the instructions described below. in a safe place for future reference. Thank you for selecting this manual carefully. Place the unit apart from the TV set for your dealer. CAUTION: Read this before concluding that the unit is hazardous if...
... this unit or avoiding excess humidification. The wire which is coloured BROWN must be connected to the terminal which is connected to read this YAMAHA Subwoofer System. When moving the unit, first disconnect the power plug and the wires connected to obstruct heat radiation. G Do not place this ... and/or damage to this unit to the instructions described below. in a safe place for future reference. Thank you for selecting this manual carefully. Place the unit apart from the TV set for your dealer. CAUTION: Read this before concluding that the unit is hazardous if...

Owner's Manual
Page 8
... - + FROM AMPLIFIER INPUT 1 Amplifier To AC outlet SPLIT SUBWOOFER SUBWOOFER (LOW PASS) 4 *Illustration shows YST-SW205. CONNECTIONS Caution: Plug in the subwoofer and other audio/video components after all connections are completed. ...and "-" to the SPLIT SUBWOOFER terminals on the rear of the SPLIT SUBWOOFER terminals. Also refer to the owner's manual for each of your components. • Basically, connect the subwoofer to the line output (... the amplifier. • To connect with a YAMAHA DSP amplifier (or AV receiver), connect the SUBWOOFER (or LOW PASS etc.) terminal on the rear...
... - + FROM AMPLIFIER INPUT 1 Amplifier To AC outlet SPLIT SUBWOOFER SUBWOOFER (LOW PASS) 4 *Illustration shows YST-SW205. CONNECTIONS Caution: Plug in the subwoofer and other audio/video components after all connections are completed. ...and "-" to the SPLIT SUBWOOFER terminals on the rear of the SPLIT SUBWOOFER terminals. Also refer to the owner's manual for each of your components. • Basically, connect the subwoofer to the line output (... the amplifier. • To connect with a YAMAHA DSP amplifier (or AV receiver), connect the SUBWOOFER (or LOW PASS etc.) terminal on the rear...

Owner's Manual
Page 13
... this switch to the ON position to use the STANDBY/ON button to switch the power between ON and STANDBY manually. * This function detects the low-frequency components below . If that the subwoofer may be used for connecting to the main speakers. Signals from the amplifier. (Refer to "CONNECTIONS" for details.) ‹...
... this switch to the ON position to use the STANDBY/ON button to switch the power between ON and STANDBY manually. * This function detects the low-frequency components below . If that the subwoofer may be used for connecting to the main speakers. Signals from the amplifier. (Refer to "CONNECTIONS" for details.) ‹...
Owner's Manual
Page 14
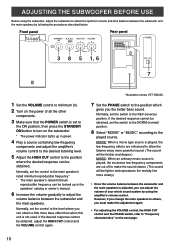
...be looked up in the speakers' catalog or owner's manual. 6 Increase the volume gradually to the REV (reverse) position. If the desired response cannot be obtained, adjust the HIGH CUT control and the VOLUME control again. *Illustration shows YST-SW205. 7 Set the PHASE switch to the played source.... If the desired response cannot be obtained, set the switch to adjust the volume balance between the subwoofer and the main speakers. Normally, set the switch to the...
...be looked up in the speakers' catalog or owner's manual. 6 Increase the volume gradually to the REV (reverse) position. If the desired response cannot be obtained, adjust the HIGH CUT control and the VOLUME control again. *Illustration shows YST-SW205. 7 Set the PHASE switch to the played source.... If the desired response cannot be obtained, set the switch to adjust the volume balance between the subwoofer and the main speakers. Normally, set the switch to the...


