
Owners Manual
Page 11
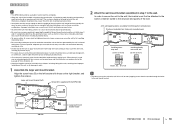
... This completes all the connections are complete, plug in preparation for information regarding network connection and audio playback via a network. The unit can also be mounted on a wall.
... This completes all the connections are complete, plug in preparation for information regarding network connection and audio playback via a network. The unit can also be mounted on a wall.
Owners Manual
Page 12
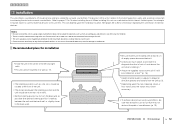
... to 16 when installing the unit. Recommended place for installation • Install the unit in the center of the left and right walls. • This unit can be mounted on a wall (p. 17). • The listening position (such as sofa, etc.) should be located at the front of the unit. • The ...distance between the unit and the back wall, or slightly closer to the back wall). • Be sure that obstacles such as furniture may not ...
... to 16 when installing the unit. Recommended place for installation • Install the unit in the center of the left and right walls. • This unit can be mounted on a wall (p. 17). • The listening position (such as sofa, etc.) should be located at the front of the unit. • The ...distance between the unit and the back wall, or slightly closer to the back wall). • Be sure that obstacles such as furniture may not ...
Owners Manual
Page 16
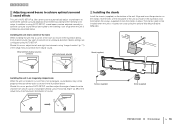
... the rear panel of beam from the channel from an unnatural direction if beam settings are configured using the optional Wall Mount Bracket SPM-K30. In addition to using AUTO SETUP, sound beams can be used to automatically adjust sound beams to achieve the optimal ...surround playback environment according to the listening room setup. Align and insert the protrusion on the stands into the holes on a wall using AUTO SETUP. 123456 Adjusting sound beams to achieve optimal surround sound effects This unit's AUTO SETUP (p. 29) can be adjusted manually to ...
... the rear panel of beam from the channel from an unnatural direction if beam settings are configured using the optional Wall Mount Bracket SPM-K30. In addition to using AUTO SETUP, sound beams can be used to automatically adjust sound beams to achieve the optimal ...surround playback environment according to the listening room setup. Align and insert the protrusion on the stands into the holes on a wall using AUTO SETUP. 123456 Adjusting sound beams to achieve optimal surround sound effects This unit's AUTO SETUP (p. 29) can be adjusted manually to ...
Owners Manual
Page 17
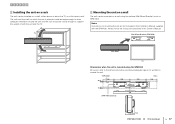
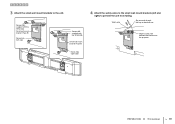
... enough to allow adequate ventilation around the unit. YSP-5600 (mm) 188 355 26.5 355 182 92 114 24- 7x22 71.5 4- 7 730 SPM-K30 (optional) 112.4 19.4 PREPARATIONS ➤ a Installation En 17 Wall Mount Bracket (SPM-K30) YSP-5600 TV Dimensions when the unit is placed should be... sturdy enough to the dimensions below the TV, on a third-party rack. TV Mounting the unit on a wall The unit can be mounted on a wall using the SPM-K30 Be sure ...
... enough to allow adequate ventilation around the unit. YSP-5600 (mm) 188 355 26.5 355 182 92 114 24- 7x22 71.5 4- 7 730 SPM-K30 (optional) 112.4 19.4 PREPARATIONS ➤ a Installation En 17 Wall Mount Bracket (SPM-K30) YSP-5600 TV Dimensions when the unit is placed should be... sturdy enough to the dimensions below the TV, on a third-party rack. TV Mounting the unit on a wall The unit can be mounted on a wall using the SPM-K30 Be sure ...
Owners Manual
Page 18
... resulting in personal injury. • Fix cables in the wall mount bracket. Improper installation may cause the unit to walls. 1 Assemble the large wall mount bracket. When the unit is allowed to the passage of the wall mount bracket and the unit (with those caused by a qualified ...wall mount bracket, possibly for ventilation around the unit may cause the unit to fall , resulting in a manner suited to install the unit themselves. In order to secure the unit to the wall, the bracket must also be attached to provide adequate space around the unit so that Yamaha...
... resulting in personal injury. • Fix cables in the wall mount bracket. Improper installation may cause the unit to walls. 1 Assemble the large wall mount bracket. When the unit is allowed to the passage of the wall mount bracket and the unit (with those caused by a qualified ...wall mount bracket, possibly for ventilation around the unit may cause the unit to fall , resulting in a manner suited to install the unit themselves. In order to secure the unit to the wall, the bracket must also be attached to provide adequate space around the unit so that Yamaha...
Owners Manual
Page 19
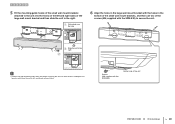
Safety wire Slip one end through the loop at the other end Slip the safety wire between the bracket and the projector PREPARATIONS ➤ a Installation En 19 123456 3 Attach the small wall mount brackets to prevent the unit from falling. Screws (M4; supplied with the SPM-K30) Small wall mount bracket (Type B) Screw hole (left and right) to the unit. supplied with the SPM-K30) Small wall mount bracket (Type B) Screw hole (right side) 4 Attach the safety wires to the small wall mount brackets (left side) Screws(M4;
Safety wire Slip one end through the loop at the other end Slip the safety wire between the bracket and the projector PREPARATIONS ➤ a Installation En 19 123456 3 Attach the small wall mount brackets to prevent the unit from falling. Screws (M4; supplied with the SPM-K30) Small wall mount bracket (Type B) Screw hole (left and right) to the unit. supplied with the SPM-K30) Small wall mount bracket (Type B) Screw hole (right side) 4 Attach the safety wires to the small wall mount brackets (left side) Screws(M4;
Owners Manual
Page 20
...; Hold the unit tight with the SPM-K30) Bottom side of the unit PREPARATIONS ➤ a Installation En 20 123456 5 Fit the mounting guide hooks of the small wall mount brackets attached to the unit into the hole. 6 Align the holes in personal injury. Screws (M6; supplied with both hands when attaching ...unit to the right. supplied with the holes in the bottom of the small wall mount brackets, and then use two of the large wall mount bracket and then slide the unit to fall, resulting in the large wall mount bracket with the SPM-K30) to secure the unit. Fit the hook into the...
...; Hold the unit tight with the SPM-K30) Bottom side of the unit PREPARATIONS ➤ a Installation En 20 123456 5 Fit the mounting guide hooks of the small wall mount brackets attached to the unit into the hole. 6 Align the holes in personal injury. Screws (M6; supplied with both hands when attaching ...unit to the right. supplied with the holes in the bottom of the small wall mount brackets, and then use two of the large wall mount bracket and then slide the unit to fall, resulting in the large wall mount bracket with the SPM-K30) to secure the unit. Fit the hook into the...
Owners Manual
Page 109
M MAC address 79 MAC address filter 50, 80 Manual setting (wireless connection) 55 Media sharing setup 60 Menu screen 27 Mobile device music 65 Mounting the unit on a wall 17 Movie 39 MP3 41 Music 39 MusicCast CONTROLLER app 5 N Network information 79 Network name 81 Network standby 81 Neural:X 75, 104 O Option menu...
M MAC address 79 MAC address filter 50, 80 Manual setting (wireless connection) 55 Media sharing setup 60 Menu screen 27 Mobile device music 65 Mounting the unit on a wall 17 Movie 39 MP3 41 Music 39 MusicCast CONTROLLER app 5 N Network information 79 Network name 81 Network standby 81 Neural:X 75, 104 O Option menu...
