Owner's Manual
Page 27
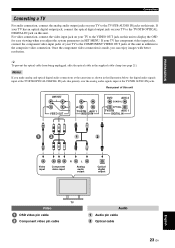
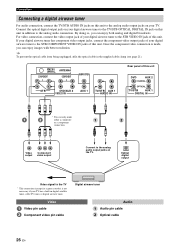
...this unit. Rear panel of this unit to display the OSD for easy viewing when you can enjoy images with better resolution. Once the component video connection is made, you adjust the system parameters in SET MENU. PREPARATION Connections Connecting a TV For audio connection, connect the analog audio output ...video connection. y To prevent the optical cable from being unplugged, affix the optical cable in the illustration below, the digital audio signals input at the TV/STB OPTICAL DIGITAL IN jack take priority over the analog audio signals input at the TV/STB AUDIO IN jacks. If your TV ...
...this unit. Rear panel of this unit to display the OSD for easy viewing when you can enjoy images with better resolution. Once the component video connection is made, you adjust the system parameters in SET MENU. PREPARATION Connections Connecting a TV For audio connection, connect the analog audio output ...video connection. y To prevent the optical cable from being unplugged, affix the optical cable in the illustration below, the digital audio signals input at the TV/STB OPTICAL DIGITAL IN jack take priority over the analog audio signals input at the TV/STB AUDIO IN jacks. If your TV ...
Owner's Manual
Page 28
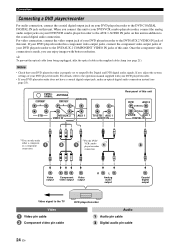
...Connecting a DVD player/recorder For audio connection, connect the coaxial digital output jack on your DVD player/recorder to the DVD COAXIAL DIGITAL IN jack on this unit in the supplied cable clamp (see page 28). If not, adjust the system settings of your DVD player/recorder to the DVD/AUX 2... VIDEO IN jack of this unit. ANTENNA COMPONENT COMPONENT SUBWOOFER STB DVD/AUX 2 VIDEO IN AUX 1 TV/STB AUX 1 AUDIO IN Rear panel of this unit DVD AUX 2 COAXIAL OPTICAL TV/STB AUX 1 DIGITAL IN *1You can enjoy images ...
...Connecting a DVD player/recorder For audio connection, connect the coaxial digital output jack on your DVD player/recorder to the DVD COAXIAL DIGITAL IN jack on this unit in the supplied cable clamp (see page 28). If not, adjust the system settings of your DVD player/recorder to the DVD/AUX 2... VIDEO IN jack of this unit. ANTENNA COMPONENT COMPONENT SUBWOOFER STB DVD/AUX 2 VIDEO IN AUX 1 TV/STB AUX 1 AUDIO IN Rear panel of this unit DVD AUX 2 COAXIAL OPTICAL TV/STB AUX 1 DIGITAL IN *1You can enjoy images ...
Owner's Manual
Page 29
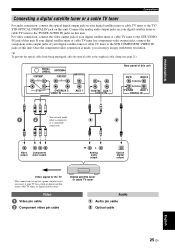
...tuner to the TV/STB AUDIO IN jacks on your digital satellite tuner or cable TV tuner to the STB COMPONENT VIDEO IN jacks of this unit DVD AUX 2 COAXIAL OPTICAL TV/STB AUX 1 DIGITAL IN * * * You can enjoy images with better resolution. Once the component video connection is... not necessary if your digital satellite tuner or cable TV tuner to the TV * This connection (except for a game ...
...tuner to the TV/STB AUDIO IN jacks on your digital satellite tuner or cable TV tuner to the STB COMPONENT VIDEO IN jacks of this unit DVD AUX 2 COAXIAL OPTICAL TV/STB AUX 1 DIGITAL IN * * * You can enjoy images with better resolution. Once the component video connection is... not necessary if your digital satellite tuner or cable TV tuner to the TV * This connection (except for a game ...
Owner's Manual
Page 30
... component video output jacks of this unit. Connect the optical digital output jack on your digital airwave tuner to the STB VIDEO IN jack of this unit DVD AUX 2 COAXIAL OPTICAL TV/STB AUX 1 DIGITAL IN * * * You can enjoy images with better resolution. Optical digital output Video signal to the analog audio connection. y To prevent...
... component video output jacks of this unit. Connect the optical digital output jack on your digital airwave tuner to the STB VIDEO IN jack of this unit DVD AUX 2 COAXIAL OPTICAL TV/STB AUX 1 DIGITAL IN * * * You can enjoy images with better resolution. Optical digital output Video signal to the analog audio connection. y To prevent...
Owner's Manual
Page 32
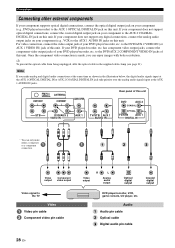
... Connecting other external components If your component supports optical digital connections, connect the optical digital output jack on your component (e.g., DVD player/recorder) to the AUX 1 OPTICAL DIGITAL IN jack on this unit DVD AUX 2 COAXIAL OPTICAL TV/STB AUX 1 DIGITAL IN * You can enjoy images with better resolution. y To prevent the optical cable from...
... Connecting other external components If your component supports optical digital connections, connect the optical digital output jack on your component (e.g., DVD player/recorder) to the AUX 1 OPTICAL DIGITAL IN jack on this unit DVD AUX 2 COAXIAL OPTICAL TV/STB AUX 1 DIGITAL IN * You can enjoy images with better resolution. y To prevent the optical cable from...

Owner's Manual
Page 61
...). 57 En ST+3BEAM 2 Notes • When you want to enjoy surround sound near this mode when the listening position is widened, you can achieve a more realistic surround effect if you adjust settings for IMAGE LOCATION in a small listening area which may not fulfill the listening room conditions for... wall, and the surround left and right sound beams cannot be reflected off the wall. Vocals and instrumental sounds can be heard close to the backside of the stage. Press ST+3BEAM to select My Surround. My Surround This mode enables surround system in BEAM MENU (see page 78). Press...
...). 57 En ST+3BEAM 2 Notes • When you want to enjoy surround sound near this mode when the listening position is widened, you can achieve a more realistic surround effect if you adjust settings for IMAGE LOCATION in a small listening area which may not fulfill the listening room conditions for... wall, and the surround left and right sound beams cannot be reflected off the wall. Vocals and instrumental sounds can be heard close to the backside of the stage. Press ST+3BEAM to select My Surround. My Surround This mode enables surround system in BEAM MENU (see page 78). Press...

Owner's Manual
Page 65
...59 and select PL II Music or Neo:6 Music. 2 Press / to the desired volume balance. IMAGE Adjusts the center image from the center channel. ENTER Enjoying surround sound ■ When Dolby Pro Logic II Music is output only from three channels (front left and right... effect, distributed throughout the entire surround sound field to 1.0 (toward the front direction) Default setting: STD (standard) C. DECODE +10 ENHANCER ENTRY MENU CAT/ A-E DISPLAY ENTER TV/AV YSP RETURN (U.S.A. MUSIC 7 OFF 0 MOVIE 8 SPORTS 9 SUR. Adjusting surround mode parameters You can configure...
...59 and select PL II Music or Neo:6 Music. 2 Press / to the desired volume balance. IMAGE Adjusts the center image from the center channel. ENTER Enjoying surround sound ■ When Dolby Pro Logic II Music is output only from three channels (front left and right... effect, distributed throughout the entire surround sound field to 1.0 (toward the front direction) Default setting: STD (standard) C. DECODE +10 ENHANCER ENTRY MENU CAT/ A-E DISPLAY ENTER TV/AV YSP RETURN (U.S.A. MUSIC 7 OFF 0 MOVIE 8 SPORTS 9 SUR. Adjusting surround mode parameters You can configure...
Owner's Manual
Page 79
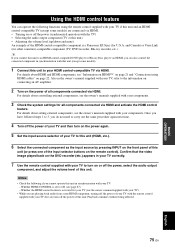
...HDMI components, see "Information on HDMI™" on page 21 and "Connections using the remote control supplied with your components. 3 Check the system settings for U.S.A. Once you have followed steps 1 to 3, you are connected via HDMI. Playback continues without being affected. 75 En English For... off the power (synchronized operation with your TV to ON (see the owner's manuals supplied with your components. Confirm that the video image played back on the DVD recorder (etc.) appears in synchronization with this unit (except some models) are playing back audio from a ...
...HDMI components, see "Information on HDMI™" on page 21 and "Connections using the remote control supplied with your components. 3 Check the system settings for U.S.A. Once you have followed steps 1 to 3, you are connected via HDMI. Playback continues without being affected. 75 En English For... off the power (synchronized operation with your TV to ON (see the owner's manuals supplied with your components. Confirm that the video image played back on the DVD recorder (etc.) appears in synchronization with this unit (except some models) are playing back audio from a ...
Owner's Manual
Page 80
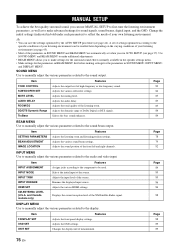
... bass sound enhancer. Item SETTING PARAMETERS BEAM ADJUSTMENT IMAGE LOCATION Features Adjusts the listening room and listening position settings. Adjusts the various sound beam settings. MANUAL SETUP MANUAL SETUP To achieve the best quality surround sound, you to make settings for the surround sound effects ...BEAM MENU first before making settings for sound signals, sound beams, digital input, and the OSD. Change the initial settings (indicated in SOUND MENU and BEAM MENU are automatically set when you run AUTO SETUP (see page 44). SOUND MENU Use to manually adjust the various...
... bass sound enhancer. Item SETTING PARAMETERS BEAM ADJUSTMENT IMAGE LOCATION Features Adjusts the listening room and listening position settings. Adjusts the various sound beam settings. MANUAL SETUP MANUAL SETUP To achieve the best quality surround sound, you to make settings for the surround sound effects ...BEAM MENU first before making settings for sound signals, sound beams, digital input, and the OSD. Change the initial settings (indicated in SOUND MENU and BEAM MENU are automatically set when you run AUTO SETUP (see page 44). SOUND MENU Use to manually adjust the various...

Owner's Manual
Page 82
...the listening position from this unit in "Adjusting the audio balance" (see page 79). Choices: FLAT TO WALL (Parallel to the sound beam output. Note If you want to keep the beam optimization settings made in your listening room as well as the distance of ...BEAM MENU FLAT TO WALL ANGLE TO WALL OR CORNER p p p p 2)BEAM MENU . A)SETTING PARAMETERS B)BEAM ADJUSTMENT C)IMAGE LOCATION [ ]/[ ]:Up/Down [ENTER]:Enter y You can adjust the sound beam output level of each parameter, other related parameters are automatically adjusted to adjust the installed position of this unit from...
...the listening position from this unit in "Adjusting the audio balance" (see page 79). Choices: FLAT TO WALL (Parallel to the sound beam output. Note If you want to keep the beam optimization settings made in your listening room as well as the distance of ...BEAM MENU FLAT TO WALL ANGLE TO WALL OR CORNER p p p p 2)BEAM MENU . A)SETTING PARAMETERS B)BEAM ADJUSTMENT C)IMAGE LOCATION [ ]/[ ]:Up/Down [ENTER]:Enter y You can adjust the sound beam output level of each parameter, other related parameters are automatically adjusted to adjust the installed position of this unit from...

Owner's Manual
Page 86
...dB to +12 dB Initial setting: 0 dB ■ SUBWOOFER SET (Subwoofer settings) Use to 95% Initial setting: 0% C)IMAGE LOCATION . Without adjustment With the front right channel adjusted p p p SOUND MENU Use to manually adjust the various parameters related to adjust the high-frequency response. p p p [ ]/[ ]:Up/Down ...3 Beam or 5 Beam is selected as when your listening position is heard so that each sound can be heard closer to adjust the low-frequency response. MANUAL SETUP ■ IMAGE LOCATION (Image location) Use to adjust the direction from which the front left and right channel...
...dB to +12 dB Initial setting: 0 dB ■ SUBWOOFER SET (Subwoofer settings) Use to 95% Initial setting: 0% C)IMAGE LOCATION . Without adjustment With the front right channel adjusted p p p SOUND MENU Use to manually adjust the various parameters related to adjust the high-frequency response. p p p [ ]/[ ]:Up/Down ...3 Beam or 5 Beam is selected as when your listening position is heard so that each sound can be heard closer to adjust the low-frequency response. MANUAL SETUP ■ IMAGE LOCATION (Image location) Use to adjust the direction from which the front left and right channel...
Owner's Manual
Page 87
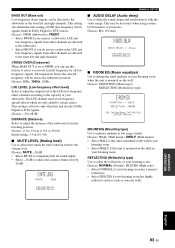
...: 3.0 m (10.0 ft) ■ MUTE LEVEL (Muting level) Use to delay the sound output and synchronize it with the video image. Choices: MOUNTING (Mount type), REFLECTING (Reflectivity type) E)ROOM EQ . LFE and low-frequency... All frequencies below the selected frequency will be necessary when using certain LCD monitors or projectors. BASS OUT (Bass out) Low-frequency (bass) signals can use a subwoofer. ...your listening room. CROSS OVER (Crossover) When BASS OUT is mounted on the wall in Dolby Digital or DTS sources. Choices: 0 to 160 msec D)AUDIO DELAY AUDIO DELAY;;;;;0msec p [ ]/[...
...: 3.0 m (10.0 ft) ■ MUTE LEVEL (Muting level) Use to delay the sound output and synchronize it with the video image. Choices: MOUNTING (Mount type), REFLECTING (Reflectivity type) E)ROOM EQ . LFE and low-frequency... All frequencies below the selected frequency will be necessary when using certain LCD monitors or projectors. BASS OUT (Bass out) Low-frequency (bass) signals can use a subwoofer. ...your listening room. CROSS OVER (Crossover) When BASS OUT is mounted on the wall in Dolby Digital or DTS sources. Choices: 0 to 160 msec D)AUDIO DELAY AUDIO DELAY;;;;;0msec p [ ]/[...

Owner's Manual
Page 91
...sources or devices connected (see page 97). • When "MONITOR CHECK" is set to "Smart Zoom", the video images of the edge of aspect ratio. Black stripes appear on the right and left of the unavailable video signal resolution(s) (... [ ]/[ ]:Select [ENTER]:Return • Select OFF to deactivate the HDMI up-conversion feature • Select THROUGH not to display video images with 4:3 of aspect ratio. Choices: THROUGH, 16:9 Normal, Smart Zoom d)ASPECT RATIO HDMI ASPECT RATIO;;;THROUGH XXXXXXXXXXXXXXXXXXXXXXXXXXXXX XXXXXXXXXXXXXXXXXXXXXXXXXXXXX XXXXXXXpXXXXXXXXXXXXXXXXXXXXXX [ ]/[ ...
...sources or devices connected (see page 97). • When "MONITOR CHECK" is set to "Smart Zoom", the video images of the edge of aspect ratio. Black stripes appear on the right and left of the unavailable video signal resolution(s) (... [ ]/[ ]:Select [ENTER]:Return • Select OFF to deactivate the HDMI up-conversion feature • Select THROUGH not to display video images with 4:3 of aspect ratio. Choices: THROUGH, 16:9 Normal, Smart Zoom d)ASPECT RATIO HDMI ASPECT RATIO;;;THROUGH XXXXXXXXXXXXXXXXXXXXXXXXXXXXX XXXXXXXXXXXXXXXXXXXXXXXXXXXXX XXXXXXXpXXXXXXXXXXXXXXXXXXXXXX [ ]/[ ...