
Owner's Manual
Page 1
CONCERT MARIMBAS YM-5100A/4900A/4600A/4100A OWNER'S MANUAL Make sure to read "PRECAUTIONS FOR HANDLING GAS SPRING" and "PRECAUTIONS".
CONCERT MARIMBAS YM-5100A/4900A/4600A/4100A OWNER'S MANUAL Make sure to read "PRECAUTIONS FOR HANDLING GAS SPRING" and "PRECAUTIONS".
Owner's Manual
Page 2
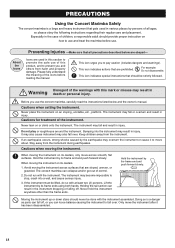
... manual. This icon urges you use of the warnings with the instrument assembled. For example: Do not disassemble. Cautions when setting the instrument. Never lean on an sloping, unstable, etc., platform. Cautions when moving the instrument across smooth, flat surfaces. When moving the instrument on how to promote the safe use the concert marimba, carefully read the instructions listed below are used...
... manual. This icon urges you use of the warnings with the instrument assembled. For example: Do not disassemble. Cautions when setting the instrument. Never lean on an sloping, unstable, etc., platform. Cautions when moving the instrument across smooth, flat surfaces. When moving the instrument on how to promote the safe use the concert marimba, carefully read the instructions listed below are used...

Owner's Manual
Page 3
... or much rigidity in malfunction. Instructions for anything other than playing the instrument. Do not crash. After moving the instrument, check and make a hole anywhere other than the specified positions (q and w in the order of q and w. ) * Drill 2 holes as possible. Do not let children strike other, etc., with this part of the assembly, double-checking as it...
... or much rigidity in malfunction. Instructions for anything other than playing the instrument. Do not crash. After moving the instrument, check and make a hole anywhere other than the specified positions (q and w in the order of q and w. ) * Drill 2 holes as possible. Do not let children strike other, etc., with this part of the assembly, double-checking as it...

Owner's Manual
Page 4
... the manual in a safe place. Assembly Cautions • When assembling/disassembling the instrument, do so with at least two persons and follow the instructions outlined in this may cause damage to the tone bars and frame parts or topple the instrument, which may result in an injury, impair the performance functionality of the instrument or cause noise. • After final adjustment of...
... the manual in a safe place. Assembly Cautions • When assembling/disassembling the instrument, do so with at least two persons and follow the instructions outlined in this may cause damage to the tone bars and frame parts or topple the instrument, which may result in an injury, impair the performance functionality of the instrument or cause noise. • After final adjustment of...
Owner's Manual
Page 5
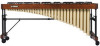
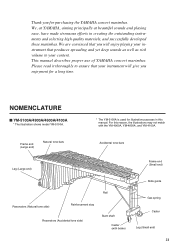
... enjoy playing your instrument that your content. Frame end (Large end) Natural tone bars Accidental tone bars Leg (Large end) Frame end (Small end) Rail Resonators (Natural tone side) Reinforcement stay Resonators (Accidental tone side) Slant shaft Caster (with the YM-4900A, YM-4600A, and YM-4100A. NOMENCLATURE ■ YM-5100A/4900A/4600A/4100A * The illustration shows model YM-5100A. * The YM-5100A is used for...
... enjoy playing your instrument that your content. Frame end (Large end) Natural tone bars Accidental tone bars Leg (Large end) Frame end (Small end) Rail Resonators (Natural tone side) Reinforcement stay Resonators (Accidental tone side) Slant shaft Caster (with the YM-4900A, YM-4600A, and YM-4100A. NOMENCLATURE ■ YM-5100A/4900A/4600A/4100A * The illustration shows model YM-5100A. * The YM-5100A is used for...

Owner's Manual
Page 6
... your marimba should contain the parts shown below. q Natural tone bars w Accidental tone bars e Resonators (Natural tone side) Resonance Regulator: G23, A25 (YM-5100A, YM4900A only) r Resonators (Accidental tone side) Resonance Regulator: F#22, G#24, A#26 (YM-5100A, YM4900A only) y Rail (1) Marking on the end face (C). Before assembling the instrument, confirm that all parts are included as listed. * In the event that...
... your marimba should contain the parts shown below. q Natural tone bars w Accidental tone bars e Resonators (Natural tone side) Resonance Regulator: G23, A25 (YM-5100A, YM4900A only) r Resonators (Accidental tone side) Resonance Regulator: F#22, G#24, A#26 (YM-5100A, YM4900A only) y Rail (1) Marking on the end face (C). Before assembling the instrument, confirm that all parts are included as listed. * In the event that...

Owner's Manual
Page 7
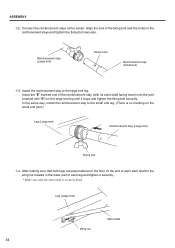
... very dangerous. We recommend to you to the next step, make sure that they will cause a sudden rise of the large and small end legs are securely fastened. z Connect the large and the small end legs using the reinforcement stays. * Before proceeding to assemble the instrument on a soft rug or carpet. Reinforcement stay (Large end...
... very dangerous. We recommend to you to the next step, make sure that they will cause a sudden rise of the large and small end legs are securely fastened. z Connect the large and the small end legs using the reinforcement stays. * Before proceeding to assemble the instrument on a soft rug or carpet. Reinforcement stay (Large end...
Owner's Manual
Page 8
...leg. (There is securely fitted. In the same way, install the reinforcement stay to the large end leg. Align the end...lower part of the fixing bolt and the holes in the reinforcement stays and tighten the fixing bolt securely. ASSEMBLY 1-2. Reinforcement stay (Large end) Screw hole Reinforcement stay (Small end) 1-3. After making ...sure that the slant shaft is no marking on the small end joint.) Leg (Large end) Reinforcement stay (Large end) Fixing bolt 1-4. Connect...
...leg. (There is securely fitted. In the same way, install the reinforcement stay to the large end leg. Align the end...lower part of the fixing bolt and the holes in the reinforcement stays and tighten the fixing bolt securely. ASSEMBLY 1-2. Reinforcement stay (Large end) Screw hole Reinforcement stay (Small end) 1-3. After making ...sure that the slant shaft is no marking on the small end joint.) Leg (Large end) Reinforcement stay (Large end) Fixing bolt 1-4. Connect...

Owner's Manual
Page 9
... down first, but push both sides are inserted fully and stop. Rail (3) Rail (2) Rail clamp 25 Next, in the same way, insert the rail (3) securely. ASSEMBLY x Insert the rails (2) and (3) into grooves alternately little by little until both sides into the end frames of the legs. 2-1. First, insert the rail (2). "C" mark...
... down first, but push both sides are inserted fully and stop. Rail (3) Rail (2) Rail clamp 25 Next, in the same way, insert the rail (3) securely. ASSEMBLY x Insert the rails (2) and (3) into grooves alternately little by little until both sides into the end frames of the legs. 2-1. First, insert the rail (2). "C" mark...

Owner's Manual
Page 10
ASSEMBLY c Attach the resonators. 3-1. Hook Wing nut 3-2. Insert the resonators into the resonator holders on the end frames in the same way as the rails. * Make sure not to confuse the natural tone resonators and accidental tone resonators. * Take care not to them. Resonators (Accidental tone side) Resonators (Natureal tone side) 26 Unbend the resonators, apply a hook and tighten the wing nut securely. * All the natural tone resonators are closed at the bottom. * When assembling the resonators, use care not cause any damage to bump the resonators against the legs, etc.
ASSEMBLY c Attach the resonators. 3-1. Hook Wing nut 3-2. Insert the resonators into the resonator holders on the end frames in the same way as the rails. * Make sure not to confuse the natural tone resonators and accidental tone resonators. * Take care not to them. Resonators (Accidental tone side) Resonators (Natureal tone side) 26 Unbend the resonators, apply a hook and tighten the wing nut securely. * All the natural tone resonators are closed at the bottom. * When assembling the resonators, use care not cause any damage to bump the resonators against the legs, etc.

Owner's Manual
Page 11
... ASSEMBLY v Insert the rails (1) and (4) into the end frames of the big end leg, and a mark "D" for the rail (4). Rail (1) Hook Rail (2) 27 "D" mark on rail (2) and rail (3) with rail (1) and rail (4) respectively. Rail (4) Rail (1) Large end Small end 4-2. Rail clamp YM-...5100A Only 4-3. Insert the outer rails (1) and (4) in Step 4-2. * Hooks are provided at 2 locations both on the natural tone side and the accidental tone side. * Make sure that each hook is printed on the rail and end frame. ...
... ASSEMBLY v Insert the rails (1) and (4) into the end frames of the big end leg, and a mark "D" for the rail (4). Rail (1) Hook Rail (2) 27 "D" mark on rail (2) and rail (3) with rail (1) and rail (4) respectively. Rail (4) Rail (1) Large end Small end 4-2. Rail clamp YM-...5100A Only 4-3. Insert the outer rails (1) and (4) in Step 4-2. * Hooks are provided at 2 locations both on the natural tone side and the accidental tone side. * Make sure that each hook is printed on the rail and end frame. ...

Owner's Manual
Page 12
...cord Large end Post Suspension cord YM-5100A/4900A Only 5-2. ASSEMBLY b Set the tone bars. 5-1. Each of F#22, G23, G#24, A25 and A#26 resonators has a resonance regulator. With one person holding the suspension cords on the rails. After confirming that it is secured to them. Align each other holding the suspension cords...securely with both hands, gently place the tone bars on the bass side and the other . * When setting the tone bars, use care not to cause any damage to every post, fix the tone bars by pulling the right and left cords forward from the large end side and ...
...cord Large end Post Suspension cord YM-5100A/4900A Only 5-2. ASSEMBLY b Set the tone bars. 5-1. Each of F#22, G23, G#24, A25 and A#26 resonators has a resonance regulator. With one person holding the suspension cords on the rails. After confirming that it is secured to them. Align each other holding the suspension cords...securely with both hands, gently place the tone bars on the bass side and the other . * When setting the tone bars, use care not to cause any damage to every post, fix the tone bars by pulling the right and left cords forward from the large end side and ...

Owner's Manual
Page 13
ASSEMBLY YM-4600A/4100A Only 5-2. Move the resonators to fit into longer grooves when the temperature is higher and into resonator holders as shown below. * The resonators are factory adjusted so that each bolt is not available due to use the lines on both large end and small end sides. Adjust the height to make the tone bars in the...
ASSEMBLY YM-4600A/4100A Only 5-2. Move the resonators to fit into longer grooves when the temperature is higher and into resonator holders as shown below. * The resonators are factory adjusted so that each bolt is not available due to use the lines on both large end and small end sides. Adjust the height to make the tone bars in the...

Owner's Manual
Page 14
...") thick ˔ Resonator: Circle resonator ˔ Height Adjustment: Gas spring system 15 cm (83.5 - 98.5 cm) 5.9" (32.9" - 38.8") ˔ Dimensions (W x D): 203 x 87 cm (79.9" x 34.3") ˔ Weight: 63 kg (138 lbs 14 oz) ● SCALE RANGE YM-4100A YM-4600A YM-4900A YM-5100A * Specifications subject to change without notice. 30 SPECIFICATIONS/SCALE RANGE ■ YM-5100A ● Range: C16 - C76 (5 octave...
...") thick ˔ Resonator: Circle resonator ˔ Height Adjustment: Gas spring system 15 cm (83.5 - 98.5 cm) 5.9" (32.9" - 38.8") ˔ Dimensions (W x D): 203 x 87 cm (79.9" x 34.3") ˔ Weight: 63 kg (138 lbs 14 oz) ● SCALE RANGE YM-4100A YM-4600A YM-4900A YM-5100A * Specifications subject to change without notice. 30 SPECIFICATIONS/SCALE RANGE ■ YM-5100A ● Range: C16 - C76 (5 octave...

