Owners Manual
Page 5
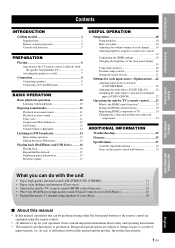
... connection method and connected components 24 ADDITIONAL INFORMATION Troubleshooting 25 Glossary 29 Specifications 31 Available signal information 32 Notes on the remote control and batteries 33 USEFUL OPERATION ADDITIONAL INFORMATION What you can do with the unit • Enjoy high quality surround sound ...(AIR SURROUND XTREME 11 • Enjoy clear dialogue and narration (Clear voice 11 • Operate the unit by TV's remote control (HDMI control function 23 • Play back iPod/iPhone in part as a result of differences between the manual and the product, the product ...
... connection method and connected components 24 ADDITIONAL INFORMATION Troubleshooting 25 Glossary 29 Specifications 31 Available signal information 32 Notes on the remote control and batteries 33 USEFUL OPERATION ADDITIONAL INFORMATION What you can do with the unit • Enjoy high quality surround sound ...(AIR SURROUND XTREME 11 • Enjoy clear dialogue and narration (Clear voice 11 • Operate the unit by TV's remote control (HDMI control function 23 • Play back iPod/iPhone in part as a result of differences between the manual and the product, the product ...

Owners Manual
Page 6
... × 2 (AAA, R03, UM4) Mounting template × 1 Owner's Manual × 1 Remote control preparation Before installing batteries or using the remote control, make sure that you read precautions on the remote control and batteries in "Caution: Read this before operating your unit.", and "Notes on the remote control and batteries" on the page 33. ■ Installing the batteries ■...
... × 2 (AAA, R03, UM4) Mounting template × 1 Owner's Manual × 1 Remote control preparation Before installing batteries or using the remote control, make sure that you read precautions on the remote control and batteries in "Caution: Read this before operating your unit.", and "Notes on the remote control and batteries" on the page 33. ■ Installing the batteries ■...
Owners Manual
Page 7
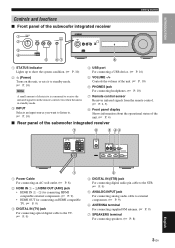
.... (☞ P. 10) Note 5 VOLUME -/+ Controls the volume of the unit. (☞ P. 10) 6 PHONES jack For connecting headphones. (☞ P. 10) A small amount of electricity is consumed to receive the infrared signal from the remote control even when the unit is in standby mode. ...3 INPUT Selects an input source you want to listen to. (☞ P. 10) 7 Remote control sensor Receives infrared signals from the remote control. (☞ P. 2, 5) 8 Front panel display Shows information about the operational status of the unit. (☞ P. 4) ■ Rear panel of ...
.... (☞ P. 10) Note 5 VOLUME -/+ Controls the volume of the unit. (☞ P. 10) 6 PHONES jack For connecting headphones. (☞ P. 10) A small amount of electricity is consumed to receive the infrared signal from the remote control even when the unit is in standby mode. ...3 INPUT Selects an input source you want to listen to. (☞ P. 10) 7 Remote control sensor Receives infrared signals from the remote control. (☞ P. 2, 5) 8 Front panel display Shows information about the operational status of the unit. (☞ P. 4) ■ Rear panel of ...
Owners Manual
Page 9
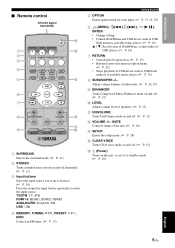
INTRODUCTION ■ Remote control Infrared signal transmitter E 1 D 2 3 4 5 C 6 7 8 B A 9 0 1 SURROUND Selects the surround mode. (☞ P. 11) 2 STEREO Turns extended stereo mode on and off . (☞ P. 11) E (Power) Turns on and off ... mode on and off. (☞ P. 12) 0 LEVEL Adjusts output level of speakers. (☞ P. 12) A UNIVOLUME Turns UniVolume mode on and off. (☞ P. 11) B VOLUME +/-, MUTE Control volume of USB device such as USB flash memory, portable music player. (☞ P. 16) S / T: Scroll screen of iPod/iPhone, or skip folder of USB device...
INTRODUCTION ■ Remote control Infrared signal transmitter E 1 D 2 3 4 5 C 6 7 8 B A 9 0 1 SURROUND Selects the surround mode. (☞ P. 11) 2 STEREO Turns extended stereo mode on and off . (☞ P. 11) E (Power) Turns on and off ... mode on and off. (☞ P. 12) 0 LEVEL Adjusts output level of speakers. (☞ P. 12) A UNIVOLUME Turns UniVolume mode on and off. (☞ P. 11) B VOLUME +/-, MUTE Control volume of USB device such as USB flash memory, portable music player. (☞ P. 16) S / T: Scroll screen of iPod/iPhone, or skip folder of USB device...
Owners Manual
Page 10
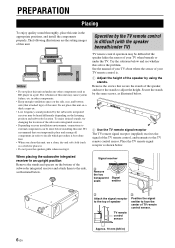
...components properly. To enjoy desired sounds, try changing the location of the TV remote control, and transmits to the TV remote control sensor. Try the solutions below . 2 Use the TV remote signal receptor The TV remote signal receptor (supplied) receives the signal of the subwoofer integrated receiver. •.... Signal receiver 1 Remove the two transparent seals Signal emitter 6 En 3 Attach the signal receptor to the top of speaker TV remote control sensor 2 Position the signal emitter to face the center of the speaker, and move the stands to decide which procedure is . ...
...components properly. To enjoy desired sounds, try changing the location of the TV remote control, and transmits to the TV remote control sensor. Try the solutions below . 2 Use the TV remote signal receptor The TV remote signal receptor (supplied) receives the signal of the subwoofer integrated receiver. •.... Signal receiver 1 Remove the two transparent seals Signal emitter 6 En 3 Attach the signal receptor to the top of speaker TV remote control sensor 2 Position the signal emitter to face the center of the speaker, and move the stands to decide which procedure is . ...
Owners Manual
Page 11
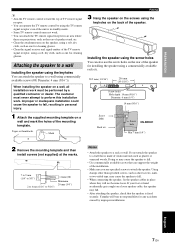
... (1-9/16") 256 mm (10-1/16") Screw holes Hole depth: 14 mm (9/16") Diameter: 6 mm (1/4") 14 mm (9/16") Screw (M6) Rack etc. Yamaha will not become loose. Tapes or thumbtacks Mark Placing 3 Hang the speaker on the screws using the keyholes on the speaker, using a soft, dry cloth... veneered woods. PREPARATION y • Aim the TV remote control toward the top of TV remote signal receptor. • You can operate the TV remote control by using the TV remote signal receptor even if the unit is in standby mode. • Some TV remote controls may not work . Attaching the speaker to a wall...
... (1-9/16") 256 mm (10-1/16") Screw holes Hole depth: 14 mm (9/16") Diameter: 6 mm (1/4") 14 mm (9/16") Screw (M6) Rack etc. Yamaha will not become loose. Tapes or thumbtacks Mark Placing 3 Hang the speaker on the screws using the keyholes on the speaker, using a soft, dry cloth... veneered woods. PREPARATION y • Aim the TV remote control toward the top of TV remote signal receptor. • You can operate the TV remote control by using the TV remote signal receptor even if the unit is in standby mode. • Some TV remote controls may not work . Attaching the speaker to a wall...
Owners Manual
Page 14
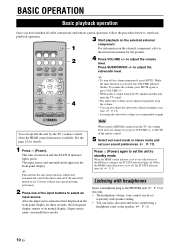
... night. The input source and surround mode appear in the front panel display for the product. 2 4 Press VOLUME +/- Note When sound of the remote control. 5 Select surround mode or stereo mode and set your sound preferences. (☞ P. 11) Press (Power) again to set to off, the... • You can be adjusted separately from the TV, the volume level does not change if you have finished all cable connections and remote control operation, follow the procedure below to start basic playback operation. 3 Start playback on the selected external component. 1 For information on the external...
... night. The input source and surround mode appear in the front panel display for the product. 2 4 Press VOLUME +/- Note When sound of the remote control. 5 Select surround mode or stereo mode and set your sound preferences. (☞ P. 11) Press (Power) again to set to off, the... • You can be adjusted separately from the TV, the volume level does not change if you have finished all cable connections and remote control operation, follow the procedure below to start basic playback operation. 3 Start playback on the selected external component. 1 For information on the external...

Owners Manual
Page 18
...Tune into a radio station you want to preset. 2 Press MEMORY. When you select a registered preset number, a registered frequency is displayed on the remote control or leave the tuner without any operations for more than the last preset number. 3 Press PRESET / to select the preset number (01 to 40)... a preset number to the option menu by the preset number to the selected preset number is registered, EMPTY indicator appears on the remote control. 3 Select the preset number of the preset number. Preset number and the frequency appears in the front panel display, followed soon by...
...Tune into a radio station you want to preset. 2 Press MEMORY. When you select a registered preset number, a registered frequency is displayed on the remote control or leave the tuner without any operations for more than the last preset number. 3 Press PRESET / to select the preset number (01 to 40)... a preset number to the option menu by the preset number to the selected preset number is registered, EMPTY indicator appears on the remote control. 3 Select the preset number of the preset number. Preset number and the frequency appears in the front panel display, followed soon by...
Owners Manual
Page 23
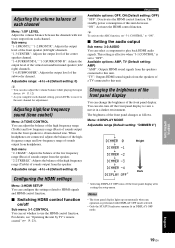
...) "AMP": Outputs HDMI sound signals from headphones. The brightness of the subwoofer channel. For details, see "Operating the unit by TV's remote control" (☞ P. 23). * Selecting DISPLAY OFF turns off Sub menu: 3-1:CONTROL You can set whether to this unit. Adjustable range: -6 to +6 (Default setting: 0) y • You can adjust the balance of the...
...) "AMP": Outputs HDMI sound signals from headphones. The brightness of the subwoofer channel. For details, see "Operating the unit by TV's remote control" (☞ P. 23). * Selecting DISPLAY OFF turns off Sub menu: 3-1:CONTROL You can set whether to this unit. Adjustable range: -6 to +6 (Default setting: 0) y • You can adjust the balance of the...

Owners Manual
Page 27
...8226; Some TV supports switching the UniVolume function on the TV. Even you use the TV remote control to operate this unit. USEFUL OPERATION English 23 En You can control that device using the HDMI control function. • We suggest that you press (Power) button, the power does not ...and the signal outputs from the same manufacturer. For this unit's HDMI OUT (ARC) jack. *1 Remote control of TV settings • From a setup menu on it again. *2 y • The default setting is set "3-1:CONTROL" in the setup menu "3:HDMI SETUP" to "ON" (☞ P. 19). *2 For external ...
...8226; Some TV supports switching the UniVolume function on the TV. Even you use the TV remote control to operate this unit. USEFUL OPERATION English 23 En You can control that device using the HDMI control function. • We suggest that you press (Power) button, the power does not ...and the signal outputs from the same manufacturer. For this unit's HDMI OUT (ARC) jack. *1 Remote control of TV settings • From a setup menu on it again. *2 y • The default setting is set "3-1:CONTROL" in the setup menu "3:HDMI SETUP" to "ON" (☞ P. 19). *2 For external ...

Owners Manual
Page 28
... method and connected components When the connected components and jacks are changed, reset this unit with HDMI. "3-1:CONTROL" in the "3:HDMI SETUP" is set the HDMI control function. Operating the unit by TV's remote control Registering HDMI components to TV *4 1 Select this unit as power interlock function or speaker priority.) The..., and then turn on this unit to the HDMI OUT (ARC) jack of this unit or adjust the volume level using the remote control of "Setting the HDMI control function". Registering HDMI components to TV is not required in setup menu. (☞ P. 19) - If the HDMI...
... method and connected components When the connected components and jacks are changed, reset this unit with HDMI. "3-1:CONTROL" in the "3:HDMI SETUP" is set the HDMI control function. Operating the unit by TV's remote control Registering HDMI components to TV *4 1 Select this unit as power interlock function or speaker priority.) The..., and then turn on this unit to the HDMI OUT (ARC) jack of this unit or adjust the volume level using the remote control of "Setting the HDMI control function". Registering HDMI components to TV is not required in setup menu. (☞ P. 19) - If the HDMI...
Owners Manual
Page 30
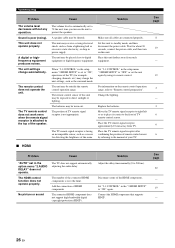
... referring to protect the speakers. See page 22 - 19 - 26 En The remote control does not operate the unit. Set this unit. Place this unit may be outside the remote control operation range. Set "3-1:CONTROL" in the setup menu "3:HDMI SETUP" is not appropriate. Change the lighting....by using its center to the front of this unit farther away from TV. Set "3-1:CONTROL" in power supply. Replace the batteries. The remote control sensor of TV remote control sensor. Move the TV remote signal receptor to right/left so as from a lightening bolt or excessive static electricity, ...
... referring to protect the speakers. See page 22 - 19 - 26 En The remote control does not operate the unit. Set this unit. Place this unit may be outside the remote control operation range. Set "3-1:CONTROL" in the setup menu "3:HDMI SETUP" is not appropriate. Change the lighting....by using its center to the front of this unit farther away from TV. Set "3-1:CONTROL" in power supply. Replace the batteries. The remote control sensor of TV remote control sensor. Move the TV remote signal receptor to right/left so as from a lightening bolt or excessive static electricity, ...

Owners Manual
Page 37
... starts leaking, dispose of it immediately. Specifications Notes on the remote control and batteries • Be careful not to spill liquid on the remote control. • Be careful not to drop the remote control. • Do not leave the remote control in a place that is accidentally swallowed, contact your skin or.... • When not planning to use different types of batteries (for long periods of time, remove the batteries from the remote control. • Do not charge or disassemble the supplied batteries. 33 En ADDITIONAL INFORMATION English extremely cold - dusty • If...
... starts leaking, dispose of it immediately. Specifications Notes on the remote control and batteries • Be careful not to spill liquid on the remote control. • Be careful not to drop the remote control. • Do not leave the remote control in a place that is accidentally swallowed, contact your skin or.... • When not planning to use different types of batteries (for long periods of time, remove the batteries from the remote control. • Do not charge or disassemble the supplied batteries. 33 En ADDITIONAL INFORMATION English extremely cold - dusty • If...


