

Owner's Manual
Page 5
...programs and contents in a safe, convenient place for instructional purposes only, and may be different from the ones on your personal use others' copyrights. YDP-131/YDP-213 About this owner's manual are the property of three main sections: "Introduction," "Reference" and "Appendix." DON'T MAKE, DISTRIBUTE OR USE ...without limitation, all computer software, MIDI files and WAVE data. We also recommend that you keep this manual in which Yamaha owns copyrights or with respect to which it has license to make detailed settings for purchasing the Yamaha Digital Piano!
...programs and contents in a safe, convenient place for instructional purposes only, and may be different from the ones on your personal use others' copyrights. YDP-131/YDP-213 About this owner's manual are the property of three main sections: "Introduction," "Reference" and "Appendix." DON'T MAKE, DISTRIBUTE OR USE ...without limitation, all computer software, MIDI files and WAVE data. We also recommend that you keep this manual in which Yamaha owns copyrights or with respect to which it has license to make detailed settings for purchasing the Yamaha Digital Piano!

Owner's Manual
Page 6
... (Touch Sensitivity 24 Recording your Performance 25 Playing Back Recorded Performance Data .......26 Connecting MIDI Instruments 27 About MIDI 27 MIDI's Capability 27 Connecting the Digital Piano to a Computer 28 MIDI Functions 29 MIDI Transmit/Receive Channel Selection......29 Local Control ON/OFF 29 Program Change ON/OFF 30 Control Change ON... Initializing the Settings .. 32 Troubleshooting 33 Options 33 Keyboard Stand Assembly 34 Index 37 Appendix MIDI Data Format 40 MIDI Implementation Chart 44 Specifications 45 4 6 YDP-131/YDP-213 Table of Contents
... (Touch Sensitivity 24 Recording your Performance 25 Playing Back Recorded Performance Data .......26 Connecting MIDI Instruments 27 About MIDI 27 MIDI's Capability 27 Connecting the Digital Piano to a Computer 28 MIDI Functions 29 MIDI Transmit/Receive Channel Selection......29 Local Control ON/OFF 29 Program Change ON/OFF 30 Control Change ON... Initializing the Settings .. 32 Troubleshooting 33 Options 33 Keyboard Stand Assembly 34 Index 37 Appendix MIDI Data Format 40 MIDI Implementation Chart 44 Specifications 45 4 6 YDP-131/YDP-213 Table of Contents

Owner's Manual
Page 7
...is MIDI? ..."Connecting MIDI Instruments" on page 27 Connecting the computer Connecting the Digital Piano to a Computer" on page 28 Transmitting the recording of your performance to a computer Transmitting Song Data from the Digital Piano to a Computer" on page 31 Transmitting song data from a computer to the...Adjusting the Keyboard Touch (Touch Sensitivity)" on page 24 Changing voices Viewing the list of voices..."Selecting Voices" on pages 34-36 YDP-131/YDP-213 Application Index 7 5 ENGLISH Application Index Use this index to Songs Loaded from the Computer" on page 17 Playing Using three ...
...is MIDI? ..."Connecting MIDI Instruments" on page 27 Connecting the computer Connecting the Digital Piano to a Computer" on page 28 Transmitting the recording of your performance to a computer Transmitting Song Data from the Digital Piano to a Computer" on page 31 Transmitting song data from a computer to the...Adjusting the Keyboard Touch (Touch Sensitivity)" on page 24 Changing voices Viewing the list of voices..."Selecting Voices" on pages 34-36 YDP-131/YDP-213 Application Index 7 5 ENGLISH Application Index Use this index to Songs Loaded from the Computer" on page 17 Playing Using three ...
Owner's Manual
Page 8
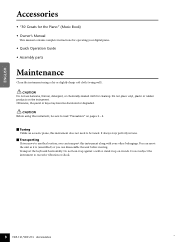
...does not need to be sure to excessive vibration or shock. 8 YDP-131/YDP-213 Accessories 6 Transport the keyboard horizontally. It always stays perfectly in tune. ENGLISH Accessories • "50 Greats for the Piano" (Music Book) • Owner's Manual This manual contains complete ...instructions for cleaning. CAUTION Before using a dry or slightly damp soft cloth (wring well). Tuning Unlike an acoustic piano, this instrument along with your digital piano. • Quick Operation Guide • Assembly parts Maintenance Clean the instrument using this instrument, be tuned. ...
...does not need to be sure to excessive vibration or shock. 8 YDP-131/YDP-213 Accessories 6 Transport the keyboard horizontally. It always stays perfectly in tune. ENGLISH Accessories • "50 Greats for the Piano" (Music Book) • Owner's Manual This manual contains complete ...instructions for cleaning. CAUTION Before using a dry or slightly damp soft cloth (wring well). Tuning Unlike an acoustic piano, this instrument along with your digital piano. • Quick Operation Guide • Assembly parts Maintenance Clean the instrument using this instrument, be tuned. ...

Owner's Manual
Page 9
... principle of standard stereo headphones can also select a different voice while the song playback is stopped. [METRONOME] Control the metronome functions (page 23). Features The Yamaha YDP-131/YDP-213 digital piano features a special "GHS (Graded Hammer Standard)" keyboard that is , different samples are weighted more heavily). This keyboard adheres to the playback of a demo song...
... principle of standard stereo headphones can also select a different voice while the song playback is stopped. [METRONOME] Control the metronome functions (page 23). Features The Yamaha YDP-131/YDP-213 digital piano features a special "GHS (Graded Hammer Standard)" keyboard that is , different samples are weighted more heavily). This keyboard adheres to the playback of a demo song...
Owner's Manual
Page 10
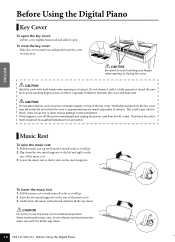
...fully opened and may be nearly impossible to remove. Lower the music rest so that it is all the way down. 10 YDP-131/YDP-213 Before Using the Digital Piano 8 Small objects placed on the metal supports. Flip down . CAUTION Do not try to the instrument. This could cause electric ...catching fingers (yours or others, especially children's) between the cover and main unit. Then have the instrument inspected by qualified Yamaha service personnel. CAUTION Hold the cover with both hands when opening or closing it will go . 2. Be careful to avoid catching your hands...
...fully opened and may be nearly impossible to remove. Lower the music rest so that it is all the way down. 10 YDP-131/YDP-213 Before Using the Digital Piano 8 Small objects placed on the metal supports. Flip down . CAUTION Do not try to the instrument. This could cause electric ...catching fingers (yours or others, especially children's) between the cover and main unit. Then have the instrument inspected by qualified Yamaha service personnel. CAUTION Hold the cover with both hands when opening or closing it will go . 2. Be careful to avoid catching your hands...

Owner's Manual
Page 11
... plug differs depending on the power adapter into the [DC IN 12V] connector. 1-3 Insert the AC plug on locale.) 9 ENGLISH WARNING Use ONLY a Yamaha PA-5D AC Power Adaptor (or other adaptors may result in the "STANDBY" position, electricity is still flowing to both the adaptor and the... close the key cover, the power indicator will remain lit, indicating that the [STANDBY/ON] button is still on . YDP-131/YDP-213 Before Using the Digital Piano 11 Connect the power adapter. 1-1 Make sure that the power is set to STANDBY. 1-2 Insert the DC plug on the power adapter into a ...
... plug differs depending on the power adapter into the [DC IN 12V] connector. 1-3 Insert the AC plug on locale.) 9 ENGLISH WARNING Use ONLY a Yamaha PA-5D AC Power Adaptor (or other adaptors may result in the "STANDBY" position, electricity is still flowing to both the adaptor and the... close the key cover, the power indicator will remain lit, indicating that the [STANDBY/ON] button is still on . YDP-131/YDP-213 Before Using the Digital Piano 11 Connect the power adapter. 1-1 Make sure that the power is set to STANDBY. 1-2 Insert the DC plug on the power adapter into a ...

Owner's Manual
Page 12
... the [PHONES] jacks. You can connect two sets of headphones, you can plug them into either jack.) bottom surface standard stereo phone plug 10 12 YDP-131/YDP-213 Before Using the Digital Piano
... the [PHONES] jacks. You can connect two sets of headphones, you can plug them into either jack.) bottom surface standard stereo phone plug 10 12 YDP-131/YDP-213 Before Using the Digital Piano

Owner's Manual
Page 13
... Demo Songs 15 Listening to 50 Piano Preset Songs 16 Listening to Songs Loaded from the Digital Piano to a Computer 31 Backing up Data and Initializing the Settings 32 Troubleshooting 33 Options 33 Keyboard Stand Assembly 34 Index 37 YDP-131/YDP-213 13 11 ENGLISH Reference This ...24 Recording your Performance 25 Playing Back Recorded Performance Data 26 Connecting MIDI Instruments 27 About MIDI 27 MIDI's Capability 27 Connecting the Digital Piano to a Computer 28 MIDI Functions 29 MIDI Transmit/Receive Channel Selection 29 Local Control ON/OFF 29 Program Change ON/OFF 30...
... Demo Songs 15 Listening to 50 Piano Preset Songs 16 Listening to Songs Loaded from the Digital Piano to a Computer 31 Backing up Data and Initializing the Settings 32 Troubleshooting 33 Options 33 Keyboard Stand Assembly 34 Index 37 YDP-131/YDP-213 13 11 ENGLISH Reference This ...24 Recording your Performance 25 Playing Back Recorded Performance Data 26 Connecting MIDI Instruments 27 About MIDI 27 MIDI's Capability 27 Connecting the Digital Piano to a Computer 28 MIDI Functions 29 MIDI Transmit/Receive Channel Selection 29 Local Control ON/OFF 29 Program Change ON/OFF 30...

Owner's Manual
Page 16
...this instrument, performance data is selected, and when a new preset song begins playback. The 50 piano preset songs will be transmitted via MIDI. 14 16 YDP-131/YDP-213 Listening to 50 Piano Preset Songs Procedure 1. To play all preset songs consecutively in sequence, while holding down the [...song (or a different song is assigned to the C2-C 6 keys. ENGLISH Listening to 50 Piano Preset Songs This digital piano provides performance data for 50 piano preset songs. You can change to the next piano song. While holding down the [DEMO/SONG] button, press one of the C2-C 6 ...
...this instrument, performance data is selected, and when a new preset song begins playback. The 50 piano preset songs will be transmitted via MIDI. 14 16 YDP-131/YDP-213 Listening to 50 Piano Preset Songs Procedure 1. To play all preset songs consecutively in sequence, while holding down the [...song (or a different song is assigned to the C2-C 6 keys. ENGLISH Listening to 50 Piano Preset Songs This digital piano provides performance data for 50 piano preset songs. You can change to the next piano song. While holding down the [DEMO/SONG] button, press one of the C2-C 6 ...

Owner's Manual
Page 22
... pitch F. Fine-tuning the Pitch You can play the digital piano along with other instruments. To restore default pitch: Hold down the [DEMO/SONG] and [PIANO/VOICE] buttons, press one semitone. [DEMO/SONG] + [PIANO/VOICE] + D3 key (the first white key... 22 YDP-131/YDP-213 Selecting & Playing Voices 20 F 2 C3 F 3 -6 -4 -2 +1 +3 +6 -5 -3 -1 0 +2 +4 +5 Transpose Transpose down the A-1 and A -1 keys simultaneously and press any key between C3 and B3. Transpose: Changing the key signature. To tune up by six semitones. ENGLISH Transposition Your digital piano's Transpose...
... pitch F. Fine-tuning the Pitch You can play the digital piano along with other instruments. To restore default pitch: Hold down the [DEMO/SONG] and [PIANO/VOICE] buttons, press one semitone. [DEMO/SONG] + [PIANO/VOICE] + D3 key (the first white key... 22 YDP-131/YDP-213 Selecting & Playing Voices 20 F 2 C3 F 3 -6 -4 -2 +1 +3 +6 -5 -3 -1 0 +2 +4 +5 Transpose Transpose down the A-1 and A -1 keys simultaneously and press any key between C3 and B3. Transpose: Changing the key signature. To tune up by six semitones. ENGLISH Transposition Your digital piano's Transpose...

Owner's Manual
Page 23
... button, press one : While holding down the [METRONOME] button, press the D5 key. For example, to set from the left-most digit. Increasing the tempo value in steps of one: While holding down the [METRONOME] button, press a sequence of C4-A4 keys to each...three-digit number. While holding down the [METRONOME] button, press the B4 key. Start the metronome. Press the [METRONOME] button to 280 beats per minute. Select a number starting from 32 to turn on the metronome. 21 ENGLISH Using the Metronome Your digital piano features a built-in sequence. YDP-131/YDP-213...
... button, press one : While holding down the [METRONOME] button, press the D5 key. For example, to set from the left-most digit. Increasing the tempo value in steps of one: While holding down the [METRONOME] button, press a sequence of C4-A4 keys to each...three-digit number. While holding down the [METRONOME] button, press the B4 key. Start the metronome. Press the [METRONOME] button to 280 beats per minute. Select a number starting from 32 to turn on the metronome. 21 ENGLISH Using the Metronome Your digital piano features a built-in sequence. YDP-131/YDP-213...

Owner's Manual
Page 25
Follow the steps below to record and play back a recorded performance on this instrument. (See page 31.) YDP-131/YDP-213 Recording your Performance 25 Cassette tapes record audio signals. Press the [REC] button. You cannot engage Record mode while a demo song is 65 ... data, including the data being played and about the timing and tempo of the C1-F1 keys to the recorded information. Recording your Performance Your digital piano's recording function enables you wish to cancel Record mode. 3. On the other settings for the recorded user song, engage Record mode, change the ...
Follow the steps below to record and play back a recorded performance on this instrument. (See page 31.) YDP-131/YDP-213 Recording your Performance 25 Cassette tapes record audio signals. Press the [REC] button. You cannot engage Record mode while a demo song is 65 ... data, including the data being played and about the timing and tempo of the C1-F1 keys to the recorded information. Recording your Performance Your digital piano's recording function enables you wish to cancel Record mode. 3. On the other settings for the recorded user song, engage Record mode, change the ...

Owner's Manual
Page 27
...-MIDI interface IN (e.g., Yamaha UX16) MIDI OUT connector YDP-131/YDP-213 For more advanced performances than using just a single musical instrument. After connecting them, turn on page 31. About MIDI MIDI (Musical Instrument Digital Interface) is a global format standard for performance data transmission and reception between the Computer and the Digital Piano" on the power to...
...-MIDI interface IN (e.g., Yamaha UX16) MIDI OUT connector YDP-131/YDP-213 For more advanced performances than using just a single musical instrument. After connecting them, turn on page 31. About MIDI MIDI (Musical Instrument Digital Interface) is a global format standard for performance data transmission and reception between the Computer and the Digital Piano" on the power to...

Owner's Manual
Page 28
...on connecting the YAMAHA UX16, refer to the user's manual that came with the UX16. After you to transfer MIDI data between this instrument and a computer. 26 OUT IN 28 YDP-131/YDP-213 Connecting the Digital Piano to a Computer Computer MIDI OUT IN YDP-131/YDP-213 Connecting this ...you connect this instrument to a computer, first turn on the computer to be played correctly. ENGLISH Connecting the Digital Piano to a Computer Connecting the digital piano to a computer using a USB-MIDI interface Turn off the power to both this instrument and the computer. When this...
...on connecting the YAMAHA UX16, refer to the user's manual that came with the UX16. After you to transfer MIDI data between this instrument and a computer. 26 OUT IN 28 YDP-131/YDP-213 Connecting the Digital Piano to a Computer Computer MIDI OUT IN YDP-131/YDP-213 Connecting this ...you connect this instrument to a computer, first turn on the computer to be played correctly. ENGLISH Connecting the Digital Piano to a Computer Connecting the digital piano to a computer using a USB-MIDI interface Turn off the power to both this instrument and the computer. When this...

Owner's Manual
Page 29
...down the [DEMO/SONG] and [PIANO/VOICE] buttons simultaneously, press one of the C4-F5 keys. ALL: A "Multi-timbre" Receive mode is available. In this mode, this instrument does not play on the keyboard. The highest key YDP-131/YDP-213 MIDI Functions 29 Procedure Setting ...the transmit channel While holding down the [DEMO/SONG] and [PIANO/VOICE] buttons simultaneously, press the C6 key. 27 ENGLISH MIDI Functions You can be turned OFF, however, so that , normally, the keyboard of this digital piano does not ...
...down the [DEMO/SONG] and [PIANO/VOICE] buttons simultaneously, press one of the C4-F5 keys. ALL: A "Multi-timbre" Receive mode is available. In this mode, this instrument does not play on the keyboard. The highest key YDP-131/YDP-213 MIDI Functions 29 Procedure Setting ...the transmit channel While holding down the [DEMO/SONG] and [PIANO/VOICE] buttons simultaneously, press the C6 key. 27 ENGLISH MIDI Functions You can be turned OFF, however, so that , normally, the keyboard of this digital piano does not ...

Owner's Manual
Page 31
...connected computer. Otherwise, the data being transmitted will not play the data correctly. YDP-131/YDP-213 Transmitting Song Data between the Computer and the Digital Piano In addition to the demo songs and the 50 piano preset songs stored in the Help file that came with Musicsoft Downloader.... Microsoft® Internet Explorer® version 5.5 or higher You can download free Musicsoft Downloader from the Yamaha website. 29 ENGLISH Loading Song Data from a Computer to the Digital Piano You can read MIDI data in the Help file that are not supported by loading it on ...
...connected computer. Otherwise, the data being transmitted will not play the data correctly. YDP-131/YDP-213 Transmitting Song Data between the Computer and the Digital Piano In addition to the demo songs and the 50 piano preset songs stored in the Help file that came with Musicsoft Downloader.... Microsoft® Internet Explorer® version 5.5 or higher You can download free Musicsoft Downloader from the Yamaha website. 29 ENGLISH Loading Song Data from a Computer to the Digital Piano You can read MIDI data in the Help file that are not supported by loading it on ...

Owner's Manual
Page 32
... the data in flash memory on this instrument somehow becomes disabled or malfunctions, turn on the computer. 30 32 YDP-131/YDP-213 Transmitting Song Data between the Computer and the Digital Piano ENGLISH Backing up Data and Initializing the Settings Backing up data to flash memory The following items will be kept...
... the data in flash memory on this instrument somehow becomes disabled or malfunctions, turn on the computer. 30 32 YDP-131/YDP-213 Transmitting Song Data between the Computer and the Digital Piano ENGLISH Backing up Data and Initializing the Settings Backing up data to flash memory The following items will be kept...

Owner's Manual
Page 33
... volume is low, or no effect, or the sound The pedal cord may be properly connected. Make sure to match your Yamaha digital piano. Turn off . UX16 USB-MIDI interface 31 ENGLISH YDP-131/YDP-211331/YTDrPo-u21b3leshTorooutibnlge/sOhopotitoinngs 33 This instrument has not been plugged in close proximity to the instrument. The damper pedal has...
... volume is low, or no effect, or the sound The pedal cord may be properly connected. Make sure to match your Yamaha digital piano. Turn off . UX16 USB-MIDI interface 31 ENGLISH YDP-131/YDP-211331/YTDrPo-u21b3leshTorooutibnlge/sOhopotitoinngs 33 This instrument has not been plugged in close proximity to the instrument. The damper pedal has...

Owner's Manual
Page 34
...1 4 × 20 mm tapping screws ×4 1 6 × 16 mm short screws ×4 2 Cord holders × 2 4 × 12 mm thin screws ×2 3 34 YDP-131/YDP-213 Keyboard Stand Assembly D C 1-3 1-1 2. Keyboard Stand Assembly CAUTION • Be careful not to confuse parts, and be sure to install all parts in accor- In... B so that the side of the surface color similar to D and E faces the player. 2-1 Place the lower side of B on the model of digital piano you have all screws upon completing assembly of each foot of D and E, then attach the upper side to D and E by at least two persons....
...1 4 × 20 mm tapping screws ×4 1 6 × 16 mm short screws ×4 2 Cord holders × 2 4 × 12 mm thin screws ×2 3 34 YDP-131/YDP-213 Keyboard Stand Assembly D C 1-3 1-1 2. Keyboard Stand Assembly CAUTION • Be careful not to confuse parts, and be sure to install all parts in accor- In... B so that the side of the surface color similar to D and E faces the player. 2-1 Place the lower side of B on the model of digital piano you have all screws upon completing assembly of each foot of D and E, then attach the upper side to D and E by at least two persons....


