Owner's Manual
Page 2
... the presence of important operating and maintenance (servicing) instructions in any way, such as radiators, heat registers, stoves, or other . Install in the space below. IMPORTANT Please record the serial number of this apparatus during lightning storms or when unused for replacement of the obsolete outlet. 10 Protect the power cable from the apparatus. 11 Only use this Owner's Manual in particular, specifies...
... the presence of important operating and maintenance (servicing) instructions in any way, such as radiators, heat registers, stoves, or other . Install in the space below. IMPORTANT Please record the serial number of this apparatus during lightning storms or when unused for replacement of the obsolete outlet. 10 Protect the power cable from the apparatus. 11 Only use this Owner's Manual in particular, specifies...
Owner's Manual
Page 3
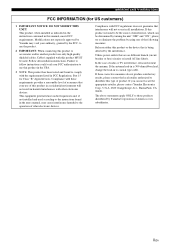
... INFORMATION (for Class "B" digital devices. Compliance with the requirements listed in to follow instructions could void your use only high quality shielded cables. In the case of the following measures: Relocate either this manual, meets FCC requirements. Follow all installations. Compliance with FCC regulations does not guarantee that are on different branch (circuit breaker or fuse) circuits or install AC line...
... INFORMATION (for Class "B" digital devices. Compliance with the requirements listed in to follow instructions could void your use only high quality shielded cables. In the case of the following measures: Relocate either this manual, meets FCC requirements. Follow all installations. Compliance with FCC regulations does not guarantee that are on different branch (circuit breaker or fuse) circuits or install AC line...
Owner's Manual
Page 4
... responsible for any accident caused by improper placement or installation of your equipment by lightning, keep the power cable and outdoor antennas disconnected from direct sunlight, heat sources, vibration, dust, moisture, and/or cold. Yamaha will form when the surrounding temperature changes suddenly. vacation), disconnect the AC power plug from the outlet, then leave the unit alone. 21 Secure placement or installation is needed...
... responsible for any accident caused by improper placement or installation of your equipment by lightning, keep the power cable and outdoor antennas disconnected from direct sunlight, heat sources, vibration, dust, moisture, and/or cold. Yamaha will form when the surrounding temperature changes suddenly. vacation), disconnect the AC power plug from the outlet, then leave the unit alone. 21 Secure placement or installation is needed...
Owner's Manual
Page 5
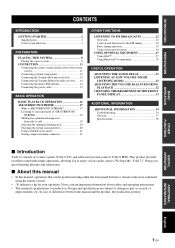
... 2 Supplied parts 2 Controls and functions 3 PREPARATION PLACING THIS SYSTEM 8 Placing the center system 8 CONNECTION 11 Connecting the center system and the subwoofer/system control 11 Connecting external components 12 Connecting the Yamaha iPod universal dock 14 Connecting the Yamaha Bluetooth audio receiver ...... 14 Connecting the indoor FM antenna 14 Connecting the power cable 15 BASIC OPERATION BASIC PLAYBACK OPERATION 16 AIR SURROUND XTREME 17 What is printed prior to enjoy various audio sources. This product provides excellent sound with simple operations...
... 2 Supplied parts 2 Controls and functions 3 PREPARATION PLACING THIS SYSTEM 8 Placing the center system 8 CONNECTION 11 Connecting the center system and the subwoofer/system control 11 Connecting external components 12 Connecting the Yamaha iPod universal dock 14 Connecting the Yamaha Bluetooth audio receiver ...... 14 Connecting the indoor FM antenna 14 Connecting the power cable 15 BASIC OPERATION BASIC PLAYBACK OPERATION 16 AIR SURROUND XTREME 17 What is printed prior to enjoy various audio sources. This product provides excellent sound with simple operations...
Owner's Manual
Page 6
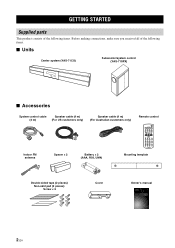
... making connections, make sure you received all of the following items. ■ Units Center system (YAS-71CU) Subwoofer/system control (YAS-71SPX) ■ Accessories System control cable Speaker cable (4 m) (4 m) (For US customers only) Speaker cable (4 m) (For Australian customers only) Remote control Indoor FM antenna Spacer × 2 Battery × 2 (AAA, R03, UM4) Mounting template Double-sided tape (2 pieces) Non-skid pad (2 pieces) Screw × 6 Cover Owner's manual UA Front Surround System (CENTER SYSTEM + SUBWOOFER/SYSTEM CONTROL) YAS-71 (YAS...
... making connections, make sure you received all of the following items. ■ Units Center system (YAS-71CU) Subwoofer/system control (YAS-71SPX) ■ Accessories System control cable Speaker cable (4 m) (4 m) (For US customers only) Speaker cable (4 m) (For Australian customers only) Remote control Indoor FM antenna Spacer × 2 Battery × 2 (AAA, R03, UM4) Mounting template Double-sided tape (2 pieces) Non-skid pad (2 pieces) Screw × 6 Cover Owner's manual UA Front Surround System (CENTER SYSTEM + SUBWOOFER/SYSTEM CONTROL) YAS-71 (YAS...
Owner's Manual
Page 9
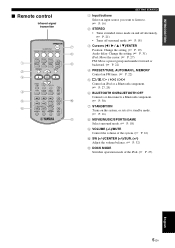
..., AUTO/MAN'L, MEMORY Control an FM tuner. (☞ P. 22) 5 s/e/p/b/a Control an iPod or a Bluetooth component. (☞ P. 27, 29) 6 BLUETOOTH ON/BLUETOOTH OFF Connects or disconnects a Bluetooth component. (☞ P. 30) 7 STANDBY/ON Turns on the system, or sets it to standby mode. (☞ P. 16) 8 MOVIE/MUSIC/SPORTS/GAME Select surround mode. (☞ P. 18) 9 VOLUME (+/-)/MUTE Control the volume of the system. (☞ P. 16) 0 SW (+/-)/CENTER (+/-)/SUR. (+/-) Adjust the volume balance. (☞ P. 32) A DOCK MODE Switches operation mode of the iPod...
..., AUTO/MAN'L, MEMORY Control an FM tuner. (☞ P. 22) 5 s/e/p/b/a Control an iPod or a Bluetooth component. (☞ P. 27, 29) 6 BLUETOOTH ON/BLUETOOTH OFF Connects or disconnects a Bluetooth component. (☞ P. 30) 7 STANDBY/ON Turns on the system, or sets it to standby mode. (☞ P. 16) 8 MOVIE/MUSIC/SPORTS/GAME Select surround mode. (☞ P. 18) 9 VOLUME (+/-)/MUTE Control the volume of the system. (☞ P. 16) 0 SW (+/-)/CENTER (+/-)/SUR. (+/-) Adjust the volume balance. (☞ P. 32) A DOCK MODE Switches operation mode of the iPod...
Owner's Manual
Page 12
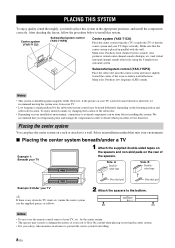
...remote control sensor of your TV y If there is any obstacle (TV stand, etc.) under the center system, use the supplied spacers as follows. 2 Attach the spacers to decide which procedure is best done first. Main roles: Produces front channel (stereo) sounds. We recommend that you need to reduce wall...bottom. Subwoofer/system control (YAS-71SPX) Place the subwoofer near the center system and turn it to external components can place the center system on your TV align vertically. Make sure that the center system and your installation environment, connections to a wall. ...
...remote control sensor of your TV y If there is any obstacle (TV stand, etc.) under the center system, use the supplied spacers as follows. 2 Attach the spacers to decide which procedure is best done first. Main roles: Produces front channel (stereo) sounds. We recommend that you need to reduce wall...bottom. Subwoofer/system control (YAS-71SPX) Place the subwoofer near the center system and turn it to external components can place the center system on your TV align vertically. Make sure that the center system and your installation environment, connections to a wall. ...
Owner's Manual
Page 20
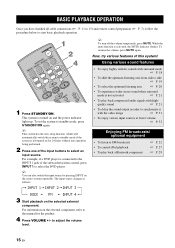
.... BASIC OPERATION BASIC PLAYBACK OPERATION Once you have finished all cable connections (☞ P. 11 to 15) and remote control preparation (☞ P. 7), follow the procedure below to standby mode, press STANDBY/ON again. While the mute function is turned on the center system repeatedly. to synchronize it with high- y You can also switch the input source by pressing INPUT on and the power indicator lights up. quality sound...
.... BASIC OPERATION BASIC PLAYBACK OPERATION Once you have finished all cable connections (☞ P. 11 to 15) and remote control preparation (☞ P. 7), follow the procedure below to standby mode, press STANDBY/ON again. While the mute function is turned on the center system repeatedly. to synchronize it with high- y You can also switch the input source by pressing INPUT on and the power indicator lights up. quality sound...
Owner's Manual
Page 21
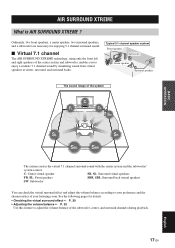
... volume balance of the system BASIC OPERATION The system creates the virtual 7.1 channel surround sound with the center system and the subwoofer/ system control. AIR SURROUND XTREME What is AIR SURROUND XTREME ? Ordinarily, two front speakers, a center speaker, two surround speakers, and a subwoofer are necessary for details. • Checking the virtual surround effect ☞ P. 20 • Adjusting the volume balance ☞ P. 32 Use this feature to enjoy a realistic 7.1 channel sound by simulating sound from virtual speakers at center, surround, and surround...
... volume balance of the system BASIC OPERATION The system creates the virtual 7.1 channel surround sound with the center system and the subwoofer/ system control. AIR SURROUND XTREME What is AIR SURROUND XTREME ? Ordinarily, two front speakers, a center speaker, two surround speakers, and a subwoofer are necessary for details. • Checking the virtual surround effect ☞ P. 20 • Adjusting the volume balance ☞ P. 32 Use this feature to enjoy a realistic 7.1 channel sound by simulating sound from virtual speakers at center, surround, and surround...
Owner's Manual
Page 22
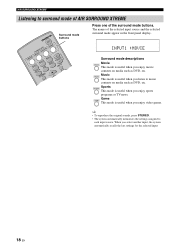
.... Surround mode descriptions Movie This mode is useful when you enjoy sports programs or TV news. Music This mode is useful when you enjoy video games. AIR SURROUND XTREME Listening to surround mode of AIR SURROUND XTREME Surround mode buttons Press one of the selected input source and the selected surround mode appear in the front panel display. Sports This mode is useful when you select another input, the system automatically recalls the last settings for...
.... Surround mode descriptions Movie This mode is useful when you enjoy sports programs or TV news. Music This mode is useful when you enjoy video games. AIR SURROUND XTREME Listening to surround mode of AIR SURROUND XTREME Surround mode buttons Press one of the selected input source and the selected surround mode appear in the front panel display. Sports This mode is useful when you select another input, the system automatically recalls the last settings for...
Owner's Manual
Page 23
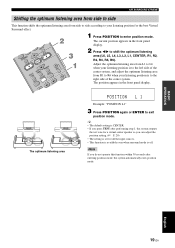
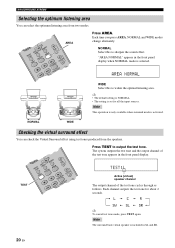
... default setting is CENTER. • If you can adjust the position setting. (☞ P. 20) • The setting is set for all the input sources. • This function is available even when surround mode is to the left side of the center system. AIR SURROUND XTREME Shifting ...mode. Note If you do not operate this function within 30 seconds after performing step 1, the system outputs the test tone for the best Virtual Surround effect. 1 Press POSITION to enter position mode. Adjust the optimum listening area from R1 to R6 when your listening position for a virtual center speaker...
... default setting is CENTER. • If you can adjust the position setting. (☞ P. 20) • The setting is set for all the input sources. • This function is available even when surround mode is to the left side of the center system. AIR SURROUND XTREME Shifting ...mode. Note If you do not operate this function within 30 seconds after performing step 1, the system outputs the test tone for the best Virtual Surround effect. 1 Press POSITION to enter position mode. Adjust the optimum listening area from R1 to R6 when your listening position for a virtual center speaker...
Owner's Manual
Page 24
... sound effect. Note This operation is only available when surround mode is selected. Note The surround back virtual speaker is set for about 2 seconds. AIR SURROUND XTREME Selecting the optimum listening area You can check the Virtual Surround effect using test tones produced from two modes. y • The default setting is NORMAL. • The setting is included in the front panel display. TEST 20 En Active (virtual) speaker channel...
... sound effect. Note This operation is only available when surround mode is selected. Note The surround back virtual speaker is set for about 2 seconds. AIR SURROUND XTREME Selecting the optimum listening area You can check the Virtual Surround effect using test tones produced from two modes. y • The default setting is NORMAL. • The setting is included in the front panel display. TEST 20 En Active (virtual) speaker channel...
Owner's Manual
Page 25
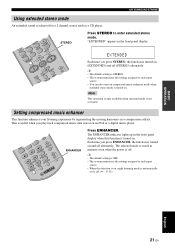
... set to each input source. • When this function is turned on an iPod or a digital music player. BASIC OPERATION AIR SURROUND XTREME Using extended stereo mode An extended sound is off. Note This operation is only available when surround mode is turned on and off (STEREO) alternately. This is turned on (EXTENDED) and off alternately. Each time you press ENHANCER, the function is useful when you press STEREO, the function is not activated...
... set to each input source. • When this function is turned on an iPod or a digital music player. BASIC OPERATION AIR SURROUND XTREME Using extended stereo mode An extended sound is off. Note This operation is only available when surround mode is turned on and off (STEREO) alternately. This is turned on (EXTENDED) and off alternately. Each time you press ENHANCER, the function is useful when you press STEREO, the function is not activated...
Owner's Manual
Page 31
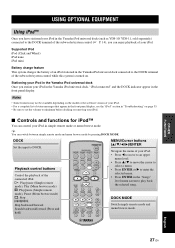
... control (☞ P. 14), you station your iPod in the Yamaha iPod universal dock, "iPod connected" and the DOCK indicator appear in the front panel display. Stationing your iPod in the Yamaha iPod universal dock connected to DOCK. DOCK Set the input to the DOCK terminal of the connected iPod. Supported iPod iPod (Click and Wheel) iPod nano iPod mini Battery charge feature This system charges the battery of an iPod stationed in the Yamaha iPod universal dock Once you can switch between simple remote mode...
... control (☞ P. 14), you station your iPod in the Yamaha iPod universal dock, "iPod connected" and the DOCK indicator appear in the front panel display. Stationing your iPod in the Yamaha iPod universal dock connected to DOCK. DOCK Set the input to the DOCK terminal of the connected iPod. Supported iPod iPod (Click and Wheel) iPod nano iPod mini Battery charge feature This system charges the battery of an iPod stationed in the Yamaha iPod universal dock Once you can switch between simple remote mode...
Owner's Manual
Page 33
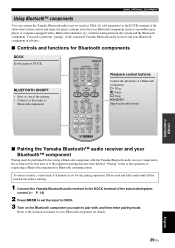
... the instruction manual of your Bluetooth component for Bluetooth components DOCK Set the input to DOCK. You need to perform "pairing" of the connected Yamaha Bluetooth audio receiver and your Bluetooth component in your Bluetooth™ component Pairing must be performed before starting. 1 Connect the Yamaha Bluetooth audio receiver to the DOCK terminal of the subwoofer/system control. (☞ P. 14) 2 Press DOCK to set for Bluetooth communications. To ensure security, a time limit of 8 minutes is set the input to DOCK. 3 Turn on the Bluetooth...
... the instruction manual of your Bluetooth component for Bluetooth components DOCK Set the input to DOCK. You need to perform "pairing" of the connected Yamaha Bluetooth audio receiver and your Bluetooth component in your Bluetooth™ component Pairing must be performed before starting. 1 Connect the Yamaha Bluetooth audio receiver to the DOCK terminal of the subwoofer/system control. (☞ P. 14) 2 Press DOCK to set for Bluetooth communications. To ensure security, a time limit of 8 minutes is set the input to DOCK. 3 Turn on the Bluetooth...
Owner's Manual
Page 34
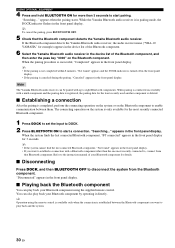
...; Establishing a connection After the pairing is successful, "Completed" appears in the front panel display. y Operation using the supplied remote control. "Searching..." While the Yamaha Bluetooth audio receiver is established between them. appears in the front panel display. • If you want to establish a connection with up to eight Bluetooth components. "Disconnected" appears in the device list of your Bluetooth component by operating it directly. The connecting operation on the Bluetooth component. When...
...; Establishing a connection After the pairing is successful, "Completed" appears in the front panel display. y Operation using the supplied remote control. "Searching..." While the Yamaha Bluetooth audio receiver is established between them. appears in the front panel display. • If you want to establish a connection with up to eight Bluetooth components. "Disconnected" appears in the device list of your Bluetooth component by operating it directly. The connecting operation on the Bluetooth component. When...
Owner's Manual
Page 38
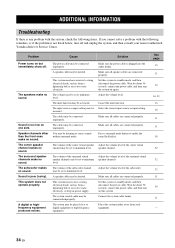
... subwoofer makes no sound. Press a surround mode button to minimum level. Speaker channels other than the front ones make no sound. Select the correct input source or input setting. Wait for about 30 seconds, connect the power cable, and then turn off . The system control cable may be connected improperly. Problem Cause Solution Power turns on but immediately shuts off and unplug the system, and then consult your nearest authorized Yamaha dealer or Service Center. Adjust the volume level...
... subwoofer makes no sound. Press a surround mode button to minimum level. Speaker channels other than the front ones make no sound. Select the correct input source or input setting. Wait for about 30 seconds, connect the power cable, and then turn off . The system control cable may be connected improperly. Problem Cause Solution Power turns on but immediately shuts off and unplug the system, and then consult your nearest authorized Yamaha dealer or Service Center. Adjust the volume level...
Owner's Manual
Page 39
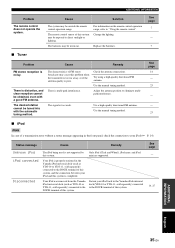
.... Replace the batteries. See page 14 - 23 - - 23 ■ iPod Note In case of this system. Your iPod is noisy. ADDITIONAL INFORMATION Cause Solution The system may be worn out. Problem The remote control does not operate the system. Your iPod was removed from the Yamaha iPod universal dock (such as YDS-10 or YDS-11, sold separately) connected to the DOCK terminal of a transmission error without...
.... Replace the batteries. See page 14 - 23 - - 23 ■ iPod Note In case of this system. Your iPod is noisy. ADDITIONAL INFORMATION Cause Solution The system may be worn out. Problem The remote control does not operate the system. Your iPod was removed from the Yamaha iPod universal dock (such as YDS-10 or YDS-11, sold separately) connected to the DOCK terminal of a transmission error without...
Owner's Manual
Page 41
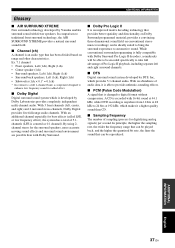
... frequency The number of Pro Logic II playback, including separate left , center, and right) and 2 surround stereo channels, Dolby Digital provides five full-range audio channels. By using 2channel stereo for added effect. ■ Dolby Digital Digital surround sound system which is changed to digital format without compression. provides a convincing three-dimensional sound field on Dolby Surround programmed material; A CD is recorded with fewer speakers. With 3 front channels (left and right surround channels. ■ DTS Digital surround sound...
... frequency The number of Pro Logic II playback, including separate left , center, and right) and 2 surround stereo channels, Dolby Digital provides five full-range audio channels. By using 2channel stereo for added effect. ■ Dolby Digital Digital surround sound system which is changed to digital format without compression. provides a convincing three-dimensional sound field on Dolby Surround programmed material; A CD is recorded with fewer speakers. With 3 front channels (left and right surround channels. ■ DTS Digital surround sound...
Owner's Manual
Page 42
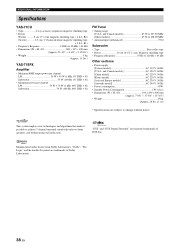
...; Antenna Input (unbalanced 75 Ω Subwoofer • Type Bass reflex type • Driver 16 cm (6-1/2") cone, Magnetic shielding type • Frequency Response 35 Hz to 20 kHz (-10 dB) • Dimensions (W × H × D 800 × 105 × 100 mm (Approx. 31-1/2" × 4-1/8" × 3-15/16") • Weight 5 kg (Approx. 11 lbs.) YAS-71SPX Amplifier • Minimum RMS output power per channel L/R 55 W + 55 W (1 kHz 1% THD + N) Subwoofer 55...
...; Antenna Input (unbalanced 75 Ω Subwoofer • Type Bass reflex type • Driver 16 cm (6-1/2") cone, Magnetic shielding type • Frequency Response 35 Hz to 20 kHz (-10 dB) • Dimensions (W × H × D 800 × 105 × 100 mm (Approx. 31-1/2" × 4-1/8" × 3-15/16") • Weight 5 kg (Approx. 11 lbs.) YAS-71SPX Amplifier • Minimum RMS output power per channel L/R 55 W + 55 W (1 kHz 1% THD + N) Subwoofer 55...


