

Owners Manual
Page 5
...DSP 28 Enjoy sound field programs with the remote control 59 Setting remote control codes 59 Resetting all remote control codes 59 Advanced setup 60 APPENDIX Troubleshooting 61 General 61 HDMI 64 Tuner (FM/AM 64 XM Satellite Radio (U.S.A. INTRODUCTION PREPARATION BASIC OPERATION ADVANCED OPERATION...projector 14 Connecting other components 15 Connecting an external amplifier 16 Using REMOTE IN/OUT jacks 17 Connecting a Yamaha iPod universal dock or Bluetooth™ wireless audio receiver 17 Using the VIDEO AUX jacks on the front panel .... 17 Connecting the FM and AM antennas ...
...DSP 28 Enjoy sound field programs with the remote control 59 Setting remote control codes 59 Resetting all remote control codes 59 Advanced setup 60 APPENDIX Troubleshooting 61 General 61 HDMI 64 Tuner (FM/AM 64 XM Satellite Radio (U.S.A. INTRODUCTION PREPARATION BASIC OPERATION ADVANCED OPERATION...projector 14 Connecting other components 15 Connecting an external amplifier 16 Using REMOTE IN/OUT jacks 17 Connecting a Yamaha iPod universal dock or Bluetooth™ wireless audio receiver 17 Using the VIDEO AUX jacks on the front panel .... 17 Connecting the FM and AM antennas ...
Owners Manual
Page 6
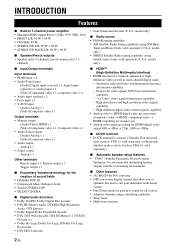
...8226; HDMI interface for standard, enhanced or highdefinition video as well as YBA-10, sold separately) or Bluetooth wireless audio receiver (such as multi-channel digital audio. - High refresh rate and high resolution video signals capability - Automatic audio and video... or 1080p ■ DOCK terminal • DOCK terminal to connect a Yamaha iPod universal dock (such as YDS-11, sold separately) ■ Automatic speaker setup features • "YPAO" (Yamaha Parametric Room Acoustic Optimizer) for automatically optimizing speaker outputs suitable for listening environments...
...8226; HDMI interface for standard, enhanced or highdefinition video as well as YBA-10, sold separately) or Bluetooth wireless audio receiver (such as multi-channel digital audio. - High refresh rate and high resolution video signals capability - Automatic audio and video... or 1080p ■ DOCK terminal • DOCK terminal to connect a Yamaha iPod universal dock (such as YDS-11, sold separately) ■ Automatic speaker setup features • "YPAO" (Yamaha Parametric Room Acoustic Optimizer) for automatically optimizing speaker outputs suitable for listening environments...

Owners Manual
Page 11
.... Part names and functions h Input selection keys HDMI 1-4 AV 1-6 AUDIO 1/2 V-AUX [A]/[B] DOCK TUNER SIRIUS XM MULTI Selects HDMI inputs 1 through 6. Selects AV inputs 1 through 4. Selects a Yamaha iPod universal dock/Bluetooth wireless audio receiver connected to the previous screen or ends the menu display. ...page 23). k Sound selection keys Selects sound field programs (see page 51). l SCENE Switches between FM and AM. m SETUP Displays the setup menu (see page 25). ENTER Confirms a selected item. r MUTE Turns the mute function of input sources and sound field ...
.... Part names and functions h Input selection keys HDMI 1-4 AV 1-6 AUDIO 1/2 V-AUX [A]/[B] DOCK TUNER SIRIUS XM MULTI Selects HDMI inputs 1 through 6. Selects AV inputs 1 through 4. Selects a Yamaha iPod universal dock/Bluetooth wireless audio receiver connected to the previous screen or ends the menu display. ...page 23). k Sound selection keys Selects sound field programs (see page 51). l SCENE Switches between FM and AM. m SETUP Displays the setup menu (see page 25). ENTER Confirms a selected item. r MUTE Turns the mute function of input sources and sound field ...
Owners Manual
Page 12
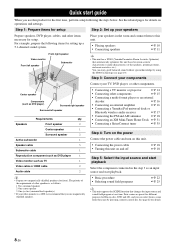
...multi-format player or an external decoder ☞P. 16 • Connecting an external amplifier ☞P. 16 • Connecting a Yamaha iPod universal dock or Bluetooth wireless audio receiver ☞P. 17 • Connecting the FM and AM antennas ☞P. 18 • Connecting an XM Mini-Tuner Home ... right speaker Surround left speaker Subwoofer Place your TV, DVD player, or other items necessary for front). Step 1: Prepare items for setup Step 2: Set up a 5.1-channel sound system. The priority of the requirement of the speakers, speaker positions, and room acoustics, ...
...multi-format player or an external decoder ☞P. 16 • Connecting an external amplifier ☞P. 16 • Connecting a Yamaha iPod universal dock or Bluetooth wireless audio receiver ☞P. 17 • Connecting the FM and AM antennas ☞P. 18 • Connecting an XM Mini-Tuner Home ... right speaker Surround left speaker Subwoofer Place your TV, DVD player, or other items necessary for front). Step 1: Prepare items for setup Step 2: Set up a 5.1-channel sound system. The priority of the requirement of the speakers, speaker positions, and room acoustics, ...
Owners Manual
Page 16
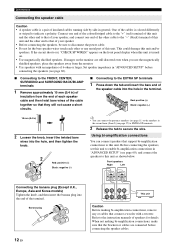
...see page 60). ■ Connecting to secure the wire. Before connecting the speakers, set this unit to enable bi-amplification connections in "ADVANCED SETUP" (see page 57) to EXTRA SP terminals. 2 Release the tab to the FRONT, CENTER, SURROUND and SURROUND BACK/BI-AMP terminals 1 ...Remove approximately 10 mm (0.4 in "ADVANCED SETUP" before connecting the speaker cables. Banana plug 12 En This unit FRONT SURROUND BACK/ BI-AMP Caution Before making bi-amplification connections, make sure...
...see page 60). ■ Connecting to secure the wire. Before connecting the speakers, set this unit to enable bi-amplification connections in "ADVANCED SETUP" (see page 57) to EXTRA SP terminals. 2 Release the tab to the FRONT, CENTER, SURROUND and SURROUND BACK/BI-AMP terminals 1 ...Remove approximately 10 mm (0.4 in "ADVANCED SETUP" before connecting the speaker cables. Banana plug 12 En This unit FRONT SURROUND BACK/ BI-AMP Caution Before making bi-amplification connections, make sure...
Owners Manual
Page 23
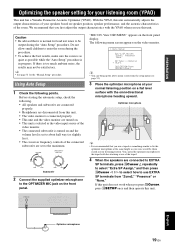
... when you use EXTRA SP terminals from this unit automatically adjusts the output characteristics of your speakers based on the video monitor. 1 Auto Setup Extra SP Assign >Zone2 Presence None EQ Type;;;;Natural . If there is in your normal listening position on the front panel. [ [... acoustic characteristics of the connected subwoofer are turned on. • This unit is selected as your listening room (YPAO) This unit has a Yamaha Parametric Acoustic Optimizer (YPAO). With the YPAO, this unit. • The video monitor is connected properly. • This unit and the ...
... when you use EXTRA SP terminals from this unit automatically adjusts the output characteristics of your speakers based on the video monitor. 1 Auto Setup Extra SP Assign >Zone2 Presence None EQ Type;;;;Natural . If there is in your normal listening position on the front panel. [ [... acoustic characteristics of the connected subwoofer are turned on. • This unit is selected as your listening room (YPAO) This unit has a Yamaha Parametric Acoustic Optimizer (YPAO). With the YPAO, this unit. • The video monitor is connected properly. • This unit and the ...
Owners Manual
Page 24
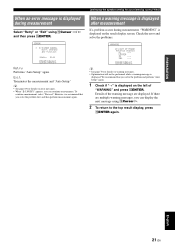
...sound field based on an AV component. Flat This adjusts each frequency range. DIST Displays the speaker distance from direct sunlight after measurement. "Auto Setup" is now complete. 1 Auto Setup AUTO SETUP Complete Disconnect Microphone PRESS [ENTER] [SETUP]:Exit The optimizer microphone ...occur during measurement, "WARNING (XX)" (xx indicates the number of warning) appears above "RESULT" (see page 51) is displayed. 1 Auto Setup RESULT SP : DIST: LVL : . >Set 3/4/0.1 8.0/ 8.5ft -3.5/ +4.5dB Cancel [p]/[[]:Select [ENTER]:Finish SP Displays the number of speakers ...
...sound field based on an AV component. Flat This adjusts each frequency range. DIST Displays the speaker distance from direct sunlight after measurement. "Auto Setup" is now complete. 1 Auto Setup AUTO SETUP Complete Disconnect Microphone PRESS [ENTER] [SETUP]:Exit The optimizer microphone ...occur during measurement, "WARNING (XX)" (xx indicates the number of warning) appears above "RESULT" (see page 51) is displayed. 1 Auto Setup RESULT SP : DIST: LVL : . >Set 3/4/0.1 8.0/ 8.5ft -3.5/ +4.5dB Cancel [p]/[[]:Select [ENTER]:Finish SP Displays the number of speakers ...
Owners Manual
Page 25
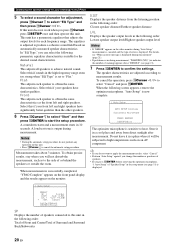
...21 En y • See page 69 for details on error messages. • When "E-5:NOISY" appears, you solve the problem and perform "Auto Setup" again. 1 Check if "→" is displayed during measurement, "WARNING" is displayed. To continue measurement, select "Proceed." Check the error and ... the warning message are multiple warning messages, you solve the problem first and then perform measurement again. Exit Terminates the measurement and "Auto Setup." However, we recommend that you can display the next message using oCursor l / h and then press oENTER. Details of "WARNING"...
...21 En y • See page 69 for details on error messages. • When "E-5:NOISY" appears, you solve the problem and perform "Auto Setup" again. 1 Check if "→" is displayed during measurement, "WARNING" is displayed. To continue measurement, select "Proceed." Check the error and ... the warning message are multiple warning messages, you solve the problem first and then perform measurement again. Exit Terminates the measurement and "Auto Setup." However, we recommend that you can display the next message using oCursor l / h and then press oENTER. Details of "WARNING"...
Owners Manual
Page 26
.../CD on the player by pressing the SCENE key. • When connecting a Yamaha DVD/CD player that you play back the DTS-CD. Switching remotely controlled external...not improved, the problem may cause a speaker malfunction. BD/DVD TV CD RADIO Input source HDMI 1 AV 1 AV 3 TUNER Sound field program Straight Straight Straight 7ch Enhancer y • When this unit is on ...video monitor (OSD). Note • Remote control codes cannot be output in the OPTION menu or SETUP menu, "SCENE Setting Complete" appears on the front panel display. Consult the manufacturer of an iPod ...
.../CD on the player by pressing the SCENE key. • When connecting a Yamaha DVD/CD player that you play back the DTS-CD. Switching remotely controlled external...not improved, the problem may cause a speaker malfunction. BD/DVD TV CD RADIO Input source HDMI 1 AV 1 AV 3 TUNER Sound field program Straight Straight Straight 7ch Enhancer y • When this unit is on ...video monitor (OSD). Note • Remote control codes cannot be output in the OPTION menu or SETUP menu, "SCENE Setting Complete" appears on the front panel display. Consult the manufacturer of an iPod ...

Owners Manual
Page 27
... the previous screen soon after you set to change. Control range: -10.0 dB to enjoy the pure high fidelity sound of the option menu and setup menu - NPURE DIRECT lights up when you release the key. sound field program, tone control - mulit-zone function Using your headphones Plug your headphones in...
... the previous screen soon after you set to change. Control range: -10.0 dB to enjoy the pure high fidelity sound of the option menu and setup menu - NPURE DIRECT lights up when you release the key. sound field program, tone control - mulit-zone function Using your headphones Plug your headphones in...
Owners Manual
Page 32
...None" (see page 47). • Disconnect the headphones from only the front left and right speakers. When the sound field program runs in the setup menu is selected. - SILENT CINEMA mode is reproduced with your headphones. A sound field program name appears on the front panel display, and sound ... mode, press MSTRAIGHT (or kSTRAIGHT). Using CINEMA DSP 3D mode CINEMA DSP 3D mode creates the intensive and accurate stereoscopic sound field in the setup menu (see page 52), this unit in the following settings and select a CINEMA DSP related sound field program. • Set the "Extra...
...None" (see page 47). • Disconnect the headphones from only the front left and right speakers. When the sound field program runs in the setup menu is selected. - SILENT CINEMA mode is reproduced with your headphones. A sound field program name appears on the front panel display, and sound ... mode, press MSTRAIGHT (or kSTRAIGHT). Using CINEMA DSP 3D mode CINEMA DSP 3D mode creates the intensive and accurate stereoscopic sound field in the setup menu (see page 52), this unit in the following settings and select a CINEMA DSP related sound field program. • Set the "Extra...
Owners Manual
Page 35
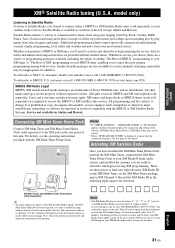
...2346). To subscribe to copy, decompile, disassemble, reverse engineer, hack, manipulate or otherwise make available any technology or software incorporated in receivers compatible with no obstacles in Alaska and Hawaii. To subscribe to the sky. SIRIUS and XM subscriptions sold separately) to residents of...is displayed, it indoors or outdoors. You will send a signal from your XM Ready home audio system you to follow installation and setup instructions are a variety of programming packages available, including the option of adding "The Best of SIRIUS" programming to your XM tuner...
...2346). To subscribe to copy, decompile, disassemble, reverse engineer, hack, manipulate or otherwise make available any technology or software incorporated in receivers compatible with no obstacles in Alaska and Hawaii. To subscribe to the sky. SIRIUS and XM subscriptions sold separately) to residents of...is displayed, it indoors or outdoors. You will send a signal from your XM Ready home audio system you to follow installation and setup instructions are a variety of programming packages available, including the option of adding "The Best of SIRIUS" programming to your XM tuner...

Owners Manual
Page 50
... marked with the default parameters, you can protect the sound field against the changes of parameters the sound filed parameters when "Memory Guard" of the setup menu is added too much. →Reduce the effect level. 46 En Decoders that you want to change, and press oCursor l / h to change the parameter... "→" to the sound field program and press oCursor l / h to select the sound field program. 5 Press oCursor k / n to select "DSP Parameter" and press oENTER. The setup menu appears on the monitor. 3 Press oCursor k / n to select the parameter that can be added).
... marked with the default parameters, you can protect the sound field against the changes of parameters the sound filed parameters when "Memory Guard" of the setup menu is added too much. →Reduce the effect level. 46 En Decoders that you want to change, and press oCursor l / h to change the parameter... "→" to the sound field program and press oCursor l / h to select the sound field program. 5 Press oCursor k / n to select "DSP Parameter" and press oENTER. The setup menu appears on the monitor. 3 Press oCursor k / n to select the parameter that can be added).
Owners Manual
Page 54
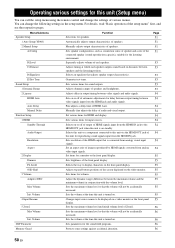
... input 54 signals. Volume Sets the maximum volume level so that the volume will not be displayed on standby. Menu/Submenu Speaker Setup Sets items for the sound field programs. 56 Memory Guard Protects some settings against accidental alteration. 56 50 En Sets the maximum ... connection status of speaker and a size of 54 this unit is converted from the HDMI jack and audio signals. Sets resolution of the setup menu" first, and see the respective pages. For details, read "Basic operation of the HDMI output that adjusts speaker output characteristics. 53...
... input 54 signals. Volume Sets the maximum volume level so that the volume will not be displayed on standby. Menu/Submenu Speaker Setup Sets items for the sound field programs. 56 Memory Guard Protects some settings against accidental alteration. 56 50 En Sets the maximum ... connection status of speaker and a size of 54 this unit is converted from the HDMI jack and audio signals. Sets resolution of the setup menu" first, and see the respective pages. For details, read "Basic operation of the HDMI output that adjusts speaker output characteristics. 53...
Owners Manual
Page 55
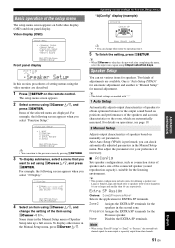
...* Selects the application for main output is separately output from other items by pressing oRETURN. 3 To display submenus, select a menu that you select "Function Setup." ;Function Setup . 1 HDMI 2 Display 3 Volume 4 Input Rename 5 Zone2 [ ]/[ ]:Up/Down [ENTER]:Enter y • You can change the setting of...screen by repeating step 4. 5 To finish the setting, press mSETUP. Operating various settings for this section, procedures of the setup menu The setup menu screen appears on both video display (OSD) and front panel display. Two kinds of the speakers and acoustic characteristics or...
...* Selects the application for main output is separately output from other items by pressing oRETURN. 3 To display submenus, select a menu that you select "Function Setup." ;Function Setup . 1 HDMI 2 Display 3 Volume 4 Input Rename 5 Zone2 [ ]/[ ]:Up/Down [ENTER]:Enter y • You can change the setting of...screen by repeating step 4. 5 To finish the setting, press mSETUP. Operating various settings for this section, procedures of the setup menu The setup menu screen appears on both video display (OSD) and front panel display. Two kinds of the speakers and acoustic characteristics or...

Owners Manual
Page 56
... speaker are spread to front left and right speakers. Select this when one large surround back speaker is connected. Operating various settings for this unit (Setup menu) LFE/Bass Out Choices: SWFR/Front/Both* Selects speaker(s) for outputting low-frequency components of the LFE (low-frequency effect sound) channel or other...
... speaker are spread to front left and right speakers. Select this when one large surround back speaker is connected. Operating various settings for this unit (Setup menu) LFE/Bass Out Choices: SWFR/Front/Both* Selects speaker(s) for outputting low-frequency components of the LFE (low-frequency effect sound) channel or other...
Owners Manual
Page 57
... / Front R / Center / Sur. EQ Type Select Choices: Auto PEQ/GEQ*/Off Select an equalizer type. Sound Setup You can adjust the settings of "2 Manual Setup" while listening to "Channel," then the desired frequency band with oCursor k / n, and adjust the signal level with oCursor... INFORMATION APPENDIX English 53 En Subwoofer Phase Choices: Normal*/Reverse Sets the phase of "Sur.B L" and "Sur.B R." Normal Select this unit (Setup menu) ■ D)Equalizer Adjusts sound quality and tone using oCursor l / h. When "On" is connected, "SB" appears instead of "...
... / Front R / Center / Sur. EQ Type Select Choices: Auto PEQ/GEQ*/Off Select an equalizer type. Sound Setup You can adjust the settings of "2 Manual Setup" while listening to "Channel," then the desired frequency band with oCursor k / n, and adjust the signal level with oCursor... INFORMATION APPENDIX English 53 En Subwoofer Phase Choices: Normal*/Reverse Sets the phase of "Sur.B L" and "Sur.B R." Normal Select this unit (Setup menu) ■ D)Equalizer Adjusts sound quality and tone using oCursor l / h. When "On" is connected, "SB" appears instead of "...
Owners Manual
Page 58
...on standby. ■ Audio Output Choices: Amp*/TV/Amp+TV Selects this unit or a component connected to this unit via the HDMI jack, this unit (Setup menu) ■ 2 Lipsync Adjusts delay between video output and audio output. Outputs HDMI sound signals from the speakers of a TV connected to this when ...the HDMI OUT jack. Thrgh 16:9 Smart Outputs the video signals without changing the aspect ratio. Set the correction time in "Auto Delay." Function Setup You can set "HDMI Auto" to this unit via the HDMI OUT jack of this unit for inputs with black bands on the monitor screen...
...on standby. ■ Audio Output Choices: Amp*/TV/Amp+TV Selects this unit or a component connected to this unit via the HDMI jack, this unit (Setup menu) ■ 2 Lipsync Adjusts delay between video output and audio output. Outputs HDMI sound signals from the speakers of a TV connected to this when ...the HDMI OUT jack. Thrgh 16:9 Smart Outputs the video signals without changing the aspect ratio. Set the correction time in "Auto Delay." Function Setup You can set "HDMI Auto" to this unit via the HDMI OUT jack of this unit for inputs with black bands on the monitor screen...

Owners Manual
Page 59
... the volume will not be entered For entering the selected characters The following characters are listening at lower volumes or at the time this unit (Setup menu) ■ Max Volume Adjustable range: -30.0dB to +15.0dB/+16.5dB* (5.0 dB step) Sets the maximum volume level so that you want to...
... the volume will not be entered For entering the selected characters The following characters are listening at lower volumes or at the time this unit (Setup menu) ■ Max Volume Adjustable range: -30.0dB to +15.0dB/+16.5dB* (5.0 dB step) Sets the maximum volume level so that you want to...
Owners Manual
Page 60
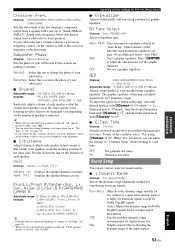
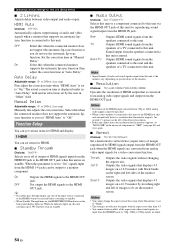
... This item is displayed only when "Extra SP Assign" is set to "Zone2." ■ Max Volume Adjustable range: -30.0dB to set this unit (Setup menu) 5 Zone2 Sets the maximum volume level and initial volume level of Zone2 unit is turned on . Memory Guard Choices: Off*/On Protects settings of... "Max Volume" becomes effective. For example, you can set to "On," "G" appears while the setup menu is displayed on the video monitor. 56 En Operating various settings for this parameter to "-30.0dB" and "Init. For example, when you ...
... This item is displayed only when "Extra SP Assign" is set to "Zone2." ■ Max Volume Adjustable range: -30.0dB to set this unit (Setup menu) 5 Zone2 Sets the maximum volume level and initial volume level of Zone2 unit is turned on . Memory Guard Choices: Off*/On Protects settings of... "Max Volume" becomes effective. For example, you can set to "On," "G" appears while the setup menu is displayed on the video monitor. 56 En Operating various settings for this parameter to "-30.0dB" and "Init. For example, when you ...

