Owners Manual
Page 2
... changes suddenly. In this state, this unit, and/or personal injury. - Burning objects (i.e. The cabinet should never be exposed to excessive heat such as they may become warm. Disconnect the power cable from use force on switches, knobs and/or cords. 10 When disconnecting the power cable from earphones and headphones can be reached easily. 21 The batteries shall not be opened...
... changes suddenly. In this state, this unit, and/or personal injury. - Burning objects (i.e. The cabinet should never be exposed to excessive heat such as they may become warm. Disconnect the power cable from use force on switches, knobs and/or cords. 10 When disconnecting the power cable from earphones and headphones can be reached easily. 21 The batteries shall not be opened...
Owners Manual
Page 3
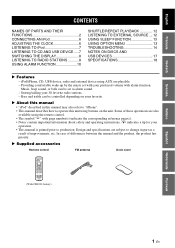
...çais Deutsch Svenska CONTENTS NAMES OF PARTS AND THEIR FUNCTIONS 2 CONNECTING AN iPod 6 ADJUSTING THE CLOCK 6 LISTENING TO iPod 7 LISTENING TO CD AND USB DEVICE .....7 SWITCHING THE DISPLAY 8 LISTENING TO RADIO STATIONS ...........8 USING ALARM FUNCTION 10 SHUFFLE/REPEAT PLAYBACK 12 LISTENING TO EXTERNAL SOURCE.... 12 USING SLEEP FUNCTION 13 USING OPTION MENU 13 TROUBLESHOOTING 14 NOTES ON DISCS AND USB DEVICES 17 SPECIFICATIONS 18 X Features - iPod/iPhone, CD, USB device, radio and external device using buttons on your preferred volume with alarm function.
...çais Deutsch Svenska CONTENTS NAMES OF PARTS AND THEIR FUNCTIONS 2 CONNECTING AN iPod 6 ADJUSTING THE CLOCK 6 LISTENING TO iPod 7 LISTENING TO CD AND USB DEVICE .....7 SWITCHING THE DISPLAY 8 LISTENING TO RADIO STATIONS ...........8 USING ALARM FUNCTION 10 SHUFFLE/REPEAT PLAYBACK 12 LISTENING TO EXTERNAL SOURCE.... 12 USING SLEEP FUNCTION 13 USING OPTION MENU 13 TROUBLESHOOTING 14 NOTES ON DISCS AND USB DEVICES 17 SPECIFICATIONS 18 X Features - iPod/iPhone, CD, USB device, radio and external device using buttons on your preferred volume with alarm function.
Owners Manual
Page 4
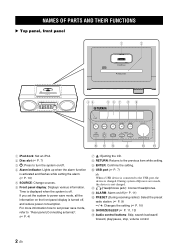
... radios): Select the preset radio station. (☞ P. 9) - / +: Changes the setting (☞ P. 10) D SNOOZE/SLEEP (☞ P. 11, 13) E Audio control buttons: Skip, search backward/ forward, play/pause, stop, volume control 2 En A (Headphones jack): Connect headphones. PREPARATION NAMES OF PARTS AND THEIR FUNCTIONS X Top panel, front panel 1 2 IPod / iPhone LABEL SIDE IPod / iPhone LABEL SIDE USB SOURCE RETURN ENTER ALARM PRESET VOLUME SNOOZE / SLEEP 34 567 8 9 SOURCE RETURN ENTER USB ALARM PRESET VOLUME SNOOZE / SLEEP 0AB C DE 1 iPod dock: Set an iPod. 2 Disc...
... radios): Select the preset radio station. (☞ P. 9) - / +: Changes the setting (☞ P. 10) D SNOOZE/SLEEP (☞ P. 11, 13) E Audio control buttons: Skip, search backward/ forward, play/pause, stop, volume control 2 En A (Headphones jack): Connect headphones. PREPARATION NAMES OF PARTS AND THEIR FUNCTIONS X Top panel, front panel 1 2 IPod / iPhone LABEL SIDE IPod / iPhone LABEL SIDE USB SOURCE RETURN ENTER ALARM PRESET VOLUME SNOOZE / SLEEP 34 567 8 9 SOURCE RETURN ENTER USB ALARM PRESET VOLUME SNOOZE / SLEEP 0AB C DE 1 iPod dock: Set an iPod. 2 Disc...

Owners Manual
Page 5
... OF PARTS AND THEIR FUNCTIONS 1 2 3 4 SLEEP PRESET STEREO AUTO TUNED MEMORY 56 SHUFFLE REPEAT ARTISTS ALBUMS SONGS 7 MUTE B 8 90 A 1 SLEEP indicator: Lights up when this unit is on Multi information display. (☞ P. 8) B Operation indicators: Shows the available menu buttons for a radio station by automatic preset tuning. Lights up when you preset radio stations automatically or manually. (☞ P. 9) A Multi information indicators: Indicate the music information currently displayed on . (☞ P. 13) 2 PRESET indicator: Lights up when you preset radio stations...
... OF PARTS AND THEIR FUNCTIONS 1 2 3 4 SLEEP PRESET STEREO AUTO TUNED MEMORY 56 SHUFFLE REPEAT ARTISTS ALBUMS SONGS 7 MUTE B 8 90 A 1 SLEEP indicator: Lights up when this unit is on Multi information display. (☞ P. 8) B Operation indicators: Shows the available menu buttons for a radio station by automatic preset tuning. Lights up when you preset radio stations automatically or manually. (☞ P. 9) A Multi information indicators: Indicate the music information currently displayed on . (☞ P. 13) 2 PRESET indicator: Lights up when you preset radio stations...

Owners Manual
Page 6
... of the antenna is turned off in system off/power save mode when system is off . All the information on the front panel display is not threaded. 4 En NAMES OF PARTS AND THEIR FUNCTIONS X Rear panel (Connecting antenna) 1 2 34 SET ON OFF 5 1 FM antenna (supplied) 2 FM antenna terminal: Connect the supplied FM antenna. 3 AUX: Connect an external device. (☞ P. 12) 4 CLOCK SET: Adjusts the clock. (☞ P. 6) ON: Displays the current time when system...
... of the antenna is turned off in system off/power save mode when system is off . All the information on the front panel display is not threaded. 4 En NAMES OF PARTS AND THEIR FUNCTIONS X Rear panel (Connecting antenna) 1 2 34 SET ON OFF 5 1 FM antenna (supplied) 2 FM antenna terminal: Connect the supplied FM antenna. 3 AUX: Connect an external device. (☞ P. 12) 4 CLOCK SET: Adjusts the clock. (☞ P. 6) ON: Displays the current time when system...
Owners Manual
Page 7
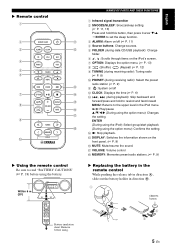
... : Stop playback. X Remote control 1 2 SNOOZE / SLEEP A 3 ALARM CLOCK B CD iPod AUX 4 RADIO USB 5 FOLDER 6 MENU ENTER C 7 OPTION D DISPLAY E 8 VOLUME MUTE F G 9 TUNING H MEMORY PRESET 0 X Using the remote control Be sure to read "BATTERY CAUTIONS" (☞ P. 18) before using. NAMES OF PARTS AND THEIR FUNCTIONS 1 Infrared signal transmitter 2 SNOOZE/SLEEP: Snooze/sleep setting. (☞ P. 11, 13) Press and hold this button, then press Cursor T/S J ENTER to set the sleep function. 3 ALARM: Alarm on/off (☞ P. 11) 4 Source buttons: Change sources...
... : Stop playback. X Remote control 1 2 SNOOZE / SLEEP A 3 ALARM CLOCK B CD iPod AUX 4 RADIO USB 5 FOLDER 6 MENU ENTER C 7 OPTION D DISPLAY E 8 VOLUME MUTE F G 9 TUNING H MEMORY PRESET 0 X Using the remote control Be sure to read "BATTERY CAUTIONS" (☞ P. 18) before using. NAMES OF PARTS AND THEIR FUNCTIONS 1 Infrared signal transmitter 2 SNOOZE/SLEEP: Snooze/sleep setting. (☞ P. 11, 13) Press and hold this button, then press Cursor T/S J ENTER to set the sleep function. 3 ALARM: Alarm on/off (☞ P. 11) 4 Source buttons: Change sources...

Owners Manual
Page 8
... dock cover to power save mode, the iPod is not charged. y • The time is displayed for a certain period when you press CLOCK on the remote control. • You can switch the system to the iPod dock whenever you are lost about 5 minutes after unplugging the unit. Press - / + to SET. 2 Set the time. CONNECTING AN iPod Dock Adaptor IPod / iPhone LABEL SIDE Set your iPod. • If you do not use an adapter or if the adapter...
... dock cover to power save mode, the iPod is not charged. y • The time is displayed for a certain period when you press CLOCK on the remote control. • You can switch the system to the iPod dock whenever you are lost about 5 minutes after unplugging the unit. Press - / + to SET. 2 Set the time. CONNECTING AN iPod Dock Adaptor IPod / iPhone LABEL SIDE Set your iPod. • If you do not use an adapter or if the adapter...
Owners Manual
Page 9
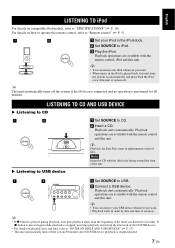
... on playable discs and files, refer to "SPECIFICATIONS" (☞ P. 18). For details on how to operate the remote control, refer to "Remote control" (☞ P. 5). 1 2 1 Set your USB device whenever you want . • Playback starts in alphanumeric order of the track you listened to iPod. 3 Play the iPod. y This unit automatically turns off the system 60 minutes after CD/USB device playback is stopped, next time playback starts from...
... on playable discs and files, refer to "SPECIFICATIONS" (☞ P. 18). For details on how to operate the remote control, refer to "Remote control" (☞ P. 5). 1 2 1 Set your USB device whenever you want . • Playback starts in alphanumeric order of the track you listened to iPod. 3 Play the iPod. y This unit automatically turns off the system 60 minutes after CD/USB device playback is stopped, next time playback starts from...
Owners Manual
Page 10
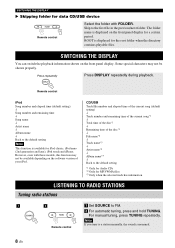
... display for a certain period. Remote control iPod Song number and elapsed time (default setting) L Song number and remaining time L Song name L Artist name L Album name L Back to a station manually, the sound is available for iPod classic, iPod nano (2nd generation and later), iPod touch and iPhone. Note If you tune to the default setting Note This function is monaural. 8 En CD/USB Track/file number and elapsed time of the current song (default setting) L Track number...
... display for a certain period. Remote control iPod Song number and elapsed time (default setting) L Song number and remaining time L Song name L Artist name L Album name L Back to a station manually, the sound is available for iPod classic, iPod nano (2nd generation and later), iPod touch and iPhone. Note If you tune to the default setting Note This function is monaural. 8 En CD/USB Track/file number and elapsed time of the current song (default setting) L Track number...
Owners Manual
Page 11
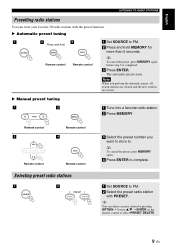
...Selecting preset radio stations 1 SOURCE 2 PRESET 1 Set SOURCE to FM. 2 Select the preset radio station with the preset function. English LISTENING TO RADIO STATIONS Presetting radio stations You can delete a preset station by pressing OPTION J Cursor S/T J ENTER on the remote control to select PRESET DELETE. 9 En X Automatic preset tuning 1 SOURCE 2 3 Press and hold MEMORY for more than 2 seconds. y You can store your favorite 30 radio stations with PRESET. Remote control 3 MENU ENTER Remote control Remote control 4 ENTER Remote control 3 Select the preset number you...
...Selecting preset radio stations 1 SOURCE 2 PRESET 1 Set SOURCE to FM. 2 Select the preset radio station with the preset function. English LISTENING TO RADIO STATIONS Presetting radio stations You can delete a preset station by pressing OPTION J Cursor S/T J ENTER on the remote control to select PRESET DELETE. 9 En X Automatic preset tuning 1 SOURCE 2 3 Press and hold MEMORY for more than 2 seconds. y You can store your favorite 30 radio stations with PRESET. Remote control 3 MENU ENTER Remote control Remote control 4 ENTER Remote control 3 Select the preset number you...
Owners Manual
Page 12
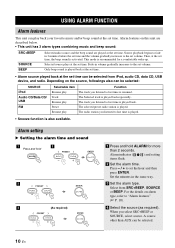
... the set time. • Alarm source played back at the set time can be selected: SOURCE iPod Audio CD/Data CD/ USB FM Selectable item Resume play Track Resume play Preset Resume play back your favorite music and/or beep sound at the set time. The selected preset radio station is recommended for more than AUX can play Function The track you listened to fade in the same way. 3 Set the alarm type. Alarm indicator ( ) and setting items flash. 2 Set the alarm time. For...
... the set time. • Alarm source played back at the set time can be selected: SOURCE iPod Audio CD/Data CD/ USB FM Selectable item Resume play Track Resume play Preset Resume play back your favorite music and/or beep sound at the set time. The selected preset radio station is recommended for more than AUX can play Function The track you listened to fade in the same way. 3 Set the alarm type. Alarm indicator ( ) and setting items flash. 2 Set the alarm time. For...
Owners Manual
Page 13
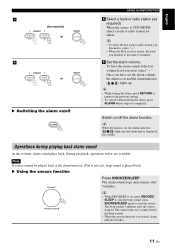
... 1 minute before step 6 is displayed for alarm. y • To select the last song or radio station you used, select "---". Operations during playing back alarm sound At the set ), beep sound is not set time, alarm sound plays back. During playback, operations below are available. X Using the snooze function VOLUME SNOOZE / SLEEP Press SNOOZE/SLEEP. press SNOOZE/SLEEP again to , select "---". • When the iPod is CD/USB/FM, select a track or radio station for a while. The...
... 1 minute before step 6 is displayed for alarm. y • To select the last song or radio station you used, select "---". Operations during playing back alarm sound At the set ), beep sound is not set time, alarm sound plays back. During playback, operations below are available. X Using the snooze function VOLUME SNOOZE / SLEEP Press SNOOZE/SLEEP. press SNOOZE/SLEEP again to , select "---". • When the iPod is CD/USB/FM, select a track or radio station for a while. The...
Owners Manual
Page 14
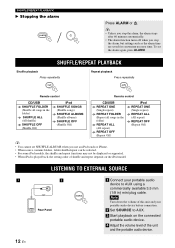
... alarm time are saved for convenient use an iPod touch or iPhone. • When source contains folders, folder shuffle/repeat can be selected. • For some iPod models, the shuffle and repeat functions may not be displayed or supported. • When iPod is played back, the setting order of shuffle and repeat depends on the connected portable audio device. 4 Adjust the volume level of this unit and your portable audio device to AUX. 3 Start playback...
... alarm time are saved for convenient use an iPod touch or iPhone. • When source contains folders, folder shuffle/repeat can be selected. • For some iPod models, the shuffle and repeat functions may not be displayed or supported. • When iPod is played back, the setting order of shuffle and repeat depends on the connected portable audio device. 4 Adjust the volume level of this unit and your portable audio device to AUX. 3 Start playback...
Owners Manual
Page 15
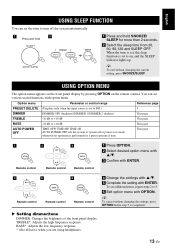
... SLEEP indicator lights up. This page 1 OPTION 2 MENU ENTER 3 ENTER Remote control Remote control Remote control 1 Press OPTION. 2 Select desired option menu with S/T. 3 Confirm with ENTER. 4 MENU ENTER 5 ENTER 6 OPTION Remote control Remote control Remote control 4 Change the settings with S/T. 5 Complete the setting with OPTION. Option menu Parameter or control range Reference page PRESET DELETE (Displays only when the input source is set the time to turn off or power save mode whenever no operation is...
... SLEEP indicator lights up. This page 1 OPTION 2 MENU ENTER 3 ENTER Remote control Remote control Remote control 1 Press OPTION. 2 Select desired option menu with S/T. 3 Confirm with ENTER. 4 MENU ENTER 5 ENTER 6 OPTION Remote control Remote control Remote control 4 Change the settings with S/T. 5 Complete the setting with OPTION. Option menu Parameter or control range Reference page PRESET DELETE (Displays only when the input source is set the time to turn off or power save mode whenever no operation is...
Owners Manual
Page 16
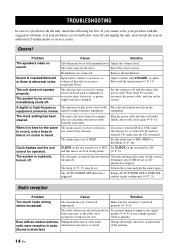
... Bass). Set the alarm type to the minimum level. The antenna may have occurred. (Sound is set the clock again (☞ P. 6). The source may have dropped. Remove the headphones. The unit does not operate properly. CLOCK on the rear panel is distorted.) Change the height, direction, or placement of the antenna. 14 En Radio reception Problem Cause Solution Too much noise during stereo broadcast. ADDITIONAL INFORMATION TROUBLESHOOTING In...
... Bass). Set the alarm type to the minimum level. The antenna may have occurred. (Sound is set the clock again (☞ P. 6). The source may have dropped. Remove the headphones. The unit does not operate properly. CLOCK on the rear panel is distorted.) Change the height, direction, or placement of the antenna. 14 En Radio reception Problem Cause Solution Too much noise during stereo broadcast. ADDITIONAL INFORMATION TROUBLESHOOTING In...
Owners Manual
Page 17
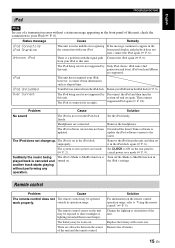
...), iPod touch and iPhone are connected. The iPod's Shake to cancel power save mode (☞ P. 2). Remote control Problem Cause The remote control does not The remote control may be worn out. Solution For information on the rear panel to Shuffle function is connected at an angle. The system is not set to "Using the remote control" (☞ P. 5). Remove the headphones. Set CLOCK to ON on the remote control operation range, refer to power save mode (☞ P. 4). Headphones are supported. Problem...
...), iPod touch and iPhone are connected. The iPod's Shake to cancel power save mode (☞ P. 2). Remote control Problem Cause The remote control does not The remote control may be worn out. Solution For information on the rear panel to Shuffle function is connected at an angle. The system is not set to "Using the remote control" (☞ P. 5). Remove the headphones. Set CLOCK to ON on the remote control operation range, refer to power save mode (☞ P. 4). Headphones are supported. Problem...
Owners Manual
Page 18
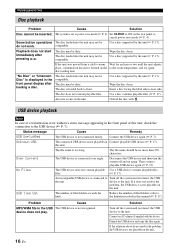
... limitations noted in this manual (☞ P. 17). USB Time Out The number of files/folders; refer to the unit. Set CLOCK to ON on Connect playable USB device (☞ P. 17). Some button operations The disc loaded into the unit may have formed on the unit. 16 En Playback does not start immediately after loading a disc. The disc loaded into the unit...
... limitations noted in this manual (☞ P. 17). USB Time Out The number of files/folders; refer to the unit. Set CLOCK to ON on Connect playable USB device (☞ P. 17). Some button operations The disc loaded into the unit may have formed on the unit. 16 En Playback does not start immediately after loading a disc. The disc loaded into the unit...
Owners Manual
Page 19
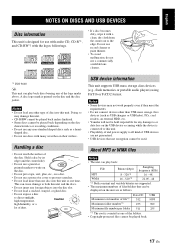
..., an external HDD, etc. • Yamaha will not be used. Notes • Do not load any foreign objects into the disc slot. • Do not load a cracked, warped, or glued disc. • Do not expose a disc to the edge. USB device information This unit supports USB mass storage class devices (e.g., flash memories or portable audio players) using FAT16 or FAT32 format. A disc logo mark...
..., an external HDD, etc. • Yamaha will not be used. Notes • Do not load any foreign objects into the disc slot. • Do not load a cracked, warped, or glued disc. • Do not expose a disc to the edge. USB device information This unit supports USB mass storage class devices (e.g., flash memories or portable audio players) using FAT16 or FAT32 format. A disc logo mark...
Owners Manual
Page 20
... output power 15 W + 15 W (6 Ω 1 kHz, 10% THD) • Headphones 3.5 mm STEREO mini Jack (Adaptive Impedance 16 to 32 Ω) X TUNER SECTION • Tuning range FM 87.50 to look into inside. iPhone, iPod, iPod classic, iPod nano, iPod shuffle, and iPod touch are subject to change without notice. Clean the battery compartment thoroughly before installing a new battery. • Keep the battery away from the remote control. • Do not charge or disassemble...
... output power 15 W + 15 W (6 Ω 1 kHz, 10% THD) • Headphones 3.5 mm STEREO mini Jack (Adaptive Impedance 16 to 32 Ω) X TUNER SECTION • Tuning range FM 87.50 to look into inside. iPhone, iPod, iPod classic, iPod nano, iPod shuffle, and iPod touch are subject to change without notice. Clean the battery compartment thoroughly before installing a new battery. • Keep the battery away from the remote control. • Do not charge or disassemble...

Owners Manual
Page 163
...;LEN. ■ For U.K. customers If the socket outlets in a live socket outlet. ■ Special Instructions for the plug supplied with this appliance, it should be connected to the terminal which is marked with the letter L or coloured RED. Model IMPORTANT THE WIRES IN MAINS LEAD ARE COLOURED IN ACCORDANCE WITH THE FOLLOWING CODE: Blue: NEUTRAL Brown: LIVE...
...;LEN. ■ For U.K. customers If the socket outlets in a live socket outlet. ■ Special Instructions for the plug supplied with this appliance, it should be connected to the terminal which is marked with the letter L or coloured RED. Model IMPORTANT THE WIRES IN MAINS LEAD ARE COLOURED IN ACCORDANCE WITH THE FOLLOWING CODE: Blue: NEUTRAL Brown: LIVE...