

Owner's Manual
Page 1
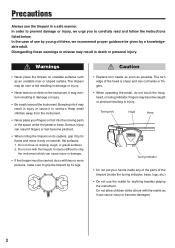
... & Lubrication 3 Transporting and Setting Up the Timpani ... 4 Setting up the Timpani 4 Adjusting Pedal Height 5 Transporting 5 Relocating the Tuning Indicator 5 Initial Preparation 6 Adjusting the Pitch 8 Head Tuning 8 Pedal Adjustment 9 Tuning Indicator Adjustment 10 Replacing the Head 11 1 English PEDAL TIMPANI TP3100(EA) Series TP3123(EA) / TP3126(EA) / TP3129(EA) / TP3132(EA) Owner's Manual Thank you for the first time be sure to carefully read the instructions on "Initial Preparation...
... & Lubrication 3 Transporting and Setting Up the Timpani ... 4 Setting up the Timpani 4 Adjusting Pedal Height 5 Transporting 5 Relocating the Tuning Indicator 5 Initial Preparation 6 Adjusting the Pitch 8 Head Tuning 8 Pedal Adjustment 9 Tuning Indicator Adjustment 10 Replacing the Head 11 1 English PEDAL TIMPANI TP3100(EA) Series TP3123(EA) / TP3126(EA) / TP3129(EA) / TP3132(EA) Owner's Manual Thank you for the first time be sure to carefully read the instructions on "Initial Preparation...
Owner's Manual
Page 2
....) • Do not use the mallet for anything besides playing the instrument. The timpani may become damaged. 2 Tuning bolt Head Hoop Tuning Indicator • Do not put your fingers or foot into it only on the instrument. Keep small children away from the instrument. • Never place your hands inside any of the parts of use by young children, we...
....) • Do not use the mallet for anything besides playing the instrument. The timpani may become damaged. 2 Tuning bolt Head Hoop Tuning Indicator • Do not put your fingers or foot into it only on the instrument. Keep small children away from the instrument. • Never place your hands inside any of the parts of use by young children, we...

Owner's Manual
Page 3
... Tuning Indicator Pointer Lock Nut Pointer Adjustment Knob Leg Lock Bolt Handle Kettle Edge Lug Hoop (Counter Hoop) Kettle Spring Tension Adjustment Bolt Sliding Leg Base Caster Pedal Leg Pedal Supplied Accessories • Tuning Key 1 • Mallets 1 set • Hex Wrench 1 • Spring Adjustment Wrench 1 Caution Never place your fingers or foot into the moving parts indicated by the arrows in the diagram...
... Tuning Indicator Pointer Lock Nut Pointer Adjustment Knob Leg Lock Bolt Handle Kettle Edge Lug Hoop (Counter Hoop) Kettle Spring Tension Adjustment Bolt Sliding Leg Base Caster Pedal Leg Pedal Supplied Accessories • Tuning Key 1 • Mallets 1 set • Hex Wrench 1 • Spring Adjustment Wrench 1 Caution Never place your fingers or foot into the moving parts indicated by the arrows in the diagram...
Owner's Manual
Page 4
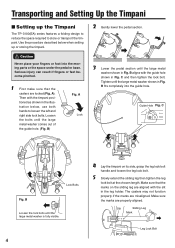
... , use both hands to store or transport the timpani. A). B Loosen the lock bolts until the large metal washer comes out of the guide hole. (Fig. Make sure that the casters are aligned with the guide hole shown in the leg holder. The casters may not function properly if the marks are properly aligned. Transporting and Setting...
... , use both hands to store or transport the timpani. A). B Loosen the lock bolts until the large metal washer comes out of the guide hole. (Fig. Make sure that the casters are aligned with the guide hole shown in the leg holder. The casters may not function properly if the marks are properly aligned. Transporting and Setting...
Owner's Manual
Page 5
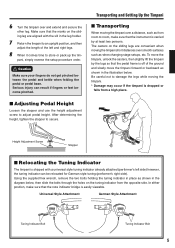
...changing stage setups, etc. In either position, make sure that the note indicator bridge is dropped or falls from the opposite side. pani, simply reverse the setup procedure order. Serious injury can be relocated for German style tuning (performer's right side). The casters on the tuning indicator from a high place. Transporting and Setting... to adjust pedal height. To move the timpani forward or backward as shown in the leg holder. 7 Return the timpani to store or pack up the tim- Using the supplied hex wrench, remove the two bolts holding the tuning indicator ...
...changing stage setups, etc. In either position, make sure that the note indicator bridge is dropped or falls from the opposite side. pani, simply reverse the setup procedure order. Serious injury can be relocated for German style tuning (performer's right side). The casters on the tuning indicator from a high place. Transporting and Setting... to adjust pedal height. To move the timpani forward or backward as shown in the leg holder. 7 Return the timpani to store or pack up the tim- Using the supplied hex wrench, remove the two bolts holding the tuning indicator ...
Owner's Manual
Page 6
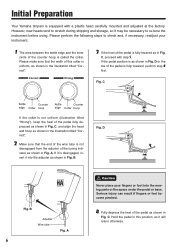
... pedal fully depressed as it may be necessary to check and, if necessary, readjust your fingers or foot into the adjuster as shown in this collar is fully lowered, perform step 4 first. Initial Preparation Your Yamaha ...pedal as shown in Fig. B Adjuster Wire tube Fig. Fig. Hold the pedal in the illustration titled "Correct". However, new heads tend to stretch during shipping and storage, so it will return otherwise. Please perform the following steps to re-tune the instrument before using. C, proceed with a plastic head carefully mounted and adjusted at the factory...
... pedal fully depressed as it may be necessary to check and, if necessary, readjust your fingers or foot into the adjuster as shown in this collar is fully lowered, perform step 4 first. Initial Preparation Your Yamaha ...pedal as shown in Fig. B Adjuster Wire tube Fig. Fig. Hold the pedal in the illustration titled "Correct". However, new heads tend to stretch during shipping and storage, so it will return otherwise. Please perform the following steps to re-tune the instrument before using. C, proceed with a plastic head carefully mounted and adjusted at the factory...

Owner's Manual
Page 7
... point lies at distance B from the pedal. Keeping the heel of the pedal depressed, loosen the first tuning bolt by 1/2 turn all other tuning bolts in the order shown in Fig. Perform this position, adjustment is tightened too much . Note As the head will stretch over time, readjustment should be loosened. 5 Using the supplied timpani key, tighten the tun- The standard striking...
... point lies at distance B from the pedal. Keeping the heel of the pedal depressed, loosen the first tuning bolt by 1/2 turn all other tuning bolts in the order shown in Fig. Perform this position, adjustment is tightened too much . Note As the head will stretch over time, readjustment should be loosened. 5 Using the supplied timpani key, tighten the tun- The standard striking...
Owner's Manual
Page 8
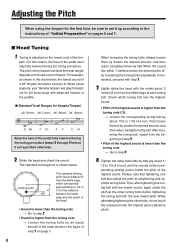
... edge, which tuning bolt has the highest sound. • Pitch of the highest sound is higher than the tuning note (*2) → Loosen the corresponding tuning bolt by about 1/16 to A. Thus, after loosening the tuning bolts (repeatedly, if necessary), proceed with step 3. 3 Lightly strike the head with the next lowest pitch. Adjusting the Pitch When using the timpani for Yamaha Timpani 32" (81cm...
... edge, which tuning bolt has the highest sound. • Pitch of the highest sound is higher than the tuning note (*2) → Loosen the corresponding tuning bolt by about 1/16 to A. Thus, after loosening the tuning bolts (repeatedly, if necessary), proceed with step 3. 3 Lightly strike the head with the next lowest pitch. Adjusting the Pitch When using the timpani for Yamaha Timpani 32" (81cm...
Owner's Manual
Page 9
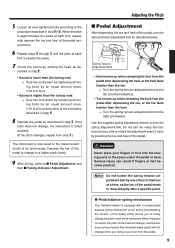
... the toe and heel of the pedal several times. 6 Repeat steps 3 through 5 until the pitch at once, and re-check the adjustment every 2 turns by pressing the toe and heel of the instrument. Spring Tension Adjustment Bolt • Heel moves up when releasing the foot from the pedal. 9 Use the supplied spring adjustment wrench to the lowest sound (note) of the head) which allows...
... the toe and heel of the pedal several times. 6 Repeat steps 3 through 5 until the pitch at once, and re-check the adjustment every 2 turns by pressing the toe and heel of the instrument. Spring Tension Adjustment Bolt • Heel moves up when releasing the foot from the pedal. 9 Use the supplied spring adjustment wrench to the lowest sound (note) of the head) which allows...
Owner's Manual
Page 10
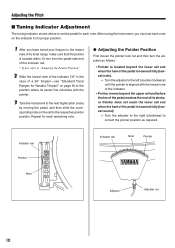
... proper position. 1 After you have tuned your timpani to the lowest note of its tonal range, make sure that the pointer is lowered fully (lowest sound) → Turn the adjuster to the right (clockwise) to the respective pointer position. After tuning the instrument, you must set the pedal for each note. Repeat for each remaining note. ● Adjusting the Pointer Position First loosen...
... proper position. 1 After you have tuned your timpani to the lowest note of its tonal range, make sure that the pointer is lowered fully (lowest sound) → Turn the adjuster to the right (clockwise) to the respective pointer position. After tuning the instrument, you must set the pedal for each note. Repeat for each remaining note. ● Adjusting the Pointer Position First loosen...
Owner's Manual
Page 11
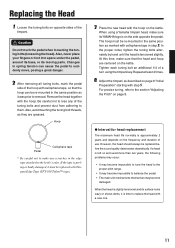
..., posing a great danger. 2 After removing all tuning bolts, mark the pedal side of a turn using a Yamaha timpani head, make sure its moving parts. However, the head should always be re-mounted in step 2. Caution Do not touch the pedal when loosening the tuning bolts (loosening the head). At this time, make any of the timpani. Changes in the edge tape attached to balance...
..., posing a great danger. 2 After removing all tuning bolts, mark the pedal side of a turn using a Yamaha timpani head, make sure its moving parts. However, the head should always be re-mounted in step 2. Caution Do not touch the pedal when loosening the tuning bolts (loosening the head). At this time, make any of the timpani. Changes in the edge tape attached to balance...

