
Owner's Manual
Page 1
U RX-V765 AV Receiver OWNER'S MANUAL
U RX-V765 AV Receiver OWNER'S MANUAL

Owner's Manual
Page 3
... be the source of interference, which can not locate the appropriate retailer, please contact Yamaha Electronics Corp., U.S.A. 6660 Orangethorpe Ave, Buena Park, CA 90620. Modifications not expressly approved by Yamaha may cause interference harmful to eliminate the problem by Yamaha Corporation of radio or TV interference, relocate/reorient the antenna. Compliance with these...
... be the source of interference, which can not locate the appropriate retailer, please contact Yamaha Electronics Corp., U.S.A. 6660 Orangethorpe Ave, Buena Park, CA 90620. Modifications not expressly approved by Yamaha may cause interference harmful to eliminate the problem by Yamaha Corporation of radio or TV interference, relocate/reorient the antenna. Compliance with these...

Owner's Manual
Page 4
... les chocs électriques, introduire la lame la plus large de la fiche dans la borne correspondante de la prise et pousser jusqu'au fond. Yamaha will not be exposed to excessive heat such as they may happen if batteries are : .......AC 110/120/220/230-240 V, 50/60 Hz (General... rear panel of the same type. Cet appareil numérique de la classe B est conforme à la norme NMB-003 du Canada. Contact qualified Yamaha service personnel when any damage resulting from use batteries of this unit must be set this unit in a well ventilated, cool, dry, clean place - Keep...
... les chocs électriques, introduire la lame la plus large de la fiche dans la borne correspondante de la prise et pousser jusqu'au fond. Yamaha will not be exposed to excessive heat such as they may happen if batteries are : .......AC 110/120/220/230-240 V, 50/60 Hz (General... rear panel of the same type. Cet appareil numérique de la classe B est conforme à la norme NMB-003 du Canada. Contact qualified Yamaha service personnel when any damage resulting from use batteries of this unit must be set this unit in a well ventilated, cool, dry, clean place - Keep...
Owner's Manual
Page 5
... player or an external decoder 18 Connecting an external amplifier 18 Using REMOTE IN/OUT jacks 19 Connecting a Yamaha iPod universal dock or Bluetooth™ wireless audio receiver 19 Connecting a camcorder or portable audio player ... 19 Connecting the FM and AM antennas 20 Connecting the ...Radio™ information 41 Using iPod 42 Controlling iPod 42 Using Bluetooth™ components 44 Pairing the Bluetooth™ wireless audio receiver and your headphones 26 Displaying input signal information 26 Changing information on the front panel display .... 26 Enjoy the sound field ...
... player or an external decoder 18 Connecting an external amplifier 18 Using REMOTE IN/OUT jacks 19 Connecting a Yamaha iPod universal dock or Bluetooth™ wireless audio receiver 19 Connecting a camcorder or portable audio player ... 19 Connecting the FM and AM antennas 20 Connecting the ...Radio™ information 41 Using iPod 42 Controlling iPod 42 Using Bluetooth™ components 44 Pairing the Bluetooth™ wireless audio receiver and your headphones 26 Displaying input signal information 26 Changing information on the front panel display .... 26 Enjoy the sound field ...
Owner's Manual
Page 6
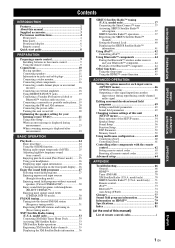
... video x 1 • Audio output Analog x 1 • Zone2 output Analog x 1 Other terminals Remote input x 1, Remote output x 1 Trigger output x 1 ■ Proprietary Yamaha technology for all sources • Adaptive dynamic range controlling capability • SCENE function that allows you to optimize this unit to suit your individual audiovisual...• 192-kHz/24-bit D/A converter • OSD (on-screen display) menus that allow you to connect a Yamaha iPod universal dock (such as YDS-11, sold separately) or Bluetooth wireless audio receiver (such as multi-channel digital audio -
... video x 1 • Audio output Analog x 1 • Zone2 output Analog x 1 Other terminals Remote input x 1, Remote output x 1 Trigger output x 1 ■ Proprietary Yamaha technology for all sources • Adaptive dynamic range controlling capability • SCENE function that allows you to optimize this unit to suit your individual audiovisual...• 192-kHz/24-bit D/A converter • OSD (on-screen display) menus that allow you to connect a Yamaha iPod universal dock (such as YDS-11, sold separately) or Bluetooth wireless audio receiver (such as multi-channel digital audio -

Owner's Manual
Page 7
... a trademark of differences between the front panel and the remote control, the key name on the front panel or the remote control. In case of Yamaha Corporation. "SILENT CINEMA" is a trademark of the following parts. • Remote control (see page 9) • Batteries (AAA, R03, UM-4) x ...is printed prior to the "Controls diagram" or "Part names and functions" on the remote control. Supplied accessories Check that you received all related marks and logos are trademark of Sirius XM Radio Inc. Refer to production. Manufactured under license under license from Dolby ...
... a trademark of differences between the front panel and the remote control, the key name on the front panel or the remote control. In case of Yamaha Corporation. "SILENT CINEMA" is a trademark of the following parts. • Remote control (see page 9) • Batteries (AAA, R03, UM-4) x ...is printed prior to the "Controls diagram" or "Part names and functions" on the remote control. Supplied accessories Check that you received all related marks and logos are trademark of Sirius XM Radio Inc. Refer to production. Manufactured under license under license from Dolby ...

Owner's Manual
Page 8
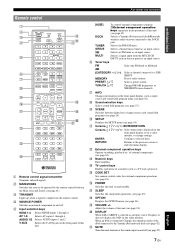
... 19). Q PURE DIRECT Changes mode to this unit passes through this unit (see page 6). Select a channel category for a XM/SIRIUS. E ZONE2 CONTROL Enables operation of a receiver set in Zone2, including input source switching, volume control and tuner operation, with the main amplifier or remote control after this unit (see page 24...
... 19). Q PURE DIRECT Changes mode to this unit passes through this unit (see page 6). Select a channel category for a XM/SIRIUS. E ZONE2 CONTROL Enables operation of a receiver set in Zone2, including input source switching, volume control and tuner operation, with the main amplifier or remote control after this unit (see page 24...
Owner's Manual
Page 9
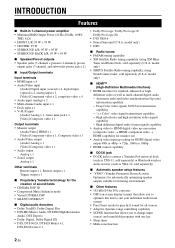
... CENTER SPEAKERS EXTRA SP ZONE2/PRESENCE SINGLE CENTER SURROUND SINGLE SURROUND BACK/ BI-AMP CENTER OPTICAL ( TV ) AV 1 COAXIAL AV 2 COAXIAL (CD) AV 3 OPTICAL AV 4 AV 5 AV 6 AV OUT AUDIO1 AUDIO2 FRONT SURROUND SUR.BACK SUBWOOFER MULTI CH INPUT AUDIO OUT ZONE2 OUT FRONT SURROUND SUR. f...ANTENNA FM GND AM MONITOR OUT COMPONENT VIDEO PR REMOTE IN UNBAL. b DOCK jack For connecting a Yamaha iPod universal dock (YDS-11, sold separately) or a Bluetooth wireless audio receiver (YBA-10, sold separately) (see page 15). i Power Cable Connect this unit to operate it...
... CENTER SPEAKERS EXTRA SP ZONE2/PRESENCE SINGLE CENTER SURROUND SINGLE SURROUND BACK/ BI-AMP CENTER OPTICAL ( TV ) AV 1 COAXIAL AV 2 COAXIAL (CD) AV 3 OPTICAL AV 4 AV 5 AV 6 AV OUT AUDIO1 AUDIO2 FRONT SURROUND SUR.BACK SUBWOOFER MULTI CH INPUT AUDIO OUT ZONE2 OUT FRONT SURROUND SUR. f...ANTENNA FM GND AM MONITOR OUT COMPONENT VIDEO PR REMOTE IN UNBAL. b DOCK jack For connecting a Yamaha iPod universal dock (YDS-11, sold separately) or a Bluetooth wireless audio receiver (YBA-10, sold separately) (see page 15). i Power Cable Connect this unit to operate it...

Owner's Manual
Page 10
... audio is selected as an input source. Part names and functions Front panel display ab c SIRIUS XM d ef STEREO 3 TUNED k l a HDMI indicator Lights up during receiving radio broadcast signals from which signals are available for the current operation. l Multi information display Displays menu items and settings for operations. MUTE PL SW...
... audio is selected as an input source. Part names and functions Front panel display ab c SIRIUS XM d ef STEREO 3 TUNED k l a HDMI indicator Lights up during receiving radio broadcast signals from which signals are available for the current operation. l Multi information display Displays menu items and settings for operations. MUTE PL SW...
Owner's Manual
Page 11
... d SOURCE POWER Switches an external component on the front panel display, such as an input source. DOCK Selects a Yamaha iPod universal dock/Bluetooth wireless audio receiver connected to the Yamaha iPod universal dock (see page 25). MEMORY Presets radio stations. PRESET k / n Select a preset station. g ...FM/AM tuner. XM Selects an XM tuner as an input source. o CODE SET Sets remote control codes for a XM/ SIRIUS. AV 1-6 Selects AV inputs 1 through 4. f Tuner keys FM Select the FM band or AM band. u MUTE Turns the mute function of input sources...
... d SOURCE POWER Switches an external component on the front panel display, such as an input source. DOCK Selects a Yamaha iPod universal dock/Bluetooth wireless audio receiver connected to the Yamaha iPod universal dock (see page 25). MEMORY Presets radio stations. PRESET k / n Select a preset station. g ...FM/AM tuner. XM Selects an XM tuner as an input source. o CODE SET Sets remote control codes for a XM/ SIRIUS. AV 1-6 Selects AV inputs 1 through 4. f Tuner keys FM Select the FM band or AM band. u MUTE Turns the mute function of input sources...

Owner's Manual
Page 12
... this unit. • Placing speakers • Connecting speakers ☞P. 10 ☞P. 11 y • This unit has a YPAO (Yamaha Parametric Room Acoustic Optimizer) that changes the input source and sound field program at least two (front) speakers. Step 3: Connect your components...multi-format player or an external decoder ☞P. 18 • Connecting an external amplifier ☞P. 18 • Connecting a Yamaha iPod universal dock or Bluetooth wireless audio receiver ☞P. 19 • Connecting the FM and AM antennas ☞P. 20 • Connecting an XM Mini-Tuner Home ...
... this unit. • Placing speakers • Connecting speakers ☞P. 10 ☞P. 11 y • This unit has a YPAO (Yamaha Parametric Room Acoustic Optimizer) that changes the input source and sound field program at least two (front) speakers. Step 3: Connect your components...multi-format player or an external decoder ☞P. 18 • Connecting an external amplifier ☞P. 18 • Connecting a Yamaha iPod universal dock or Bluetooth wireless audio receiver ☞P. 19 • Connecting the FM and AM antennas ☞P. 20 • Connecting an XM Mini-Tuner Home ...

Owner's Manual
Page 13
INTRODUCTION PREPARATION BASIC OPERATION PREPARATION Preparing remote control Installing batteries in the following conditions: - Remote control sensor window 2 within 6 m (20 ft) 30 30 1 Take off the battery compartment cover. 2 Insert the two supplied batteries (AAA, R03, UM-4) according to touch the leaked material. the transmit indicator does not flash or is without batteries for details. In such a case, install new batteries and set the remote control code. Notes • Do not spill water or other liquids on this remote control by setting the ...
INTRODUCTION PREPARATION BASIC OPERATION PREPARATION Preparing remote control Installing batteries in the following conditions: - Remote control sensor window 2 within 6 m (20 ft) 30 30 1 Take off the battery compartment cover. 2 Insert the two supplied batteries (AAA, R03, UM-4) according to touch the leaked material. the transmit indicator does not flash or is without batteries for details. In such a case, install new batteries and set the remote control code. Notes • Do not spill water or other liquids on this remote control by setting the ...

Owner's Manual
Page 14
... front left and rear right facing the listening position. Place them at an equal distance from each other, ideally at the same distance as the Yamaha Active Servo Processing Subwoofer System. To obtain a natural sound flow in Dolby Digital and DTS signals. Place them slightly further back than in order to...
... front left and rear right facing the listening position. Place them at an equal distance from each other, ideally at the same distance as the Yamaha Active Servo Processing Subwoofer System. To obtain a natural sound flow in Dolby Digital and DTS signals. Place them slightly further back than in order to...

Owner's Manual
Page 15
BACK PRE OUT 1 SUBWOOFER 2 ed hi Speakers a Front speaker L b Front speaker R c Center speaker d Surround speaker L e Surround speaker R h Subwoofer 1 i Subwoofer 2 (optional) Jacks on this unit FRONT (L) FRONT (R) CENTER SURROUND (L) SURROUND (R) SUBWOOFER 1 SUBWOOFER 2 ■ 7.1-channel Speakers a Front speaker L b Front speaker R c Center speaker d Surround speaker L e Surround speaker R f Surround back speaker L g Surround back speaker R h Subwoofer 1 i Subwoofer 2 (optional) Jacks on this unit FRONT (L) FRONT (R) CENTER SURROUND (L) SURROUND (R) SURROUND BACK/BI-AMP (L) ...
BACK PRE OUT 1 SUBWOOFER 2 ed hi Speakers a Front speaker L b Front speaker R c Center speaker d Surround speaker L e Surround speaker R h Subwoofer 1 i Subwoofer 2 (optional) Jacks on this unit FRONT (L) FRONT (R) CENTER SURROUND (L) SURROUND (R) SUBWOOFER 1 SUBWOOFER 2 ■ 7.1-channel Speakers a Front speaker L b Front speaker R c Center speaker d Surround speaker L e Surround speaker R f Surround back speaker L g Surround back speaker R h Subwoofer 1 i Subwoofer 2 (optional) Jacks on this unit FRONT (L) FRONT (R) CENTER SURROUND (L) SURROUND (R) SURROUND BACK/BI-AMP (L) ...

Owner's Manual
Page 16
You can connect Zone2 speakers with a richer and more spacial presence can be created. This unit automatically selects speakers to output sounds according to the selected input source and sound field program. • You can adjust the vertical position of center sound such as a dialog (see page 54). 0.5 to 1 m (1 to 3 ft) 0.5 to 1 m (1 to 3 ft) PL PR FL 1.8 m (6 ft) FR 1.8 m (6 ft) C To use the presence speakers, connect them to the EXTRA SP jacks and set "Extra SP Assign" in "Speaker Setup" in the SETUP menu to "Presence" (see page 54). For details, see page 27) and their ...
You can connect Zone2 speakers with a richer and more spacial presence can be created. This unit automatically selects speakers to output sounds according to the selected input source and sound field program. • You can adjust the vertical position of center sound such as a dialog (see page 54). 0.5 to 1 m (1 to 3 ft) 0.5 to 1 m (1 to 3 ft) PL PR FL 1.8 m (6 ft) FR 1.8 m (6 ft) C To use the presence speakers, connect them to the EXTRA SP jacks and set "Extra SP Assign" in "Speaker Setup" in the SETUP menu to "Presence" (see page 54). For details, see page 27) and their ...

Owner's Manual
Page 17
Using bi-amplification connections You can connect speakers that the brackets or cables are connected before connecting the speakers. Connecting the banana plug (Except U.K., Europe, Russian, Asia and Korea models) Tighten the knob, and then insert the banana plug into the hole, and then tighten the knob. Banana plug SINGLE FRONT SURROUND BACK/ BI-AMP This unit Caution Before making bi-amplification connections, make sure that support bi-amplification connections to the EXTRA SP jacks. ADVANCED OPERATION ADDITIONAL INFORMATION APPENDIX English 13 En INTRODUCTION ...
Using bi-amplification connections You can connect speakers that the brackets or cables are connected before connecting the speakers. Connecting the banana plug (Except U.K., Europe, Russian, Asia and Korea models) Tighten the knob, and then insert the banana plug into the hole, and then tighten the knob. Banana plug SINGLE FRONT SURROUND BACK/ BI-AMP This unit Caution Before making bi-amplification connections, make sure that support bi-amplification connections to the EXTRA SP jacks. ADVANCED OPERATION ADDITIONAL INFORMATION APPENDIX English 13 En INTRODUCTION ...

Owner's Manual
Page 18
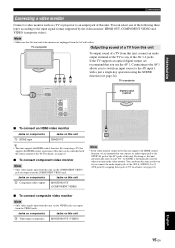
To transmit optical digital audio signals. For example, if a VCR with a composite output signal and a DVD player with the HDMI logo printed on it from the HDMI OUT jack. Input Output HDMI HDMI COMPONENT VIDEO COMPONENT VIDEO PR PB Y VIDEO PR PB Y VIDEO Not converted Converted PB PB (blue) Y Y (green) 14 En Use stereo pin cables. Connect red plugs to red jacks (R) and white plugs to a digital video signal, and then outputs it . • If you are connected, connect both VIDEO jack and COMPONENT VIDEO jack in MONITOR OUT for components that include luminance ...
To transmit optical digital audio signals. For example, if a VCR with a composite output signal and a DVD player with the HDMI logo printed on it from the HDMI OUT jack. Input Output HDMI HDMI COMPONENT VIDEO COMPONENT VIDEO PR PB Y VIDEO PR PB Y VIDEO Not converted Converted PB PB (blue) Y Y (green) 14 En Use stereo pin cables. Connect red plugs to red jacks (R) and white plugs to a digital video signal, and then outputs it . • If you are connected, connect both VIDEO jack and COMPONENT VIDEO jack in MONITOR OUT for components that include luminance ...
Owner's Manual
Page 19
...VIDEO PR REMOTE IN UNBAL. OUT PB VIDEO EO Y 12V 0.1A MAX. Note • Make sure that you to switch an input source to the AV input 1 with the remote control of this unit a c b To output sound of a TV from the VIDEO jacks. Jacks on components c Video input... HDMI control function. You can obtain the same result even if you use the AV 1. You can select one of the AV 1-6 jacks. PR FM GND AM PB Y M O OPTICAL ( TV ) AV 1 COAXIAL AV 2 COAXIAL (CD) AV 3 OPTICAL AV 4 AV 5 AV 6 AV OUT AUDIO1 AUD Note • If the video monitor connected to TV in advance...
...VIDEO PR REMOTE IN UNBAL. OUT PB VIDEO EO Y 12V 0.1A MAX. Note • Make sure that you to switch an input source to the AV input 1 with the remote control of this unit a c b To output sound of a TV from the VIDEO jacks. Jacks on components c Video input... HDMI control function. You can obtain the same result even if you use the AV 1. You can select one of the AV 1-6 jacks. PR FM GND AM PB Y M O OPTICAL ( TV ) AV 1 COAXIAL AV 2 COAXIAL (CD) AV 3 OPTICAL AV 4 AV 5 AV 6 AV OUT AUDIO1 AUD Note • If the video monitor connected to TV in advance...
Owner's Manual
Page 20
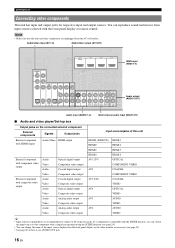
... are recommended to connect to the respective jacks. You can reproduce sound and movies from the AC wall outlets. Audio/video input (AV 1-6) Audio/video output (AV OUT) SIRIUS DOCK XM HDMI OUT HDMI 1 (BD/DVD) HDMI 2 HDMI 3 HDMI 4 HDMI input (HDMI 1-4) COMPONENT VIDEO... the front panel display or remote control. FRONT TRIGGER OUT CENTER CE Audio output (AUDIO OUT) OPTICAL ( TV ) AV 1 COAXIAL AV 2 COAXIAL (CD) AV 3 OPTICAL AV 4 AV 5 AV 6 AV OUT AUDIO1 AUDIO2 FRONT SURROUND SUR.BACK SUBWOOFER MULTI CH INPUT AUDIO OUT ZONE2 OUT Audio input (AUDIO 1-2) Multi channel ...
... are recommended to connect to the respective jacks. You can reproduce sound and movies from the AC wall outlets. Audio/video input (AV 1-6) Audio/video output (AV OUT) SIRIUS DOCK XM HDMI OUT HDMI 1 (BD/DVD) HDMI 2 HDMI 3 HDMI 4 HDMI input (HDMI 1-4) COMPONENT VIDEO... the front panel display or remote control. FRONT TRIGGER OUT CENTER CE Audio output (AUDIO OUT) OPTICAL ( TV ) AV 1 COAXIAL AV 2 COAXIAL (CD) AV 3 OPTICAL AV 4 AV 5 AV 6 AV OUT AUDIO1 AUDIO2 FRONT SURROUND SUR.BACK SUBWOOFER MULTI CH INPUT AUDIO OUT ZONE2 OUT Audio input (AUDIO 1-2) Multi channel ...

Owner's Manual
Page 21
... AUDIO 2 AUDIO y • We recommend connecting the coaxial digital output terminal of a CD player to the AV3 jack. When using the AV OUT jacks or AUDIO OUT jacks, connect them as follows: When using the AUDIO OUT jacks: connect them to analog audio jacks of an external... APPENDIX English 17 En An HDMI input signal, COMPONENT VIDEO input signal or digital audio input signal cannot be output. When using the AV OUT jacks: connect them to composite video and analog audio input jacks of an external component. INTRODUCTION PREPARATION Connections ■ Audio player ...
... AUDIO 2 AUDIO y • We recommend connecting the coaxial digital output terminal of a CD player to the AV3 jack. When using the AV OUT jacks or AUDIO OUT jacks, connect them as follows: When using the AUDIO OUT jacks: connect them to analog audio jacks of an external... APPENDIX English 17 En An HDMI input signal, COMPONENT VIDEO input signal or digital audio input signal cannot be output. When using the AV OUT jacks: connect them to composite video and analog audio input jacks of an external component. INTRODUCTION PREPARATION Connections ■ Audio player ...