
Owner's Manual
Page 3
... install near water. 6 Clean only with the requirements listed in the users manual, may void your use this product MUST be determined by turning the unit "OFF" and "ON", please try to persons. FCC INFORMATION (for long periods of time. 14 Refer all instructions. 5 Do...meets FCC requirements. REFER SERVICING TO QUALIFIED SERVICE PERSONNEL. • Explanation of interference, which can not locate the appropriate retailer, please contact Yamaha Electronics Corp., U.S.A. 6660 Orangethorpe Ave, Buena Park, CA 90620. If the provided plug does not fit into the apparatus, the apparatus ...
... install near water. 6 Clean only with the requirements listed in the users manual, may void your use this product MUST be determined by turning the unit "OFF" and "ON", please try to persons. FCC INFORMATION (for long periods of time. 14 Refer all instructions. 5 Do...meets FCC requirements. REFER SERVICING TO QUALIFIED SERVICE PERSONNEL. • Explanation of interference, which can not locate the appropriate retailer, please contact Yamaha Electronics Corp., U.S.A. 6660 Orangethorpe Ave, Buena Park, CA 90620. If the provided plug does not fit into the apparatus, the apparatus ...

Owner's Manual
Page 4
... ZONE ON/ OFF. Retain this unit by lightning, keep the power cord and outdoor antennas disconnected from the AC power source even if you turn off this Owner's Manual in order not to wide slot and fully insert. candles), as sunshine, fire or like. 21 Excessive sound pressure... may happen if batteries are complete. 8 Do not operate this unit in a well ventilated, cool, dry, clean place - Burning objects (i.e. Contact qualified Yamaha service personnel when any damage resulting from use force on the rear of this unit may fall and liquid may cause fire, damage to this...
... ZONE ON/ OFF. Retain this unit by lightning, keep the power cord and outdoor antennas disconnected from the AC power source even if you turn off this Owner's Manual in order not to wide slot and fully insert. candles), as sunshine, fire or like. 21 Excessive sound pressure... may happen if batteries are complete. 8 Do not operate this unit in a well ventilated, cool, dry, clean place - Burning objects (i.e. Contact qualified Yamaha service personnel when any damage resulting from use force on the rear of this unit may fall and liquid may cause fire, damage to this...
Owner's Manual
Page 5
...-format player or an external decoder 18 Connecting an external amplifier 18 Using REMOTE IN/OUT jacks 19 Connecting a Yamaha iPod universal dock or Bluetooth™ wireless audio receiver 19 Connecting a camcorder or portable audio player ... 19 Connecting the FM and AM antennas 20 Connecting the power... cable 20 Turning this unit on and off 20 Optimizing the speaker setting for your listening room (YPAO 21 ...
...-format player or an external decoder 18 Connecting an external amplifier 18 Using REMOTE IN/OUT jacks 19 Connecting a Yamaha iPod universal dock or Bluetooth™ wireless audio receiver 19 Connecting a camcorder or portable audio player ... 19 Connecting the FM and AM antennas 20 Connecting the power... cable 20 Turning this unit on and off 20 Optimizing the speaker setting for your listening room (YPAO 21 ...

Owner's Manual
Page 8
...CONTROL PROGRAM STRAIGHT PURE DIRECT INPUT EFFECT l TUNING/CH h OPTIMIZER MIC VOLUME VIDEO AUX VIDEO AUDIO PORTABLE MNO P A MAIN ZONE ON/OFF Turns this unit on and off (see page 61). S OPTIMIZER MIC jack For connecting the supplied optimizer microphone and adjusting output characteristics of a ...source and sound field program name (see page 19). 4 En T VIDEO (VIDEO AUX) jack For connecting the video output cable of a receiver set in Zone2, including input source switching, volume control and tuner operation, with the main amplifier or remote control after this unit (see ...
...CONTROL PROGRAM STRAIGHT PURE DIRECT INPUT EFFECT l TUNING/CH h OPTIMIZER MIC VOLUME VIDEO AUX VIDEO AUDIO PORTABLE MNO P A MAIN ZONE ON/OFF Turns this unit on and off (see page 61). S OPTIMIZER MIC jack For connecting the supplied optimizer microphone and adjusting output characteristics of a ...source and sound field program name (see page 19). 4 En T VIDEO (VIDEO AUX) jack For connecting the video output cable of a receiver set in Zone2, including input source switching, volume control and tuner operation, with the main amplifier or remote control after this unit (see ...

Owner's Manual
Page 10
... SBL SB SBR k m 6 En g ZONE2 indicator Lights up when Zone2 is selected as an input source. b XM indicator Lights up when an XM tuner is turned on the remote control are currently output. Part names and functions Front panel display ab c SIRIUS XM d ef STEREO 3 TUNED k l a HDMI indicator Lights up during...
... SBL SB SBR k m 6 En g ZONE2 indicator Lights up when Zone2 is selected as an input source. b XM indicator Lights up when an XM tuner is turned on the remote control are currently output. Part names and functions Front panel display ab c SIRIUS XM d ef STEREO 3 TUNED k l a HDMI indicator Lights up during...
Owner's Manual
Page 11
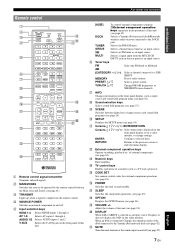
... AV 2 3 4 AUDIO 6 1 2 V-AUX [ A ] [ B ] DOCK TUNER SIRIUS CATEGORY FM AM INFO MEMORY XM PRESET MULTI TUN./CH MOVIE ENHANCER SUR. DOCK Selects a Yamaha iPod universal dock/Bluetooth wireless audio receiver ...connected to the previous screen or ends the menu display. i SCENE Switches between the Main zone and Zone2 (see page 45). TUNER Selects the FM/AM tuner. MULTI Selects a signal input from the remote control. j SETUP Displays the SETUP menu (see page 24). u MUTE Turns...
... AV 2 3 4 AUDIO 6 1 2 V-AUX [ A ] [ B ] DOCK TUNER SIRIUS CATEGORY FM AM INFO MEMORY XM PRESET MULTI TUN./CH MOVIE ENHANCER SUR. DOCK Selects a Yamaha iPod universal dock/Bluetooth wireless audio receiver ...connected to the previous screen or ends the menu display. i SCENE Switches between the Main zone and Zone2 (see page 45). TUNER Selects the FM/AM tuner. MULTI Selects a signal input from the remote control. j SETUP Displays the SETUP menu (see page 24). u MUTE Turns...

Owner's Manual
Page 12
...format player or an external decoder ☞P. 18 • Connecting an external amplifier ☞P. 18 • Connecting a Yamaha iPod universal dock or Bluetooth wireless audio receiver ☞P. 19 • Connecting the FM and AM antennas ☞P. 20 • Connecting an XM Mini-Tuner ...☞P. 33 • Connecting a SiriusConnect tuner ☞P. 37 Step 4: Turn on the power Connect the power cable and turn on this unit. • Connecting the power cable • Turning this unit on room acoustic characteristics (audio characteristics of the speakers, speaker positions...
...format player or an external decoder ☞P. 18 • Connecting an external amplifier ☞P. 18 • Connecting a Yamaha iPod universal dock or Bluetooth wireless audio receiver ☞P. 19 • Connecting the FM and AM antennas ☞P. 20 • Connecting an XM Mini-Tuner ...☞P. 33 • Connecting a SiriusConnect tuner ☞P. 37 Step 4: Turn on the power Connect the power cable and turn on this unit. • Connecting the power cable • Turning this unit on room acoustic characteristics (audio characteristics of the speakers, speaker positions...

Owner's Manual
Page 17
... to that connect a woofer with an impedance of 6-ohm or larger. When not making bi-amplification connections, remove any metal part of this unit is turned on the monitor are still distorted even when you set "BI AMP" to the instruction manuals of speakers for details. INTRODUCTION PREPARATION BASIC OPERATION Connections...
... to that connect a woofer with an impedance of 6-ohm or larger. When not making bi-amplification connections, remove any metal part of this unit is turned on the monitor are still distorted even when you set "BI AMP" to the instruction manuals of speakers for details. INTRODUCTION PREPARATION BASIC OPERATION Connections...
Owner's Manual
Page 19
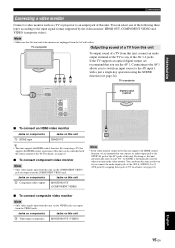
...on components Jacks on the video monitor. By doing so, this unit automatically turns on and "TV" of SCENE is automatically selected when you use the AV 1. Note • Make sure that you turn on this unit via the VIDEO jacks are output from the VIDEO jacks. If... an HDMI video monitor Jacks on components Jacks on this unit. PR FM GND AM PB Y M O OPTICAL ( TV ) AV 1 COAXIAL AV 2 COAXIAL (CD) AV 3 OPTICAL AV 4 AV 5 AV 6 AV OUT AUDIO1 AUD Note • If the video monitor connected to this unit supports the HDMI control function, we recommend that this unit...
...on components Jacks on the video monitor. By doing so, this unit automatically turns on and "TV" of SCENE is automatically selected when you use the AV 1. Note • Make sure that you turn on this unit via the VIDEO jacks are output from the VIDEO jacks. If... an HDMI video monitor Jacks on components Jacks on this unit. PR FM GND AM PB Y M O OPTICAL ( TV ) AV 1 COAXIAL AV 2 COAXIAL (CD) AV 3 OPTICAL AV 4 AV 5 AV 6 AV OUT AUDIO1 AUD Note • If the video monitor connected to this unit supports the HDMI control function, we recommend that this unit...

Owner's Manual
Page 23
...FM GND A ADVANCED OPERATION ADDITIONAL INFORMATION APPENDIX English Yamaha iPod universal dock/Bluetooth wireless audio receiver 19 En Use a dedicated cable for connecting a camcorder, a game console or a portable music player to turn down the volume of the remote control signals,...TUNING/CH h OPTIMIZER MIC VOLUME VIDEO AUX VIDEO AUDIO PORTABLE VIDEO AUX Infrared signal receiver or Yamaha component Yamaha component (CD or DVD player, etc.) y • If your Yamaha component supports the SCENE link playback function, remote connection automatically starts playback when you can...
...FM GND A ADVANCED OPERATION ADDITIONAL INFORMATION APPENDIX English Yamaha iPod universal dock/Bluetooth wireless audio receiver 19 En Use a dedicated cable for connecting a camcorder, a game console or a portable music player to turn down the volume of the remote control signals,...TUNING/CH h OPTIMIZER MIC VOLUME VIDEO AUX VIDEO AUDIO PORTABLE VIDEO AUX Infrared signal receiver or Yamaha component Yamaha component (CD or DVD player, etc.) y • If your Yamaha component supports the SCENE link playback function, remote connection automatically starts playback when you can...

Owner's Manual
Page 24
...unit while it in the moist ground. Caution Do not unplug this unit. TRIGGER OUT FRO CENTER Ground (GND terminal) The GND terminal is turned on this unit by pressing MSCENE (or iSCENE). • This unit consumes a small amount of this unit or cause the settings of ...electricity even during standby. For more details, consult the nearest authorized Yamaha dealer or service center. • Always use an outdoor antenna. y • The unit needs a few seconds until ready to be saved incorrectly. ...
...unit while it in the moist ground. Caution Do not unplug this unit. TRIGGER OUT FRO CENTER Ground (GND terminal) The GND terminal is turned on this unit by pressing MSCENE (or iSCENE). • This unit consumes a small amount of this unit or cause the settings of ...electricity even during standby. For more details, consult the nearest authorized Yamaha dealer or service center. • Always use an outdoor antenna. y • The unit needs a few seconds until ready to be saved incorrectly. ...
Owner's Manual
Page 25
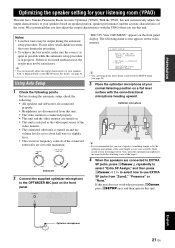
... adjusts the output characteristics of the video monitor. • The connected subwoofer is turned on speaker position, speaker performance, and the acoustic characteristics of your listening room (YPAO) This unit has a Yamaha Parametric Room Acoustic Optimizer (YPAO). Do not allow small children to the maximum. ...the YPAO when you use this unit. • The video monitor is connected properly. • This unit and the video monitor are turned on the video monitor. 1 Auto Setup Extra SP Assign >Zone2 Presence None EQ Type;;;;Natural . You can manually adjust the output ...
... adjusts the output characteristics of the video monitor. • The connected subwoofer is turned on speaker position, speaker performance, and the acoustic characteristics of your listening room (YPAO) This unit has a Yamaha Parametric Room Acoustic Optimizer (YPAO). Do not allow small children to the maximum. ...the YPAO when you use this unit. • The video monitor is connected properly. • This unit and the video monitor are turned on the video monitor. 1 Auto Setup Extra SP Assign >Zone2 Presence None EQ Type;;;;Natural . You can manually adjust the output ...
Owner's Manual
Page 28
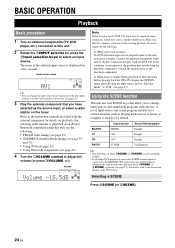
...A set of the DVD player. SW L CR SL SR y • You can receive SCENE control signals is connected to the REMOTE OUT jack of this unit, the DVD player automatically turns on external components (TV, DVD player, etc.) connected to the instruction manual of input source...see page 42) • Using Bluetooth components (see page 47). BASIC OPERATION Playback Basic procedure 1 Turn on and starts playback when MSCENE (or iSCENE) is output during standby. • If a Yamaha DVD player that can change input sources and sound field programs with the external component for a few ...
...A set of the DVD player. SW L CR SL SR y • You can receive SCENE control signals is connected to the REMOTE OUT jack of this unit, the DVD player automatically turns on external components (TV, DVD player, etc.) connected to the instruction manual of input source...see page 42) • Using Bluetooth components (see page 47). BASIC OPERATION Playback Basic procedure 1 Turn on and starts playback when MSCENE (or iSCENE) is output during standby. • If a Yamaha DVD player that can change input sources and sound field programs with the external component for a few ...

Owner's Manual
Page 29
... the front left and right speakers to the desired input source (see the next section. multi-zone function y • The front panel display turns off . Setting remote control codes for about 3 seconds while pressing down MSCENE (or iSCENE) until "SET Complete" appears on the front panel...of the OPTION menu and SETUP menu - For more details, see page 62). Note • Remote control codes cannot be registered to turn the Pure Direct mode on the remote control to SCENE selections. ADVANCED OPERATION ADDITIONAL INFORMATION APPENDIX English 25 En The MUTE indicator on the...
... the front left and right speakers to the desired input source (see the next section. multi-zone function y • The front panel display turns off . Setting remote control codes for about 3 seconds while pressing down MSCENE (or iSCENE) until "SET Complete" appears on the front panel...of the OPTION menu and SETUP menu - For more details, see page 62). Note • Remote control codes cannot be registered to turn the Pure Direct mode on the remote control to SCENE selections. ADVANCED OPERATION ADDITIONAL INFORMATION APPENDIX English 25 En The MUTE indicator on the...

Owner's Manual
Page 40
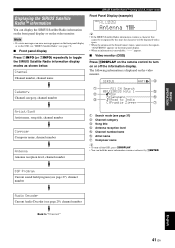
... mode (see page 34) b Channel category c Song title d Antenna reception level e Channel number/name f Artist name y • To turn on or off the OSD, press tDISPLAY. • You can display the XM Satellite Radio information on the front panel display or on the...Satellite Radio information display modes as shown below. XM ANT: d a All CH Search 008:'80s e b :Decades :Sanumemo f c :Road to turn off the information display. XM® Satellite Radio tuning (U.S.A. The following information is unavailable, "----" appears. 36 En Antenna Antenna reception level, channel ...
... mode (see page 34) b Channel category c Song title d Antenna reception level e Channel number/name f Artist name y • To turn on or off the OSD, press tDISPLAY. • You can display the XM Satellite Radio information on the front panel display or on the...Satellite Radio information display modes as shown below. XM ANT: d a All CH Search 008:'80s e b :Decades :Sanumemo f c :Road to turn off the information display. XM® Satellite Radio tuning (U.S.A. The following information is unavailable, "----" appears. 36 En Antenna Antenna reception level, channel ...
Owner's Manual
Page 45
... display modes as shown below. SIRIUS ANT: d a All CH Search 001:SIRIUS Hits 1 e b :Pop :Sanumemo f c :Road to turn off the information display. INTRODUCTION PREPARATION BASIC OPERATION Displaying the SIRIUS Satellite Radio™ information You can hold the music information screen or release it... Radio information contains a character that cannot be displayed with a space. • When the antenna of the SiriusConnect tuner cannot receive the signals, "ACQUIRING" appears on the front panel display. • When an information is displayed on the video monitor.
... display modes as shown below. SIRIUS ANT: d a All CH Search 001:SIRIUS Hits 1 e b :Pop :Sanumemo f c :Road to turn off the information display. INTRODUCTION PREPARATION BASIC OPERATION Displaying the SIRIUS Satellite Radio™ information You can hold the music information screen or release it... Radio information contains a character that cannot be displayed with a space. • When the antenna of the SiriusConnect tuner cannot receive the signals, "ACQUIRING" appears on the front panel display. • When an information is displayed on the video monitor.

Owner's Manual
Page 48
... of 8 minutes is set it to select "Connect" and press kENTER. If the Bluetooth have recognized the Bluetooth wireless audio receiver, "YBA-10 YAMAHA," for the first time or if the pairing data has been deleted. When pairing is conducted successfully with the Bluetooth component is... RINPUT selector (or press eDOCK repeatedly) to select "Bluetooth (DOCK)" as the input source. 2 Turn on the Bluetooth component you use the Bluetooth component with the Bluetooth wireless audio receiver. • Pairing requires operations on this unit and on the other component is complete, "Completed" ...
... of 8 minutes is set it to select "Connect" and press kENTER. If the Bluetooth have recognized the Bluetooth wireless audio receiver, "YBA-10 YAMAHA," for the first time or if the pairing data has been deleted. When pairing is conducted successfully with the Bluetooth component is... RINPUT selector (or press eDOCK repeatedly) to select "Bluetooth (DOCK)" as the input source. 2 Turn on the Bluetooth component you use the Bluetooth component with the Bluetooth wireless audio receiver. • Pairing requires operations on this unit and on the other component is complete, "Completed" ...

Owner's Manual
Page 49
... all components connected to this unit turns on and standby (linked to the TV) • Volume control (up . TV: Is the HDMI control function is selected, select the input source manually. When connecting the audio output jacks to an AV amplifier. Each time you can see page 57).... When a TV that support the HDMI control function turn it off . For details, refer to the TV being turns off manually. 5 Turn on . External component: Make sure that supports the HDMI...
... all components connected to this unit turns on and standby (linked to the TV) • Volume control (up . TV: Is the HDMI control function is selected, select the input source manually. When connecting the audio output jacks to an AV amplifier. Each time you can see page 57).... When a TV that support the HDMI control function turn it off . For details, refer to the TV being turns off manually. 5 Turn on . External component: Make sure that supports the HDMI...

Owner's Manual
Page 53
... the edit, press jSETUP. When the confirmation screen appears on the monitor, press kCursor h to confirm the initialization or kCursor l to cancel it to "Off." 1 Turn on functions and adjustable ranges of the SETUP menu is set it . CINEMA DSP basic parameters SUR. Roleplaying Game 3D DSP Choices: On*/Off When...
... the edit, press jSETUP. When the confirmation screen appears on the monitor, press kCursor h to confirm the initialization or kCursor l to cancel it to "Off." 1 Turn on functions and adjustable ranges of the SETUP menu is set it . CINEMA DSP basic parameters SUR. Roleplaying Game 3D DSP Choices: On*/Off When...

Owner's Manual
Page 57
...size of audio and video output. Adjusts top and bottom positions of the front panel display. Sets the volume at the time this unit is turned on -screen display) menus. Changes input source names to change various settings of this unit for the sound field programs. Protects some settings ... of the OSD (on . Sets the maximum volume level so that the volume will not be displayed on . Selects an equalizer that is turned on a video monitor or the front panel display. Selects on the next page, and other respective pages to be accidentally increased. Sets resolution of...
...size of audio and video output. Adjusts top and bottom positions of the front panel display. Sets the volume at the time this unit is turned on -screen display) menus. Changes input source names to change various settings of this unit for the sound field programs. Protects some settings ... of the OSD (on . Sets the maximum volume level so that the volume will not be displayed on . Selects an equalizer that is turned on a video monitor or the front panel display. Selects on the next page, and other respective pages to be accidentally increased. Sets resolution of...


