
Owner's Manual
Page 4
... NOTE: This product has been tested and found to be the source of interference, which can not locate the appropriate retailer, please contact Yamaha Electronics Corp., U.S.A. 6660 Orangethorpe Ave, Buena Park, CA 90620. This product, when installed as radiators, heat registers, stoves, or other...following measures: Relocate either this product or the device that interference will not result in to avoid injury from the apparatus. 11 Only use only high quality shielded cables. In the case of product. REFER SERVICING TO QUALIFIED SERVICE PERSONNEL. • Explanation...
... NOTE: This product has been tested and found to be the source of interference, which can not locate the appropriate retailer, please contact Yamaha Electronics Corp., U.S.A. 6660 Orangethorpe Ave, Buena Park, CA 90620. This product, when installed as radiators, heat registers, stoves, or other...following measures: Relocate either this product or the device that interference will not result in to avoid injury from the apparatus. 11 Only use only high quality shielded cables. In the case of product. REFER SERVICING TO QUALIFIED SERVICE PERSONNEL. • Explanation...
Owner's Manual
Page 5
...for any reasons. 15 When not planning to use this unit for long periods of plug to hot, and do not pull the cable. 11 Do not clean this unit. Using this unit. - In this state, this unit is connected to the following conditions: Buena Park, ... 714-670-0108 AV Receiver RX-Z11 - WARNING TO REDUCE THE RISK OF FIRE OR ELECTRIC SHOCK, DO NOT EXPOSE THIS UNIT TO RAIN OR MOISTURE. FOR CANADIAN CUSTOMERS To prevent electric shock, match wide blade of time (i.e. COMPLIANCE INFORMATION STATEMENT (DECLARATION OF CONFORMITY PROCEDURE) Responsible Party: Yamaha Electronics Corporation, U.S.A....
...for any reasons. 15 When not planning to use this unit for long periods of plug to hot, and do not pull the cable. 11 Do not clean this unit. Using this unit. - In this state, this unit is connected to the following conditions: Buena Park, ... 714-670-0108 AV Receiver RX-Z11 - WARNING TO REDUCE THE RISK OF FIRE OR ELECTRIC SHOCK, DO NOT EXPOSE THIS UNIT TO RAIN OR MOISTURE. FOR CANADIAN CUSTOMERS To prevent electric shock, match wide blade of time (i.e. COMPLIANCE INFORMATION STATEMENT (DECLARATION OF CONFORMITY PROCEDURE) Responsible Party: Yamaha Electronics Corporation, U.S.A....

Owner's Manual
Page 6
Contents Introduction Notices 8 Features 10 Getting started 11 Quick start guide 13 Preparation Connections 20 Optimizing the speaker setting for your listening room (YPAO 46 Before starting the automatic setup 46 Using the ... Using Network/USB features 80 Navigating the network and USB menus 80 Remote control operation 81 Using a PC server or Yamaha MCX-2000 82 Installing Windows Media Player 11 on the Yamaha MCX-2000 82 Using the Internet Radio 83 Storing your PC 82 Registering this unit by using the graphical user interface...
Contents Introduction Notices 8 Features 10 Getting started 11 Quick start guide 13 Preparation Connections 20 Optimizing the speaker setting for your listening room (YPAO 46 Before starting the automatic setup 46 Using the ... Using Network/USB features 80 Navigating the network and USB menus 80 Remote control operation 81 Using a PC server or Yamaha MCX-2000 82 Installing Windows Media Player 11 on the Yamaha MCX-2000 82 Using the Internet Radio 83 Storing your PC 82 Registering this unit by using the graphical user interface...

Owner's Manual
Page 9
Introduction Introduction Features 10 Getting started 11 Supplied accessories ...11 Using the remote control ...12 Opening and closing the front panel door 12 Quick start guide 13 Preparation: Check the items 13 Step 1: Set up your speakers ...14 Step 2: Connect your Blu-ray Disc/HD DVD player and other components 16 Step 3: Turn on the power and start playback 17 What do you want to do with this unit 18
Introduction Introduction Features 10 Getting started 11 Supplied accessories ...11 Using the remote control ...12 Opening and closing the front panel door 12 Quick start guide 13 Preparation: Check the items 13 Step 1: Set up your speakers ...14 Step 2: Connect your Blu-ray Disc/HD DVD player and other components 16 Step 3: Turn on the power and start playback 17 What do you want to do with this unit 18

Owner's Manual
Page 10
...-10, sold separately) ◆ Neural-THX Surround decoder to play back the XM HD content of XM Satellite Radio broadcasts in multi-channels, resulting in 11-channel power amplifier ◆ Minimum RMS output power (20 Hz to 20 kHz, 0.04% THD, 8 Ω) Front: 140 W + 140 W Center: 140 W... as the MP3 format) to that of this unit by using a Web browser ☞ P. 120 Automatic speaker setup features ◆ Advanced YPAO (Yamaha Parametric Room Acoustic Optimizer) for automatic speaker setup ☞ P. 46 ◆ Specialized parametric equalizer for the standing wave reduction ☞ P. 48 &#...
...-10, sold separately) ◆ Neural-THX Surround decoder to play back the XM HD content of XM Satellite Radio broadcasts in multi-channels, resulting in 11-channel power amplifier ◆ Minimum RMS output power (20 Hz to 20 kHz, 0.04% THD, 8 Ω) Front: 140 W + 140 W Center: 140 W... as the MP3 format) to that of this unit by using a Web browser ☞ P. 120 Automatic speaker setup features ◆ Advanced YPAO (Yamaha Parametric Room Acoustic Optimizer) for automatic speaker setup ☞ P. 46 ◆ Specialized parametric equalizer for the standing wave reduction ☞ P. 48 &#...
Owner's Manual
Page 11
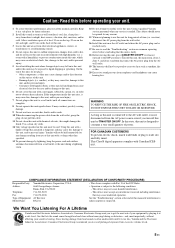
... on the inside of the battery compartment. Remote control POWER POWER STANDBY POWER TV AV MULTI V-AUX PHONO BD HD DVD CBL SAT DVD DTV TUNER DOCK CD DVR ... MODE VOLUME PRESET/CH MENU ENTER CAT. Avoid touching the leaked material or letting it come into place. 11 En and Canada models) Microphone base FRONT DIRECTION AM loop antenna (For HD Radio tuning) (U.S.A. DECODE 6...0 10 ENT. model) (U.S.A. Introduction Getting started Supplied accessories Check that you received all of the batteries if you use different types of batteries (such as these different types of batteries...
... on the inside of the battery compartment. Remote control POWER POWER STANDBY POWER TV AV MULTI V-AUX PHONO BD HD DVD CBL SAT DVD DTV TUNER DOCK CD DVR ... MODE VOLUME PRESET/CH MENU ENTER CAT. Avoid touching the leaked material or letting it come into place. 11 En and Canada models) Microphone base FRONT DIRECTION AM loop antenna (For HD Radio tuning) (U.S.A. DECODE 6...0 10 ENT. model) (U.S.A. Introduction Getting started Supplied accessories Check that you received all of the batteries if you use different types of batteries (such as these different types of batteries...
Owner's Manual
Page 13
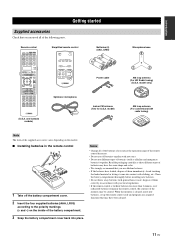
... center speaker 3. Two front presence speakers 5. Two rear presence speakers ❏ Active subwoofers x 2 Select active subwoofers equipped with an RCA input jack. ❏ Speaker cable x 11 ❏ Subwoofer cables x 2 Select monaural RCA cables. ❏ HDMI cables x 2 Select HDMI cables shorter than 5 meters (16 feet) with an HDMI input jack. 13 En...
... center speaker 3. Two front presence speakers 5. Two rear presence speakers ❏ Active subwoofers x 2 Select active subwoofers equipped with an RCA input jack. ❏ Speaker cable x 11 ❏ Subwoofer cables x 2 Select monaural RCA cables. ❏ HDMI cables x 2 Select HDMI cables shorter than 5 meters (16 feet) with an HDMI input jack. 13 En...

Owner's Manual
Page 14
.... 3 Do not let the bare speaker wires touch each other speaker configurations If you want to this unit. 1 2 3 4 1 Make sure that this unit. Front left 11.2/11.1 Front right Center Surround left Surround right Surround Surround back left back right Front presence left Front presence right Rear presence left Rear presence right... left right 7.2/7.1 6.2/6.1 5.2/5.1 3.2/3.1 2.2/2.1 14 En Quick start guide Step 1: Set up your speakers Place your speakers in the room and connect them to connect less than 11 speakers and 2 subwoofers, connect the speakers as follows.
.... 3 Do not let the bare speaker wires touch each other speaker configurations If you want to this unit. 1 2 3 4 1 Make sure that this unit. Front left 11.2/11.1 Front right Center Surround left Surround right Surround Surround back left back right Front presence left Front presence right Rear presence left Rear presence right... left right 7.2/7.1 6.2/6.1 5.2/5.1 3.2/3.1 2.2/2.1 14 En Quick start guide Step 1: Set up your speakers Place your speakers in the room and connect them to connect less than 11 speakers and 2 subwoofers, connect the speakers as follows.

Owner's Manual
Page 21
... in) or more realistic front-to use a center speaker, you use it to enjoy the CINEMA DSP and multi-channel audio sources. ■ 11.2/11.1 -channel speaker layout 11.2/11.1-channel speaker layout is highly recommended for some reason it . Center speaker The center speaker is not practical to -back transitions. Preparation Connections Placing...
... in) or more realistic front-to use a center speaker, you use it to enjoy the CINEMA DSP and multi-channel audio sources. ■ 11.2/11.1 -channel speaker layout 11.2/11.1-channel speaker layout is highly recommended for some reason it . Center speaker The center speaker is not practical to -back transitions. Preparation Connections Placing...

Owner's Manual
Page 22
... SR LSW SL C FL FR 30˚ SL 60˚ SL 80˚ SBL SR SR SBR 30 cm (12 in the 11.2/11.1-channel speaker layout. For the smooth and unbroken sound field behind the listening position. If you set "Surround Back" to the SUR.BACK/BI...Connections ■ 7.2/7.1 (or 6.2/6.1) -channel speaker layout See page 23 for connection information. ■ 5.2/5.1 -channel speaker layout See page 23 for the 11.2/11.1-channel speaker layout (see page 21). Front left and right speakers Connect the surround speakers to -back transitions. Surround left and right speakers Center speaker...
... SR LSW SL C FL FR 30˚ SL 60˚ SL 80˚ SBL SR SR SBR 30 cm (12 in the 11.2/11.1-channel speaker layout. For the smooth and unbroken sound field behind the listening position. If you set "Surround Back" to the SUR.BACK/BI...Connections ■ 7.2/7.1 (or 6.2/6.1) -channel speaker layout See page 23 for connection information. ■ 5.2/5.1 -channel speaker layout See page 23 for the 11.2/11.1-channel speaker layout (see page 21). Front left and right speakers Connect the surround speakers to -back transitions. Surround left and right speakers Center speaker...

Owner's Manual
Page 23
... ZONE/PRESENCE, FRONT ZONE/PRESENCE, and/or EXTRA SP speaker terminals for the Zone 2, Zone 3, and/or Zone 4 speakers (see page 143). ■ For the 11.2/11.1 (or 9.2/9.1) -channel speaker setting Right front presence speaker Right rear presence speaker Left rear presence speaker Left front presence speaker SPEAKERS + R REAR PRESENCE /ZONE FRONT...
... ZONE/PRESENCE, FRONT ZONE/PRESENCE, and/or EXTRA SP speaker terminals for the Zone 2, Zone 3, and/or Zone 4 speakers (see page 143). ■ For the 11.2/11.1 (or 9.2/9.1) -channel speaker setting Right front presence speaker Right rear presence speaker Left rear presence speaker Left front presence speaker SPEAKERS + R REAR PRESENCE /ZONE FRONT...

Owner's Manual
Page 36
... any home use the external amplifiers for the surround back channel, connect it to "ON", the power consumption is set "PREAMP MODE" to enjoy the 11.2-channel surround sound in the following cases: - Connections ■ Connecting external amplifiers This unit has more power to the speaker output -
... any home use the external amplifiers for the surround back channel, connect it to "ON", the power consumption is set "PREAMP MODE" to enjoy the 11.2-channel surround sound in the following cases: - Connections ■ Connecting external amplifiers This unit has more power to the speaker output -

Owner's Manual
Page 51
... Start:ENTER 4 Press 9k to select "Start". Make sure that the arrow mark on the microphone base. Choices: 1, 2, 3, 4, 5, 6, 7, 8 11 Press 9ENTER to start the measurement at 2nd listening position Next:ENTER Skip: 51 En Following menu screen appears in the check box of the ...Put the microphone at the next listening position. y To skip the measurements at the remaining listening positions, press 9 n. 12 Repeat steps 10 and 11 until the measurements at all listening points are seated in your listening room (YPAO) 3 Press IMENU on the remote control. This unit starts the ...
... Start:ENTER 4 Press 9k to select "Start". Make sure that the arrow mark on the microphone base. Choices: 1, 2, 3, 4, 5, 6, 7, 8 11 Press 9ENTER to start the measurement at 2nd listening position Next:ENTER Skip: 51 En Following menu screen appears in the check box of the ...Put the microphone at the next listening position. y To skip the measurements at the remaining listening positions, press 9 n. 12 Repeat steps 10 and 11 until the measurements at all listening points are seated in your listening room (YPAO) 3 Press IMENU on the remote control. This unit starts the ...

Owner's Manual
Page 63
See page 86 for reproducing monaural video sources such as a classic movie in 11-channel stereo. ■ Surround decoder mode SUR. When you play back multi-channel sources, this program to play back compression artifacts in an atmosphere of ...
See page 86 for reproducing monaural video sources such as a classic movie in 11-channel stereo. ■ Surround decoder mode SUR. When you play back multi-channel sources, this program to play back compression artifacts in an atmosphere of ...
Owner's Manual
Page 82
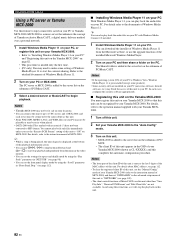
... over a personal network. 1 Install Windows Media Player 11 on your PC, or register this unit on your Yamaha MCX-2000. • Refer to "Installing Windows Media Player 11 on your PC" and "Registering this unit other than "View Play Info", "Receive PCM Stream" and "Edit Client title" are not available.... Notes • Yamaha MCX-2000 may not be for repeat...
... over a personal network. 1 Install Windows Media Player 11 on your PC, or register this unit on your Yamaha MCX-2000. • Refer to "Installing Windows Media Player 11 on your PC" and "Registering this unit other than "View Play Info", "Receive PCM Stream" and "Edit Client title" are not available.... Notes • Yamaha MCX-2000 may not be for repeat...

Owner's Manual
Page 94
... for pure hi-fi stereo sound when playing 2channel analog sources. Select "High" or "Low" to the subwoofer in the 11-channel stereo mode. Control range: 0 to 100% ■ Compressed Music Enhancer mode parameter descriptions The Compressed Music Enhancer mode ...Level ("Straight Enhancer" and "11ch Enhancer" only) Features Straight enhancer or 11-channel enhancer effect level. Control range: 0 to 100% Source sound Level Rev. Graphical user interface (GUI) menu Sound field parameter ...
... for pure hi-fi stereo sound when playing 2channel analog sources. Select "High" or "Low" to the subwoofer in the 11-channel stereo mode. Control range: 0 to 100% ■ Compressed Music Enhancer mode parameter descriptions The Compressed Music Enhancer mode ...Level ("Straight Enhancer" and "11ch Enhancer" only) Features Straight enhancer or 11-channel enhancer effect level. Control range: 0 to 100% Source sound Level Rev. Graphical user interface (GUI) menu Sound field parameter ...

Owner's Manual
Page 109
... party mode. See page 139 for Zone 2, Zone 3, and Zone 4. Control range: -30.0 dB to R10 Advanced Operation 109 En Main 11ch Stereo (Main zone 11-channel stereo) Use this feature to select whether the sound field program of this unit, the sound is output from both the headphones and the...
... party mode. See page 139 for Zone 2, Zone 3, and Zone 4. Control range: -30.0 dB to R10 Advanced Operation 109 En Main 11ch Stereo (Main zone 11-channel stereo) Use this feature to select whether the sound field program of this unit, the sound is output from both the headphones and the...

Owner's Manual
Page 149
... the backlight mode to the FAMP position.When operating the component selected by pressing MPROGRAM on the remote control) repeatedly. See page 12 - 11 - 124 - 124 124 124 126 11 126 - 130 Additional Information 149 En Remedy The remote control will function within a maximum range of 6 m (20 ft) and no longer available...
... the backlight mode to the FAMP position.When operating the component selected by pressing MPROGRAM on the remote control) repeatedly. See page 12 - 11 - 124 - 124 124 124 126 11 126 - 130 Additional Information 149 En Remedy The remote control will function within a maximum range of 6 m (20 ft) and no longer available...

Owner's Manual
Page 150
... be recognized. HDCP authentication failed. This unit does not recall the selected item by each radio station. The PC does not have Windows Media Player 11 or Windows Media Connect 2.0 installed in it properly. The PC or MCX-2000 that can be played on your USB device. Remedy Set the DHCP... recognized the USB storage device as an illegal device. The music files and directories are inserted before turning this unit off . Install Windows Media Player 11 or Windows Media Connect 2.0 in the FAT area. See page 111 40 - - - 82 83 - - - - 83 83 84 40 82 83 83 150 En The music...
... be recognized. HDCP authentication failed. This unit does not recall the selected item by each radio station. The PC does not have Windows Media Player 11 or Windows Media Connect 2.0 installed in it properly. The PC or MCX-2000 that can be played on your USB device. Remedy Set the DHCP... recognized the USB storage device as an illegal device. The music files and directories are inserted before turning this unit off . Install Windows Media Player 11 or Windows Media Connect 2.0 in the FAT area. See page 111 40 - - - 82 83 - - - - 83 83 84 40 82 83 83 150 En The music...

Owner's Manual
Page 151
... Internet Radio. Error message Please wait (Starting Server) Connect error Disconnected Access error Unable to play back the songs currently Make sure Windows Media Player 11 or Windows Media - player has been disconnected from your Turn off this unit. There is installed on your PC. to this unit no longer exists...
... Internet Radio. Error message Please wait (Starting Server) Connect error Disconnected Access error Unable to play back the songs currently Make sure Windows Media Player 11 or Windows Media - player has been disconnected from your Turn off this unit. There is installed on your PC. to this unit no longer exists...
