MCXSP10 Manual
Page 5
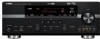
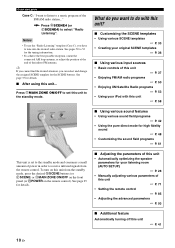
... this manual for the SCENE feature .... 85 Controlling this unit, a TV, or other components.... 86 Setting remote control codes 88 Resetting all remote control codes 89 Using multi-zone configuration 90 Connecting Zone 2 90 Controlling Zone 2 91 Advanced setup 93 Using the ...71 1 SOUND MENU 72 2 INPUT MENU 78 3 OPTION MENU 81 Remote control features 85 Using the remote control for the information about each position of the parts on the front panel or the remote control. INTRODUCTION PREPARATION BASIC OPERATION ADVANCED OPERATION Contents INTRODUCTION Notice 2 Features 3 ...
... this manual for the SCENE feature .... 85 Controlling this unit, a TV, or other components.... 86 Setting remote control codes 88 Resetting all remote control codes 89 Using multi-zone configuration 90 Connecting Zone 2 90 Controlling Zone 2 91 Advanced setup 93 Using the ...71 1 SOUND MENU 72 2 INPUT MENU 78 3 OPTION MENU 81 Remote control features 85 Using the remote control for the information about each position of the parts on the front panel or the remote control. INTRODUCTION PREPARATION BASIC OPERATION ADVANCED OPERATION Contents INTRODUCTION Notice 2 Features 3 ...
MCXSP10 Manual
Page 6
...the "HDMI" logo and "High-Definition Multimedia Interface" are registered trademarks of HDMI Licensing LLC. "SILENT CINEMA" is too late, Yamaha and the Electronic Industries Association's Consumer Electronics Group recommend you to change in the U.S. NOTICE Notice About this manual for your operation....most importantly, without annoying blaring or distortion - In case of differences between the front panel and the remote control, the button name on the remote control. One that lets the sound come through loud and clear without affecting your sensitive hearing. Design and ...
...the "HDMI" logo and "High-Definition Multimedia Interface" are registered trademarks of HDMI Licensing LLC. "SILENT CINEMA" is too late, Yamaha and the Electronic Industries Association's Consumer Electronics Group recommend you to change in the U.S. NOTICE Notice About this manual for your operation....most importantly, without annoying blaring or distortion - In case of differences between the front panel and the remote control, the button name on the remote control. One that lets the sound come through loud and clear without affecting your sensitive hearing. Design and ...

MCXSP10 Manual
Page 7
...charging capability Other features ◆ YPAO (Yamaha Parametric Room Acoustic Optimizer) for automatic speaker setup ◆ 192-kHz/24-bit D/A converter ◆ OSD (on the models. 3 En Remote control CODE SET TRANSMIT POWER TV POWER AV STANDBY POWER CD DVD DOCK V-AUX ...Zone 2 using ZONE CONTROL ◆ Bi-amplification connection capability ◆ Sleep timer Check that allow you received all sources ◆ Cinema and music night listening modes ◆ Remote control with the SCENE function Sound field programs ◆ Proprietary Yamaha technology for the creation...
...charging capability Other features ◆ YPAO (Yamaha Parametric Room Acoustic Optimizer) for automatic speaker setup ◆ 192-kHz/24-bit D/A converter ◆ OSD (on the models. 3 En Remote control CODE SET TRANSMIT POWER TV POWER AV STANDBY POWER CD DVD DOCK V-AUX ...Zone 2 using ZONE CONTROL ◆ Bi-amplification connection capability ◆ Sleep timer Check that allow you received all sources ◆ Cinema and music night listening modes ◆ Remote control with the SCENE function Sound field programs ◆ Proprietary Yamaha technology for the creation...
MCXSP10 Manual
Page 8
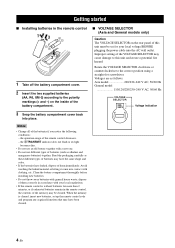
...and create a potential fire hazard. Improper setting of the VOLTAGE SELECTOR may cause damage to this unit must be set up the remote control code and program any acquired functions that may be cleared. Read the packaging carefully as follows: Asia model 220/230-240 V AC...VOLTAGE SELECTOR 230240V Voltage indication Notes • Change all of the batteries if you notice the following conditions: - the operation range of the remote control decreases. - GETTING STARTED Getting started ■ Installing batteries in accordance with a new one. • Do not use an old battery ...
...and create a potential fire hazard. Improper setting of the VOLTAGE SELECTOR may cause damage to this unit must be set up the remote control code and program any acquired functions that may be cleared. Read the packaging carefully as follows: Asia model 220/230-240 V AC...VOLTAGE SELECTOR 230240V Voltage indication Notes • Change all of the batteries if you notice the following conditions: - the operation range of the remote control decreases. - GETTING STARTED Getting started ■ Installing batteries in accordance with a new one. • Do not use an old battery ...
MCXSP10 Manual
Page 14
.... Press AMAIN ZONE ON/OFF to set to the standby mode and consumes a small amount of this unit ☞ P. 71 • Setting the remote control ☞ P. 85 • Adjusting the advanced parameters ☞ P. 93 ■ Additional feature Automatically turning off this unit ☞ P. 37 •...28 • Manually adjusting various parameters of power in order to receive infrared signals from the standby mode, press the desired FSCENE buttons (or FSCENE) or AMAIN ZONE ON/OFF on the front panel (or HPOWER on the remote control). See pages 50 to 52 for high fidelity sound ☞ ...
.... Press AMAIN ZONE ON/OFF to set to the standby mode and consumes a small amount of this unit ☞ P. 71 • Setting the remote control ☞ P. 85 • Adjusting the advanced parameters ☞ P. 93 ■ Additional feature Automatically turning off this unit ☞ P. 37 •...28 • Manually adjusting various parameters of power in order to receive infrared signals from the standby mode, press the desired FSCENE buttons (or FSCENE) or AMAIN ZONE ON/OFF on the front panel (or HPOWER on the remote control). See pages 50 to 52 for high fidelity sound ☞ ...
MCXSP10 Manual
Page 15
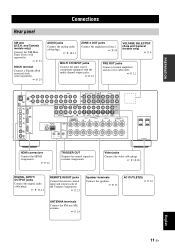
...plugs. ☞ P. 18-20 DIGITAL INPUT/ OUTPUT jacks Connect the digital audio cable plugs. ☞ P. 19-21 REMOTE IN/OUT jacks Connect the remote control input and output jacks of the Yamaha components. ☞ P. 23 Speaker terminals Connect the speakers. ☞ P. 13 AC OUTLET(S) ☞ P. 24 ... CONNECTIONS Rear panel XM jack (U.S.A. and Canada models only) Connect the XM MiniTuner Dock (sold separately). ☞ P. 53 DOCK terminal Connect a Yamaha iPod universal dock (sold separately). ☞ P. 23 AUDIO jacks Connect the analog audio cable plugs. ☞ P. 18-21 ZONE 2 OUT ...
...plugs. ☞ P. 18-20 DIGITAL INPUT/ OUTPUT jacks Connect the digital audio cable plugs. ☞ P. 19-21 REMOTE IN/OUT jacks Connect the remote control input and output jacks of the Yamaha components. ☞ P. 23 Speaker terminals Connect the speakers. ☞ P. 13 AC OUTLET(S) ☞ P. 24 ... CONNECTIONS Rear panel XM jack (U.S.A. and Canada models only) Connect the XM MiniTuner Dock (sold separately). ☞ P. 53 DOCK terminal Connect a Yamaha iPod universal dock (sold separately). ☞ P. 23 AUDIO jacks Connect the analog audio cable plugs. ☞ P. 18-21 ZONE 2 OUT ...

MCXSP10 Manual
Page 27
... before making connections. ■ Using REMOTE IN/OUT jacks When the components are the Yamaha products and have the capability of the SCENE control signals, this unit using the supplied remote control. DOCK Yamaha iPod universal dock (such as the ...REMOTE OUT jack of this unit and the remote control input jack of the SCENE buttons. Connect a Yamaha iPod universal dock to "OFF" (see page 96). PREPARATION ■ Connecting a Yamaha iPod universal dock This unit is not the Yamaha product, set "SCENE IR" in S V L R O Infrared signal receiver or Yamaha component Yamaha...
... before making connections. ■ Using REMOTE IN/OUT jacks When the components are the Yamaha products and have the capability of the SCENE control signals, this unit using the supplied remote control. DOCK Yamaha iPod universal dock (such as the ...REMOTE OUT jack of this unit and the remote control input jack of the SCENE buttons. Connect a Yamaha iPod universal dock to "OFF" (see page 96). PREPARATION ■ Connecting a Yamaha iPod universal dock This unit is not the Yamaha product, set "SCENE IR" in S V L R O Infrared signal receiver or Yamaha component Yamaha...
MCXSP10 Manual
Page 29
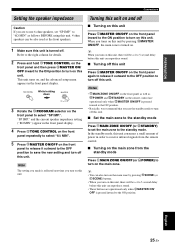
... this unit, there will be also used as the front speakers. 1 Make sure this unit consumes a small amount of power in order to receive infrared signals from the remote control. ■ Turning on the main zone from the standby mode Press AMAIN ZONE ON/OFF (or HPOWER) to turn on this unit. TONE... you turn on the front panel to use the standby mode to turn on this unit. to "6Ω MIN" as HPOWER and GSTANDBY on the remote control are operational only when BMASTER ON/ OFF is pressed inward to the ON position. • Basically, we recommend that you use 6 ohm speakers, set ...
... this unit, there will be also used as the front speakers. 1 Make sure this unit consumes a small amount of power in order to receive infrared signals from the remote control. ■ Turning on the main zone from the standby mode Press AMAIN ZONE ON/OFF (or HPOWER) to turn on this unit. TONE... you turn on the front panel to use the standby mode to turn on this unit. to "6Ω MIN" as HPOWER and GSTANDBY on the remote control are operational only when BMASTER ON/ OFF is pressed inward to the ON position. • Basically, we recommend that you use 6 ohm speakers, set ...
MCXSP10 Manual
Page 31
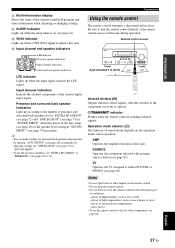
... the remote control The remote control transmits a directional infrared ray. Be sure to aim the remote control directly at the component you want to operate. VTRANSMIT indicator Flashes while the remote control is on the remote control. • Do not drop the remote control. • Do not leave or store the remote control in ...manually by adjusting settings for "SUR.B L/R SP" (see page 73) in "SOUND MENU" when this window at the remote control sensor on the operation mode selector position. SOURCE Operates the component selected with an input selector button (see pages 29 or 72...
... the remote control The remote control transmits a directional infrared ray. Be sure to aim the remote control directly at the component you want to operate. VTRANSMIT indicator Flashes while the remote control is on the remote control. • Do not drop the remote control. • Do not leave or store the remote control in ...manually by adjusting settings for "SUR.B L/R SP" (see page 73) in "SOUND MENU" when this window at the remote control sensor on the operation mode selector position. SOURCE Operates the component selected with an input selector button (see pages 29 or 72...
MCXSP10 Manual
Page 32
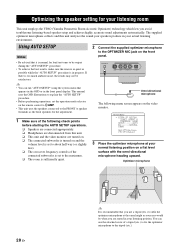
...and the volume level is set to about half way (or slightly less). ❏ The crossover frequency controls of the connected subwoofer is set the operation mode selector on the remote control to KAMP. • This unit uses the speakers connected to the FRONT A speaker terminals as the ...heading upward. OPTIMIZING THE SPEAKER SETTING FOR YOUR LISTENING ROOM Optimizing the speaker setting for your listening room This unit employs the YPAO (Yamaha Parametric Room Acoustic Optimizer) technology which lets you use the attached screw of the following menu screen appears on the video monitor. ...
...and the volume level is set to about half way (or slightly less). ❏ The crossover frequency controls of the connected subwoofer is set the operation mode selector on the remote control to KAMP. • This unit uses the speakers connected to the FRONT A speaker terminals as the ...heading upward. OPTIMIZING THE SPEAKER SETTING FOR YOUR LISTENING ROOM Optimizing the speaker setting for your listening room This unit employs the YPAO (Yamaha Parametric Room Acoustic Optimizer) technology which lets you use the attached screw of the following menu screen appears on the video monitor. ...
MCXSP10 Manual
Page 37
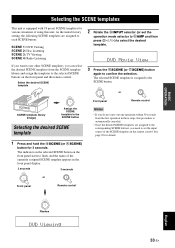
... the selection. Select the desired SCENE template 2 Rotate the IINPUT selector (or set the input source of the SCENE template on the remote control. See page 85 for details. 1 Press and hold the FSCENE (or FSCENE) button for various situations of using this procedure is ... can select the desired SCENE templates from the last operation in the front panel display. 3 seconds 3 seconds 1 or 1 Front panel Remote control English 1 Flashes DVD Viewing 33 En As the initial factory setting, the following SCENE templates are assigned to the corresponding SCENE buttons, you...
... the selection. Select the desired SCENE template 2 Rotate the IINPUT selector (or set the input source of the SCENE template on the remote control. See page 85 for details. 1 Press and hold the FSCENE (or FSCENE) button for various situations of using this procedure is ... can select the desired SCENE templates from the last operation in the front panel display. 3 seconds 3 seconds 1 or 1 Front panel Remote control English 1 Flashes DVD Viewing 33 En As the initial factory setting, the following SCENE templates are assigned to the corresponding SCENE buttons, you...
MCXSP10 Manual
Page 40
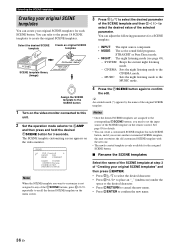
... mode selector to KAMP and then press and hold the desired FSCENE button for each SCENE button. The SCENE template customizing screen appears on the remote control. See page 85 for details. • You can refer to the preset 18 SCENE templates to confirm the edit.
... mode selector to KAMP and then press and hold the desired FSCENE button for each SCENE button. The SCENE template customizing screen appears on the remote control. See page 85 for details. • You can refer to the preset 18 SCENE templates to confirm the edit.

MCXSP10 Manual
Page 41
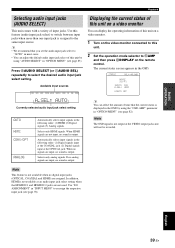
...CBL DVD MD/CD-R TUNER CD XM PHONO INPUT: DVD Currently selected input source y The corresponding input selector button on the remote control for the currently selected input source lights up for details about sound field programs. Sci-Fi Currently selected sound field program Note ... PLAYBACK Caution Extreme caution should be selected when the component connected to the desired output level. Basic procedure 1 Turn on the remote control to select the desired input source. Before performing the following operations, set the operation mode selector on the video monitor connected to...
...CBL DVD MD/CD-R TUNER CD XM PHONO INPUT: DVD Currently selected input source y The corresponding input selector button on the remote control for the currently selected input source lights up for details about sound field programs. Sci-Fi Currently selected sound field program Note ... PLAYBACK Caution Extreme caution should be selected when the component connected to the desired output level. Basic procedure 1 Turn on the remote control to select the desired input source. Before performing the following operations, set the operation mode selector on the video monitor connected to...
MCXSP10 Manual
Page 43
... by using the "OSD-AMP" parameter in "OPTION MENU" (see page 82). Use "I/O ASSIGNMENT" in "INPUT MENU" to KAMP and then press ODISPLAY on the remote control. If no sound is assigned to select the desired audio input jack select setting. The current status screen appears in the OSD. Note The OSD...
... by using the "OSD-AMP" parameter in "OPTION MENU" (see page 82). Use "I/O ASSIGNMENT" in "INPUT MENU" to KAMP and then press ODISPLAY on the remote control. If no sound is assigned to select the desired audio input jack select setting. The current status screen appears in the OSD. Note The OSD...

MCXSP10 Manual
Page 44
...OPTIMIZER MIC VIDEO AUX S VIDEO VIDEO L AUDIO R OPTICAL Press the input selector buttons (A) on the remote control to mute the audio output. Muting the audio output Press LMUTE on the remote control to select a video source and then an audio source. The audio information about the input source appears ... SET MENU . ;AUTO SETUP ;MANUAL SETUP .A;SIGNAL INFO [ ]/[ ]:Up/Down [ENTER]:Enter 2 Press Dn repeatedly to the PHONES jack on the remote control. Playing video sources in the OSD. 3 Press Dl / h to toggle between the audio and video information displays. 4 Press NSET MENU on the...
...OPTIMIZER MIC VIDEO AUX S VIDEO VIDEO L AUDIO R OPTICAL Press the input selector buttons (A) on the remote control to mute the audio output. Muting the audio output Press LMUTE on the remote control to select a video source and then an audio source. The audio information about the input source appears ... SET MENU . ;AUTO SETUP ;MANUAL SETUP .A;SIGNAL INFO [ ]/[ ]:Up/Down [ENTER]:Enter 2 Press Dn repeatedly to the PHONES jack on the remote control. Playing video sources in the OSD. 3 Press Dl / h to toggle between the audio and video information displays. 4 Press NSET MENU on the...

MCXSP10 Manual
Page 45
... pressing GSTANDBY (or AMAIN ZONE ON/OFF) to set , the SLEEP indicator lights up SLEEP STRAIGHT ■ Canceling the sleep timer Press MSLEEP on the remote control repeatedly until "SLEEP OFF" appears in the front panel display, and the display returns to the AC OUTLET(S) (see page 24). Flag data encoded in...
... pressing GSTANDBY (or AMAIN ZONE ON/OFF) to set , the SLEEP indicator lights up SLEEP STRAIGHT ■ Canceling the sleep timer Press MSLEEP on the remote control repeatedly until "SLEEP OFF" appears in the front panel display, and the display returns to the AC OUTLET(S) (see page 24). Flag data encoded in...

MCXSP10 Manual
Page 46
...). • When you play back DTS 96/24 sources with clear separation between dialog, sound effects and background music. y • The Yamaha HiFi DSP sound field programs recreate real-world acoustic environments made from almost any sound field programs. Sound field program descriptions y Select a sound ...for details. Notes • When you select an input source, this unit does not apply any stereo or multi-channel sound source. Remote control button Category of the program Name of the program Created sound fields CINEMA DSP or HiFi DSP MOVIE 4 MOVIE Sci-Fi This program ...
...). • When you play back DTS 96/24 sources with clear separation between dialog, sound effects and background music. y • The Yamaha HiFi DSP sound field programs recreate real-world acoustic environments made from almost any sound field programs. Sound field program descriptions y Select a sound ...for details. Notes • When you select an input source, this unit does not apply any stereo or multi-channel sound source. Remote control button Category of the program Name of the program Created sound fields CINEMA DSP or HiFi DSP MOVIE 4 MOVIE Sci-Fi This program ...

MCXSP10 Manual
Page 51
... selector on . Sound field programs BASIC OPERATION English 47 En Enjoying unprocessed input sources (Straight decoding mode) When this unit is turned back on the remote control to select "STRAIGHT".
... selector on . Sound field programs BASIC OPERATION English 47 En Enjoying unprocessed input sources (Straight decoding mode) When this unit is turned back on the remote control to select "STRAIGHT".

MCXSP10 Manual
Page 52
...as the input source. USING AUDIO FEATURES Using audio features Before performing the following operations are stored independently. 1 Press CTONE CONTROL on the remote control repeatedly to select the speaker you want to adjust. R Surround right speaker SUR.B.L Surround back left speaker SUR.B.R Surround...SETUP" (see page 28) and "SPEAKER LEVEL" (see page 73). • The available speaker channels differ depending on the remote control to KAMP. Display Adjusted speaker FRONT L Front left speaker SUR. switching the sound field program - adjusting the "SET MENU" ...
...as the input source. USING AUDIO FEATURES Using audio features Before performing the following operations are stored independently. 1 Press CTONE CONTROL on the remote control repeatedly to select the speaker you want to adjust. R Surround right speaker SUR.B.L Surround back left speaker SUR.B.R Surround...SETUP" (see page 28) and "SPEAKER LEVEL" (see page 73). • The available speaker channels differ depending on the remote control to KAMP. Display Adjusted speaker FRONT L Front left speaker SUR. switching the sound field program - adjusting the "SET MENU" ...

MCXSP10 Manual
Page 53
...NIGHT:CINEMA" when watching films to reduce the dynamic range of film soundtracks and make dialog easier to hear at night. 1 Press RNIGHT on the remote control repeatedly to select "NIGHT:CINEMA" or "NIGHT:MUSIC". y When a night listening mode is selected, the NIGHT indicator lights up in the front panel...the "2ch Stereo" mode. English 49 En Selecting the night listening mode The night listening modes are stored independently. Press PSTEREO on the remote control repeatedly to use this program when "LFE/BASS OUT" is set to the PHONES jack. • The night listening modes may vary ...
...NIGHT:CINEMA" when watching films to reduce the dynamic range of film soundtracks and make dialog easier to hear at night. 1 Press RNIGHT on the remote control repeatedly to select "NIGHT:CINEMA" or "NIGHT:MUSIC". y When a night listening mode is selected, the NIGHT indicator lights up in the front panel...the "2ch Stereo" mode. English 49 En Selecting the night listening mode The night listening modes are stored independently. Press PSTEREO on the remote control repeatedly to use this program when "LFE/BASS OUT" is set to the PHONES jack. • The night listening modes may vary ...


