
MCXSP10 Manual
Page 4
... of the unit. away from the wall outlet, grasp the plug; Use a clean, dry cloth. 12 Only voltage specified on the rear of this before operating your local main voltage BEFORE plugging into the AC wall outlet. FOR CANADIAN CUSTOMERS To prevent electric shock, match wide... blade of time (i.e. Contact qualified Yamaha service personnel when any reasons. 15 When not planning to turn off this unit for your unit. 1 To assure the finest performance, please read the "Troubleshooting" section on the rear panel of power. Retain this Owner's Manual in them, ...
... of the unit. away from the wall outlet, grasp the plug; Use a clean, dry cloth. 12 Only voltage specified on the rear of this before operating your local main voltage BEFORE plugging into the AC wall outlet. FOR CANADIAN CUSTOMERS To prevent electric shock, match wide... blade of time (i.e. Contact qualified Yamaha service personnel when any reasons. 15 When not planning to turn off this unit for your unit. 1 To assure the finest performance, please read the "Troubleshooting" section on the rear panel of power. Retain this Owner's Manual in them, ...
MCXSP10 Manual
Page 8
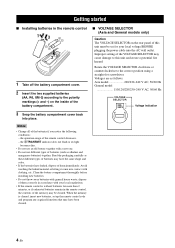
... the battery compartment. 3 Snap the battery compartment cover back into place. ■ VOLTAGE SELECTOR (Asia and General models only) Caution The VOLTAGE SELECTOR on the rear panel of batteries may have leaked, dispose of them correctly in accordance with your local voltage BEFORE plugging the power cable into contact with general house...
... the battery compartment. 3 Snap the battery compartment cover back into place. ■ VOLTAGE SELECTOR (Asia and General models only) Caution The VOLTAGE SELECTOR on the rear panel of batteries may have leaked, dispose of them correctly in accordance with your local voltage BEFORE plugging the power cable into contact with general house...
MCXSP10 Manual
Page 15
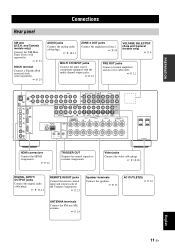
... Connections CONNECTIONS Rear panel XM jack (U.S.A. Video jacks Connect the video cable plugs. ☞ P. 18-20 DIGITAL INPUT/ OUTPUT jacks Connect the digital audio cable plugs. ☞ P. 19-21 REMOTE IN/OUT jacks Connect the remote control input and output jacks of the Yamaha components. &#...control signals to external components. and Canada models only) Connect the XM MiniTuner Dock (sold separately). ☞ P. 53 DOCK terminal Connect a Yamaha iPod universal dock (sold separately). ☞ P. 23 AUDIO jacks Connect the analog audio cable plugs. ☞ P. 18-21 ZONE 2...
... Connections CONNECTIONS Rear panel XM jack (U.S.A. Video jacks Connect the video cable plugs. ☞ P. 18-20 DIGITAL INPUT/ OUTPUT jacks Connect the digital audio cable plugs. ☞ P. 19-21 REMOTE IN/OUT jacks Connect the remote control input and output jacks of the Yamaha components. &#...control signals to external components. and Canada models only) Connect the XM MiniTuner Dock (sold separately). ☞ P. 53 DOCK terminal Connect a Yamaha iPod universal dock (sold separately). ☞ P. 23 AUDIO jacks Connect the analog audio cable plugs. ☞ P. 18-21 ZONE 2...

MCXSP10 Manual
Page 27
...components are the Yamaha products and have the capability of the SCENE buttons. DOCK Yamaha iPod universal dock (such as follows. PREPARATION ■ Connecting a Yamaha iPod universal dock This unit is not the Yamaha product, set "SCENE IR" in S V L R O Infrared signal receiver or Yamaha component Yamaha component (CD or...10, sold separately) where you use one of the SCENE control signals, this unit. Connect a Yamaha iPod universal dock to the DOCK terminal on the rear panel take priority over the ones input at the VIDEO AUX jacks. • To reproduce the source signals...
...components are the Yamaha products and have the capability of the SCENE buttons. DOCK Yamaha iPod universal dock (such as follows. PREPARATION ■ Connecting a Yamaha iPod universal dock This unit is not the Yamaha product, set "SCENE IR" in S V L R O Infrared signal receiver or Yamaha component Yamaha component (CD or...10, sold separately) where you use one of the SCENE control signals, this unit. Connect a Yamaha iPod universal dock to the DOCK terminal on the rear panel take priority over the ones input at the VIDEO AUX jacks. • To reproduce the source signals...

MCXSP10 Manual
Page 57
... United States and Canada. ©2006 XM Satellite Radio Inc. For details, see page 84) to the XM jack on the rear panel of this unit. BASIC OPERATION XM SATELLITE RADIO TUNING XM Satellite Radio tuning XM Satellite Radio offers an extraordinary variety of their respective owners... To ensure optimal reception of the XM Satellite Radio signals, the XM Mini-Tuner Dock must be connected to the XM jack on the rear panel of the XM Satellite Radio broadcasts in multi-channels, resulting in Alaska and Hawaii) and Canada. ■ Information from classical to Customer Agreement...
... United States and Canada. ©2006 XM Satellite Radio Inc. For details, see page 84) to the XM jack on the rear panel of this unit. BASIC OPERATION XM SATELLITE RADIO TUNING XM Satellite Radio tuning XM Satellite Radio offers an extraordinary variety of their respective owners... To ensure optimal reception of the XM Satellite Radio signals, the XM Mini-Tuner Dock must be connected to the XM jack on the rear panel of the XM Satellite Radio broadcasts in multi-channels, resulting in Alaska and Hawaii) and Canada. ■ Information from classical to Customer Agreement...

MCXSP10 Manual
Page 73
... MANUAL SETUP Use this unit operates. Adjusts the dynamic range of the LFE channel for the sources connected to the DIGITAL INPUT jacks on the rear panel of this menu to manually reassign the input/output jacks, select the input mode or rename the input source.
... MANUAL SETUP Use this unit operates. Adjusts the dynamic range of the LFE channel for the sources connected to the DIGITAL INPUT jacks on the rear panel of this menu to manually reassign the input/output jacks, select the input mode or rename the input source.

MCXSP10 Manual
Page 81
...when a signal flag that can be recognized by this feature to select the decoders used to -30.0 dB, the volume level is turned on the rear panel of this unit are not output to the HDMI component connected to the HDMI OUT jack on . MODE;;;;;;;;;;ON TYPE;;;PLIIxMovie [ ]/[ ]:Up/Down ... VOL. setting. • The "MAX VOL." SOUND MENU H)HDMI SET SUPPORT AUDIO: RX-V861 [p]/[[]:Select [ENTER]:Return Support audio SUPPORT AUDIO Use this feature to select whether to play back HDMI audio signals on the rear panel of this unit is automatically set to set the initial volume level in the auto...
...when a signal flag that can be recognized by this feature to select the decoders used to -30.0 dB, the volume level is turned on the rear panel of this unit are not output to the HDMI component connected to the HDMI OUT jack on . MODE;;;;;;;;;;ON TYPE;;;PLIIxMovie [ ]/[ ]:Up/Down ... VOL. setting. • The "MAX VOL." SOUND MENU H)HDMI SET SUPPORT AUDIO: RX-V861 [p]/[[]:Select [ENTER]:Return Support audio SUPPORT AUDIO Use this feature to select whether to play back HDMI audio signals on the rear panel of this unit is automatically set to set the initial volume level in the auto...
MCXSP10 Manual
Page 117
... PRIORITY, Speaker settings 72 PRO LOGIC, Decoder type 66, 67 Projector connection 18 Pure Direct 48 Pure hi-fi sound 48 PVR connection 20 ■R Rear panel 11 REMOTE AMP, Advanced setup ........ 94 Remote control AMP ID, Advanced setup 94 Remote control code default settings ... 88 Remote control codes iii Remote control...
... PRIORITY, Speaker settings 72 PRO LOGIC, Decoder type 66, 67 Projector connection 18 Pure Direct 48 Pure hi-fi sound 48 PVR connection 20 ■R Rear panel 11 REMOTE AMP, Advanced setup ........ 94 Remote control AMP ID, Advanced setup 94 Remote control code default settings ... 88 Remote control codes iii Remote control...

