MCXSP10 Manual
Page 5
...MENU 71 1 SOUND MENU 72 2 INPUT MENU 78 3 OPTION MENU 81 Remote control features 84 Using the remote control for the information about each position of the parts on the front panel or the remote control. ADDITIONAL INFORMATION APPENDIX English 1 En Refer to the attached sheet or the... the end of this manual for the SCENE feature 84 Controlling this unit, a TV, or other components 85 Setting remote control codes 87 Resetting all remote control codes 88 Using multi-zone configuration 89 Connecting Zone 2 89 Controlling Zone 2 90 Advanced setup 92 Using the advanced setup...
...MENU 71 1 SOUND MENU 72 2 INPUT MENU 78 3 OPTION MENU 81 Remote control features 84 Using the remote control for the information about each position of the parts on the front panel or the remote control. ADDITIONAL INFORMATION APPENDIX English 1 En Refer to the attached sheet or the... the end of this manual for the SCENE feature 84 Controlling this unit, a TV, or other components 85 Setting remote control codes 87 Resetting all remote control codes 88 Using multi-zone configuration 89 Connecting Zone 2 89 Controlling Zone 2 90 Advanced setup 92 Using the advanced setup...

MCXSP10 Manual
Page 6
... the name of DTS, Inc. Design and specifications are registered trademarks of the parts on the remote control is given in parentheses. • This manual is a trademark of improvements, etc. "SILENT CINEMA" is too late, Yamaha and the Electronic Industries Association's Consumer Electronics Group recommend you to get the most importantly, without annoying...
... the name of DTS, Inc. Design and specifications are registered trademarks of the parts on the remote control is given in parentheses. • This manual is a trademark of improvements, etc. "SILENT CINEMA" is too late, Yamaha and the Electronic Industries Association's Consumer Electronics Group recommend you to get the most importantly, without annoying...
MCXSP10 Manual
Page 7
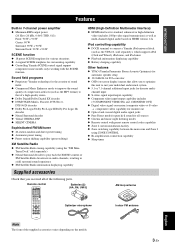
...Playback information displaying capability ◆ Battery charging capability Other features ◆ YPAO (Yamaha Parametric Room Acoustic Optimizer) for discrete multi- Remote control CODE SET TRANSMIT POWER TV POWER AV STANDBY POWER CD DVD DOCK V-AUX MD CD-R CBL DTV MULTI CH IN ... capability ◆ Sleep timer Supplied accessories Check that you received all sources ◆ Cinema and music night listening modes ◆ Remote control with the SCENE function Sound field programs ◆ Proprietary Yamaha technology for the creation of sound fields ◆ Compressed ...
...Playback information displaying capability ◆ Battery charging capability Other features ◆ YPAO (Yamaha Parametric Room Acoustic Optimizer) for discrete multi- Remote control CODE SET TRANSMIT POWER TV POWER AV STANDBY POWER CD DVD DOCK V-AUX MD CD-R CBL DTV MULTI CH IN ... capability ◆ Sleep timer Supplied accessories Check that you received all sources ◆ Cinema and music night listening modes ◆ Remote control with the SCENE function Sound field programs ◆ Proprietary Yamaha technology for the creation of sound fields ◆ Compressed ...
MCXSP10 Manual
Page 8
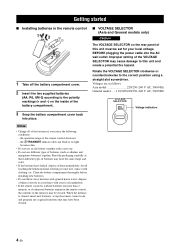
...cover back into place. ■ VOLTAGE SELECTOR (Asia and General models only) Caution The VOLTAGE SELECTOR on the rear panel of the remote control decreases. - the operation range of this unit and create a potential fire hazard. the VTRANSMIT indicator does not flash or its light ...Voltage indication Notes • Change all of the batteries if you notice the following conditions: - Improper setting of them correctly in the remote control, the contents of batteries (such as alkaline and manganese batteries) together. When the memory is cleared, insert new batteries, set for ...
...cover back into place. ■ VOLTAGE SELECTOR (Asia and General models only) Caution The VOLTAGE SELECTOR on the rear panel of the remote control decreases. - the operation range of this unit and create a potential fire hazard. the VTRANSMIT indicator does not flash or its light ...Voltage indication Notes • Change all of the batteries if you notice the following conditions: - Improper setting of them correctly in the remote control, the contents of batteries (such as alkaline and manganese batteries) together. When the memory is cleared, insert new batteries, set for ...
MCXSP10 Manual
Page 14
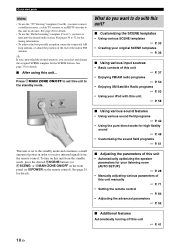
... on this unit... See page 20 for details. • To use the "TV Viewing" template (Case B), you must connect a satellite receiver, a cable TV receiver or an HDTV decoder to this unit. ☞ P. 58 This unit is set this unit ☞ P. 41 10 En y If ... Using your listening room (AUTO SETUP) ☞ P. 28 • Manually adjusting various parameters of this unit manually ☞ P. 71 • Setting the remote control ☞ P. 84 • Adjusting the advanced parameters ☞ P. 92 ■ Additional features Automatically turning off this unit to the standby mode. Quick start...
... on this unit... See page 20 for details. • To use the "TV Viewing" template (Case B), you must connect a satellite receiver, a cable TV receiver or an HDTV decoder to this unit. ☞ P. 58 This unit is set this unit ☞ P. 41 10 En y If ... Using your listening room (AUTO SETUP) ☞ P. 28 • Manually adjusting various parameters of this unit manually ☞ P. 71 • Setting the remote control ☞ P. 84 • Adjusting the advanced parameters ☞ P. 92 ■ Additional features Automatically turning off this unit to the standby mode. Quick start...
MCXSP10 Manual
Page 15
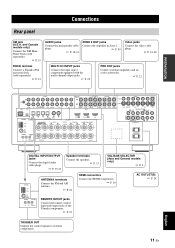
...CBL CD DVD 1 2 3 4 5 6 DIGITAL OUTPUT OPTICAL COAXIAL DIGITAL INPUT FRONT B/ZONE2/ R EXTRA SP L FRONT A R L FM 75 UNBAL REMOTE TRIGGER OUT DVD IN1 DTV/CBL IN2 OUT SPEAKERS CENTER SURROUND R L SURROUND BACK/BI-AMP R L MONITOR OUT AC OUTLETS C DVR +12V IN OUT ... Connections CONNECTIONS Rear panel XM jack (U.S.A. ANTENNA terminals Connect the FM and AM antenna. ☞ P. 24 REMOTE IN/OUT jacks Connect the remote control input and output jacks of the Yamaha components. ☞ P. 23 HDMI connectors Connect the HDMI components. ☞ P. 16 AC OUTLET(S) ☞...
...CBL CD DVD 1 2 3 4 5 6 DIGITAL OUTPUT OPTICAL COAXIAL DIGITAL INPUT FRONT B/ZONE2/ R EXTRA SP L FRONT A R L FM 75 UNBAL REMOTE TRIGGER OUT DVD IN1 DTV/CBL IN2 OUT SPEAKERS CENTER SURROUND R L SURROUND BACK/BI-AMP R L MONITOR OUT AC OUTLETS C DVR +12V IN OUT ... Connections CONNECTIONS Rear panel XM jack (U.S.A. ANTENNA terminals Connect the FM and AM antenna. ☞ P. 24 REMOTE IN/OUT jacks Connect the remote control input and output jacks of the Yamaha components. ☞ P. 23 HDMI connectors Connect the HDMI components. ☞ P. 16 AC OUTLET(S) ☞...

MCXSP10 Manual
Page 27
... output output output Infrared signal receiver or Yamaha component Yamaha component Game console or video camera English 23 En Refer to the owner's manuals for details about the capability of the SCENE control signals of the components. • Connect the REMOTE OUT jack of this unit ...unit and other components before making connections. Connect a Yamaha iPod universal dock to the remote control input and output jack with the DOCK terminal on the rear panel of the remote control signals, connect the REMOTE IN jack and REMOTE OUT jack to the DOCK terminal on the rear...
... output output output Infrared signal receiver or Yamaha component Yamaha component Game console or video camera English 23 En Refer to the owner's manuals for details about the capability of the SCENE control signals of the components. • Connect the REMOTE OUT jack of this unit ...unit and other components before making connections. Connect a Yamaha iPod universal dock to the remote control input and output jack with the DOCK terminal on the rear panel of the remote control signals, connect the REMOTE IN jack and REMOTE OUT jack to the DOCK terminal on the rear...
MCXSP10 Manual
Page 29
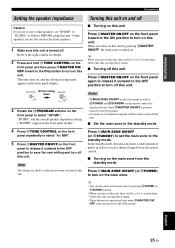
... position to turn on this unit consumes a small amount of power in order to receive infrared signals from the remote control. ■ Turning on the main zone from the standby mode Press AMAIN ZONE ON...unit turns on, and the advanced setup menu appears in the front panel display. 4 Press CTONE CONTROL on the front panel repeatedly to select "6Ω MIN". 5 Press BMASTER ON/OFF on the front...OFF on the front panel to use 6 ohm speakers, set the main zone to turn on the remote control are operational only when BMASTER ON/OFF is turned off this unit. 4 ohm speakers can reproduce sound....
... position to turn on this unit consumes a small amount of power in order to receive infrared signals from the remote control. ■ Turning on the main zone from the standby mode Press AMAIN ZONE ON...unit turns on, and the advanced setup menu appears in the front panel display. 4 Press CTONE CONTROL on the front panel repeatedly to select "6Ω MIN". 5 Press BMASTER ON/OFF on the front...OFF on the front panel to use 6 ohm speakers, set the main zone to turn on the remote control are operational only when BMASTER ON/OFF is turned off this unit. 4 ohm speakers can reproduce sound....

MCXSP10 Manual
Page 31
... unit during operation. M SLEEP indicator Lights up according to this window at the component you want to aim the remote control directly at the remote control sensor on (see page 73) in "SOUND MENU" (see page 74) procedure. AMP Operates the amplifier function of..." (see page 41). SOURCE Operates the component selected with an input selector button (see pages 29 or 72). Connections Using the remote control The remote control transmits a directional infrared ray. PREPARATION L Multi-information display Shows the name of the current digital input signal. O Input channel and...
... unit during operation. M SLEEP indicator Lights up according to this window at the component you want to aim the remote control directly at the remote control sensor on (see page 73) in "SOUND MENU" (see page 74) procedure. AMP Operates the amplifier function of..." (see page 41). SOURCE Operates the component selected with an input selector button (see pages 29 or 72). Connections Using the remote control The remote control transmits a directional infrared ray. PREPARATION L Multi-information display Shows the name of the current digital input signal. O Input channel and...

MCXSP10 Manual
Page 32
... YPAO (Yamaha Parametric Room Acoustic Optimizer) technology which lets you use the attached screw of the following menu screen appears on and the volume level is set to about half way (or slightly less). ❏ The crossover frequency controls of the connected subwoofer is set the operation mode selector on the remote control to...
... YPAO (Yamaha Parametric Room Acoustic Optimizer) technology which lets you use the attached screw of the following menu screen appears on and the volume level is set to about half way (or slightly less). ❏ The crossover frequency controls of the connected subwoofer is set the operation mode selector on the remote control to...
MCXSP10 Manual
Page 37
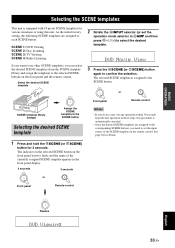
...seconds. DVD Movie View 3 Press the FSCENE (or FSCENE) button again to the selected SCENE buttons on the front panel and the remote control. See page 84 for details. 1 Press and hold the FSCENE (or FSCENE) button for various situations of the currently assigned SCENE template... out any operation within 30 seconds from the last operation in the front panel display. 3 seconds 3 seconds 1 or 1 Front panel Remote control English 1 Flashes DVD Viewing 33 En As the initial factory setting, the following SCENE templates are assigned to the corresponding SCENE buttons, you...
...seconds. DVD Movie View 3 Press the FSCENE (or FSCENE) button again to the selected SCENE buttons on the front panel and the remote control. See page 84 for details. 1 Press and hold the FSCENE (or FSCENE) button for various situations of the currently assigned SCENE template... out any operation within 30 seconds from the last operation in the front panel display. 3 seconds 3 seconds 1 or 1 Front panel Remote control English 1 Flashes DVD Viewing 33 En As the initial factory setting, the following SCENE templates are assigned to the corresponding SCENE buttons, you...

MCXSP10 Manual
Page 40
... the SCENE button 1 Turn on the menu screen. 4 Press the FSCENE button again to confirm the edit. The SCENE template customizing screen appears on the remote control. y An asterisk mark (*) appears by the name of the FSCENE buttons, press Dl / h repeatedly to recall the desired SCENE template on the video monitor connected...
... the SCENE button 1 Turn on the menu screen. 4 Press the FSCENE button again to confirm the edit. The SCENE template customizing screen appears on the remote control. y An asterisk mark (*) appears by the name of the FSCENE buttons, press Dl / h repeatedly to recall the desired SCENE template on the video monitor connected...

MCXSP10 Manual
Page 41
...V-AUX DTV/CBL DVD MD/CD-R TUNER CD XM PHONO INPUT: DVD Currently selected input source y The corresponding input selector button on the remote control for the currently selected input source lights up for approximately 5 seconds after you select an input source, this unit. y To play back ... Sci-Fi Currently selected sound field program Note Sound field programs cannot be exercised when you play back CDs encoded in DTS on the remote control to the operating instructions for the source component. • See page 50 for details about XM Satellite Radio tuning instructions. 4 Rotate...
...V-AUX DTV/CBL DVD MD/CD-R TUNER CD XM PHONO INPUT: DVD Currently selected input source y The corresponding input selector button on the remote control for the currently selected input source lights up for approximately 5 seconds after you select an input source, this unit. y To play back ... Sci-Fi Currently selected sound field program Note Sound field programs cannot be exercised when you play back CDs encoded in DTS on the remote control to the operating instructions for the source component. • See page 50 for details about XM Satellite Radio tuning instructions. 4 Rotate...

MCXSP10 Manual
Page 43
.... Displaying the current status of this unit on a video monitor You can display the operating information of this unit on a video monitor. 1 Turn on the remote control. Note The OSD signal is not output at the OPTICAL jack. Use "I/O ASSIGNMENT" in "OPTION MENU" (see page 81). y • We recommend setting the audio...
.... Displaying the current status of this unit on a video monitor You can display the operating information of this unit on a video monitor. 1 Turn on the remote control. Note The OSD signal is not output at the OPTICAL jack. Use "I/O ASSIGNMENT" in "OPTION MENU" (see page 81). y • We recommend setting the audio...
MCXSP10 Manual
Page 44
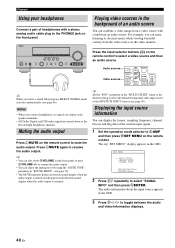
... audio source You can enjoy listening to the left and right headphone channels. Displaying the input source information You can also rotate 0VOLUME on the remote control to select "SIGNAL INFO" and then press DENTER. SET MENU . ;AUTO SETUP ;MANUAL SETUP .A;SIGNAL INFO [ ]/[ ]:Up/Down [ENTER]:Enter...8226; All Dolby Digital and DTS audio signals are mixed down to classical music while viewing beautiful scenery from the video source on the remote control to resume the audio output. Muting the audio output Press LMUTE on the video monitor. Press LMUTE again to mute the audio output....
... audio source You can enjoy listening to the left and right headphone channels. Displaying the input source information You can also rotate 0VOLUME on the remote control to select "SIGNAL INFO" and then press DENTER. SET MENU . ;AUTO SETUP ;MANUAL SETUP .A;SIGNAL INFO [ ]/[ ]:Up/Down [ENTER]:Enter...8226; All Dolby Digital and DTS audio signals are mixed down to classical music while viewing beautiful scenery from the video source on the remote control to resume the audio output. Muting the audio output Press LMUTE on the video monitor. Press LMUTE again to mute the audio output....

MCXSP10 Manual
Page 45
... English SLEEP OFF The SLEEP indicator turns off any external components connected to automatically switch decoders. BASIC OPERATION 4 Press NSET MENU on the remote control repeatedly until "SLEEP OFF" appears in the front panel display. When this unit to the AC OUTLET(S) (see page 24). The number... when this feature to automatically set , the SLEEP indicator lights up SLEEP STRAIGHT ■ Canceling the sleep timer Press MSLEEP on the remote control again to sleep while this unit. See page 101 for HDMI sources or connected HDMI devices. Playback Using the sleep timer Use this ...
... English SLEEP OFF The SLEEP indicator turns off any external components connected to automatically switch decoders. BASIC OPERATION 4 Press NSET MENU on the remote control repeatedly until "SLEEP OFF" appears in the front panel display. When this unit to the AC OUTLET(S) (see page 24). The number... when this feature to automatically set , the SLEEP indicator lights up SLEEP STRAIGHT ■ Canceling the sleep timer Press MSLEEP on the remote control again to sleep while this unit. See page 101 for HDMI sources or connected HDMI devices. Playback Using the sleep timer Use this ...

MCXSP10 Manual
Page 46
... digital decoders that allow you to KAMP and then press one of the sound field selector buttons (P) repeatedly). y • The Yamaha HiFi DSP sound field programs recreate real-world acoustic environments made from the front, back, left sound field Listening position Surround right sound... a Yamaha digital sound field processing (DSP) chip containing several sound field programs which you may notice variations in the strength of the selected sound field program appears in the front panel display and in actual concert halls, music venues, movie theaters, etc. Remote control button ...
... digital decoders that allow you to KAMP and then press one of the sound field selector buttons (P) repeatedly). y • The Yamaha HiFi DSP sound field programs recreate real-world acoustic environments made from the front, back, left sound field Listening position Surround right sound... a Yamaha digital sound field processing (DSP) chip containing several sound field programs which you may notice variations in the strength of the selected sound field program appears in the front panel display and in actual concert halls, music venues, movie theaters, etc. Remote control button ...

MCXSP10 Manual
Page 52
adjusting the "SET MENU" parameters (except for the front left speaker PRNS R Presence right speaker y • Once you press CLEVEL on the remote control, you increase or decrease the high-frequency or the lowfrequency sound to an extreme level, the tonal quality of the speakers. 2 Press Dl / ...the Pure Direct mode is activated, this unit is set the operation mode selector on the remote control to KAMP. displaying the OSD - Adjusting the tonal quality Use this unit is selected as the input source. Control range: -10.0 dB to +10.0 dB 48 En Notes • If you can...
adjusting the "SET MENU" parameters (except for the front left speaker PRNS R Presence right speaker y • Once you press CLEVEL on the remote control, you increase or decrease the high-frequency or the lowfrequency sound to an extreme level, the tonal quality of the speakers. 2 Press Dl / ...the Pure Direct mode is activated, this unit is set the operation mode selector on the remote control to KAMP. displaying the OSD - Adjusting the tonal quality Use this unit is selected as the input source. Control range: -10.0 dB to +10.0 dB 48 En Notes • If you can...
MCXSP10 Manual
Page 53
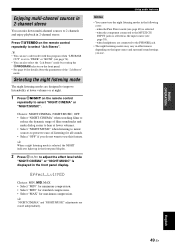
... reduce the dynamic range of film soundtracks and make dialog easier to hear at night. 1 Press RNIGHT on the remote control repeatedly to select "NIGHT:CINEMA" or "NIGHT:MUSIC". Press PSTEREO on the remote control repeatedly to select "2ch Stereo". y "NIGHT:CINEMA" and "NIGHT:MUSIC" adjustments are designed to improve listenability at lower volumes...
... reduce the dynamic range of film soundtracks and make dialog easier to hear at night. 1 Press RNIGHT on the remote control repeatedly to select "NIGHT:CINEMA" or "NIGHT:MUSIC". Press PSTEREO on the remote control repeatedly to select "2ch Stereo". y "NIGHT:CINEMA" and "NIGHT:MUSIC" adjustments are designed to improve listenability at lower volumes...

MCXSP10 Manual
Page 56
... band and frequency. Flashes MEMORY E1:FM 88.9 MHz Flashes 3 Select preset station "A5" using 4A/B/C/D/E and 5PRESET/TUNING/CH l / h on the remote control) to select the desired preset station number (1 to 8). Flashes MEMORY A5:FM 88.9 MHz Flashes 4 Press 2EDIT again. FM/AM tuning 4 Press 5PRESET/...column. 2 Press and hold 2EDIT for more than 3 seconds. The station band and frequency appear in the front panel display along with the remote control, set the operation mode selector to KSOURCE and then press TUNER to select "TUNER" as A1. Notes • Any stored station data existing...
... band and frequency. Flashes MEMORY E1:FM 88.9 MHz Flashes 3 Select preset station "A5" using 4A/B/C/D/E and 5PRESET/TUNING/CH l / h on the remote control) to select the desired preset station number (1 to 8). Flashes MEMORY A5:FM 88.9 MHz Flashes 4 Press 2EDIT again. FM/AM tuning 4 Press 5PRESET/...column. 2 Press and hold 2EDIT for more than 3 seconds. The station band and frequency appear in the front panel display along with the remote control, set the operation mode selector to KSOURCE and then press TUNER to select "TUNER" as A1. Notes • Any stored station data existing...


