MCXSP10 Manual
Page 3
...product should be connected to the grounding system of the building, as practical. Modifications not expressly approved by Yamaha may result in the USA. 3 NOTE: This product has been tested and found to be the source of interference, which can not locate the appropriate retailer, please contact... Yamaha Electronics Corp., U.S.A. 6660 Orangethorpe Ave, Buena Park, CA 90620. Compliance with FCC regulations does not guarantee ...
...product should be connected to the grounding system of the building, as practical. Modifications not expressly approved by Yamaha may result in the USA. 3 NOTE: This product has been tested and found to be the source of interference, which can not locate the appropriate retailer, please contact... Yamaha Electronics Corp., U.S.A. 6660 Orangethorpe Ave, Buena Park, CA 90620. Compliance with FCC regulations does not guarantee ...
MCXSP10 Manual
Page 28
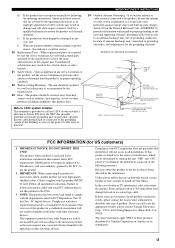
..., level and Q factor) for the subwoofer to the OPTIMIZER MIC jack on page 28. AUTO SETUP AUTO SETUP Introduction This receiver employs YAMAHA Parametric Room Acoustic Optimizer (YPAO) technology which speakers are seated in its parametric equalizer to heat. - YPAO performs the following checks...) of each of frequency characteristics. Notes • Please be when you are connected and the polarity of speakers for loud test tones to give you avoid troublesome listening-based speaker setup and achieves highly accurate sound adjustments. If possible, use different brands or...
..., level and Q factor) for the subwoofer to the OPTIMIZER MIC jack on page 28. AUTO SETUP AUTO SETUP Introduction This receiver employs YAMAHA Parametric Room Acoustic Optimizer (YPAO) technology which speakers are seated in its parametric equalizer to heat. - YPAO performs the following checks...) of each of frequency characteristics. Notes • Please be when you are connected and the polarity of speakers for loud test tones to give you avoid troublesome listening-based speaker setup and achieves highly accurate sound adjustments. If possible, use different brands or...

MCXSP10 Manual
Page 30
... ENTER. To exit auto setup. • If you selected AUTO in step 5, "WAITING" appears when the auto setup procedure is started, then loud test tones are output from this unit displayed in the order: Closest speaker distance/Farthest speaker distance The speaker output level displayed in step 5, no... test tones are output. • If an ERROR screen appears, see "If an error screen appears" on page 27. y You can switch information by ...
... ENTER. To exit auto setup. • If you selected AUTO in step 5, "WAITING" appears when the auto setup procedure is started, then loud test tones are output from this unit displayed in the order: Closest speaker distance/Farthest speaker distance The speaker output level displayed in step 5, no... test tones are output. • If an ERROR screen appears, see "If an error screen appears" on page 27. y You can switch information by ...
MCXSP10 Manual
Page 32
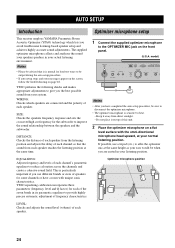
... E-2:NO SURR. Errors during the auto setup procedure. • Perform the auto setup procedure again. 28 SP E-3:NO PRES. The optimizer microphone does not detect test • Check the microphone setting. The auto setup procedure was unplugged during the auto setup procedure. Only one surround back speaker. SP E-4:SBR->SBL E-5:NOISY...
... E-2:NO SURR. Errors during the auto setup procedure. • Perform the auto setup procedure again. 28 SP E-3:NO PRES. The optimizer microphone does not detect test • Check the microphone setting. The auto setup procedure was unplugged during the auto setup procedure. Only one surround back speaker. SP E-4:SBR->SBL E-5:NOISY...

MCXSP10 Manual
Page 58
... component. 4 Start recording on the power of copyrighted material may be disturbed due to record from records, CDs, radio, etc. y Do a test recording before you want to be made. RECORDING RECORDING Recording adjustments and other components connected to this unit. • The setting of TONE CONTROL, VOLUME... a setting so that the analog signal will result in your player is a digital bitstream. model) 1 2 2 CODE SET TRANSMIT POWER TV POWER AV STANDBY CD MD/CD-R TUNER SYSTEM POWER SLEEP DVD DTV/CBL V-AUX MULTI CH IN VCR 1 DVR/VCR2 AMP 1 TV VOL TV CH VOLUME TV...
... component. 4 Start recording on the power of copyrighted material may be disturbed due to record from records, CDs, radio, etc. y Do a test recording before you want to be made. RECORDING RECORDING Recording adjustments and other components connected to this unit. • The setting of TONE CONTROL, VOLUME... a setting so that the analog signal will result in your player is a digital bitstream. model) 1 2 2 CODE SET TRANSMIT POWER TV POWER AV STANDBY CD MD/CD-R TUNER SYSTEM POWER SLEEP DVD DTV/CBL V-AUX MULTI CH IN VCR 1 DVR/VCR2 AMP 1 TV VOL TV CH VOLUME TV...
MCXSP10 Manual
Page 62
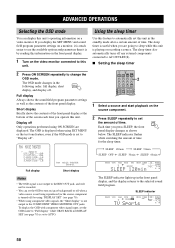
.... The sleep timer also automatically turns off any external components connected to AC OUTLET(S). ■ Setting the sleep timer CODE SET TRANSMIT POWER TV POWER AV STANDBY CD MD/CD-R TUNER SYSTEM POWER SLEEP DVD DTV/CBL V-AUX MULTI CH IN VCR 1 DVR/VCR2 AMP 2 TV VOL TV CH VOLUME TV... to sleep while this unit is useful when you operate this unit in DISPLAY SET (see page 70). • When using SET MENU or the test tone feature, even if the OSD mode is not output to the REC OUT jack, and will not be recorded. • You can display this...
.... The sleep timer also automatically turns off any external components connected to AC OUTLET(S). ■ Setting the sleep timer CODE SET TRANSMIT POWER TV POWER AV STANDBY CD MD/CD-R TUNER SYSTEM POWER SLEEP DVD DTV/CBL V-AUX MULTI CH IN VCR 1 DVR/VCR2 AMP 2 TV VOL TV CH VOLUME TV... to sleep while this unit is useful when you operate this unit in DISPLAY SET (see page 70). • When using SET MENU or the test tone feature, even if the OSD mode is not output to the REC OUT jack, and will not be recorded. • You can display this...

MCXSP10 Manual
Page 70
...feet (ft) Other models: meters (m) • Select meters to input speaker distances in meters. • Select feet to output a test tone and adjust the tonal quality so that it matches that of the surround left speaker. L adjusts the distance of the front left speaker...distance of the center speaker. Initial setting: 3.0 m (10.0 ft) • SB L* adjusts the distance of the center speaker. • Select OFF to stop the test tone and output the currently selected source component. • Press u / d to select a frequency band. • Press j / i to cancel equalizing. Initial setting...
...feet (ft) Other models: meters (m) • Select meters to input speaker distances in meters. • Select feet to output a test tone and adjust the tonal quality so that it matches that of the surround left speaker. L adjusts the distance of the front left speaker...distance of the center speaker. Initial setting: 3.0 m (10.0 ft) • SB L* adjusts the distance of the center speaker. • Select OFF to stop the test tone and output the currently selected source component. • Press u / d to select a frequency band. • Press j / i to cancel equalizing. Initial setting...