
Owner's Manual
Page 5
...MENU 61 Using SET MENU 62 1 SOUND MENU 63 2 INPUT MENU 68 3 OPTION MENU 70 Remote control features 73 Controlling this unit, a TV, or other components.... 73 Setting remote control codes 75 Advanced setup 76 ADDITIONAL INFORMATION Troubleshooting 78 Glossary 88 Specifications 90 Index 91 APPENDIX (at ...on HDMI 14 Audio and video signal flow 14 Connecting video components 15 Connecting other components 16 Connecting audio components 18 Connecting a Yamaha iPod™ universal dock or Bluetooth™ adapter 19 Using the VIDEO AUX jacks on the front panel .... 19 Connecting ...
...MENU 61 Using SET MENU 62 1 SOUND MENU 63 2 INPUT MENU 68 3 OPTION MENU 70 Remote control features 73 Controlling this unit, a TV, or other components.... 73 Setting remote control codes 75 Advanced setup 76 ADDITIONAL INFORMATION Troubleshooting 78 Glossary 88 Specifications 90 Index 91 APPENDIX (at ...on HDMI 14 Audio and video signal flow 14 Connecting video components 15 Connecting other components 16 Connecting audio components 18 Connecting a Yamaha iPod™ universal dock or Bluetooth™ adapter 19 Using the VIDEO AUX jacks on the front panel .... 19 Connecting ...
Owner's Manual
Page 6
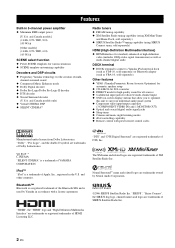
... and coaxial digital audio signal jacks ◆ Sleep timer ◆ Cinema and music night listening modes ◆ iPod controlling capability ◆ Remote control with a license agreement. "DTS" and "DTS Digital Surround" are trademarks or registered trademarks of SIRIUS Satellite Radio Inc...power [U.S.A. Features Features Built-in the U.S. The XM name and related logos are trademarks owned by Yamaha in accordance with preset remote control codes Manufactured under license from Dolby Laboratories. Bluetooth™ Bluetooth is used by Neural Audio Corporation. ...
... and coaxial digital audio signal jacks ◆ Sleep timer ◆ Cinema and music night listening modes ◆ iPod controlling capability ◆ Remote control with a license agreement. "DTS" and "DTS Digital Surround" are trademarks or registered trademarks of SIRIUS Satellite Radio Inc...power [U.S.A. Features Features Built-in the U.S. The XM name and related logos are trademarks owned by Yamaha in accordance with preset remote control codes Manufactured under license from Dolby Laboratories. Bluetooth™ Bluetooth is used by Neural Audio Corporation. ...

Owner's Manual
Page 7
...En When the memory is too late, Yamaha and the Electronic Industries Association's Consumer Electronics Group recommend you to this unit must be cleared. VOLTAGE SELECTOR 230240V Voltage indication Notes • Change all of the following parts. ❏ Remote control ❏ Batteries (2) (AAA, R03,... batteries remain in accordance with general house waste; INTRODUCTION Getting started Getting started ■ Supplied accessories Check that you received all of the batteries if you notice that lets the sound come into place. Improper setting of the battery compartment....
...En When the memory is too late, Yamaha and the Electronic Industries Association's Consumer Electronics Group recommend you to this unit must be cleared. VOLTAGE SELECTOR 230240V Voltage indication Notes • Change all of the following parts. ❏ Remote control ❏ Batteries (2) (AAA, R03,... batteries remain in accordance with general house waste; INTRODUCTION Getting started Getting started ■ Supplied accessories Check that you received all of the batteries if you notice that lets the sound come into place. Improper setting of the battery compartment....

Owner's Manual
Page 12
Quick start guide ■ After using this unit to receive infrared signals from the standby mode, press ASTANDBY/ ON (or HPOWER). Press ASTANDBY/ON on this unit from the remote control. In the standby mode, this unit ☞ P. 37 8 En To turn on ... Creating your listening room (AUTO SETUP) ☞ P. 24 • Manually adjusting various parameters of this unit ☞ P. 61 • Setting the remote control ☞ P. 73 • Adjusting the advanced parameters ☞ P. 76 ■ Additional features Automatically turning off this unit consumes a small amount of...
Quick start guide ■ After using this unit to receive infrared signals from the standby mode, press ASTANDBY/ ON (or HPOWER). Press ASTANDBY/ON on this unit from the remote control. In the standby mode, this unit ☞ P. 37 8 En To turn on ... Creating your listening room (AUTO SETUP) ☞ P. 24 • Manually adjusting various parameters of this unit ☞ P. 61 • Setting the remote control ☞ P. 73 • Adjusting the advanced parameters ☞ P. 76 ■ Additional features Automatically turning off this unit consumes a small amount of...

Owner's Manual
Page 25
Refer to the right column for details. 2 Press and hold KTONE CONTROL and then press ASTANDBY/ON to turn on , and the advanced setup menu appears in the front panel display. This unit turns on this unit. y ... unit Press ASTANDBY/ON (or HPOWER) to turn off this unit. and the current speaker impedance setting ("8Ω MIN") appear in order to receive infrared signals from the remote control. 3 Press LPROGRAM l / h to use 6 ohm speakers, set this unit. English 21 En Note The setting you made is reflected next time you are...
Refer to the right column for details. 2 Press and hold KTONE CONTROL and then press ASTANDBY/ON to turn on , and the advanced setup menu appears in the front panel display. This unit turns on this unit. y ... unit Press ASTANDBY/ON (or HPOWER) to turn off this unit. and the current speaker impedance setting ("8Ω MIN") appear in order to receive infrared signals from the remote control. 3 Press LPROGRAM l / h to use 6 ohm speakers, set this unit. English 21 En Note The setting you made is reflected next time you are...

Owner's Manual
Page 27
...speaker level setting procedure in the following types of high temperature, such as near a heater or stove - y To set the remote control codes for other information when adjusting or changing settings. SILENT CINEMA indicator Lights up when Virtual CINEMA DSP is in the automatic setup... input signal. • Light up or flash according to aim the remote control directly at the component you select a CINEMA DSP sound field program (see page 39). Connections ■ Using the remote control The remote control transmits a directional infrared ray. Notes • Do not spill water ...
...speaker level setting procedure in the following types of high temperature, such as near a heater or stove - y To set the remote control codes for other information when adjusting or changing settings. SILENT CINEMA indicator Lights up when Virtual CINEMA DSP is in the automatic setup... input signal. • Light up or flash according to aim the remote control directly at the component you select a CINEMA DSP sound field program (see page 39). Connections ■ Using the remote control The remote control transmits a directional infrared ray. Notes • Do not spill water ...

Owner's Manual
Page 32
...to flash, and the name of the currently assigned SCENE template appears in the front panel display. 3 seconds 3 seconds 1 or 1 Front panel Remote control DVD Movie View 3 Press the QSCENE (or 6SCENE) button again to confirm the selection. Select the desired SCENE template 2 Press OINPUT l /...and hold the desired QSCENE (or 6SCENE) button for details. 1 Flashes DVD Viewing 28 En l INPUT h Front panel or AMP ENTER Remote control SCENE template library (Image) 1 Assign the SCENE template to select the desired template. See page 32 for 3 seconds. The selected SCENE ...
...to flash, and the name of the currently assigned SCENE template appears in the front panel display. 3 seconds 3 seconds 1 or 1 Front panel Remote control DVD Movie View 3 Press the QSCENE (or 6SCENE) button again to confirm the selection. Select the desired SCENE template 2 Press OINPUT l /...and hold the desired QSCENE (or 6SCENE) button for details. 1 Flashes DVD Viewing 28 En l INPUT h Front panel or AMP ENTER Remote control SCENE template library (Image) 1 Assign the SCENE template to select the desired template. See page 32 for 3 seconds. The selected SCENE ...

Owner's Manual
Page 35
... mark (*) appears by the name of the original SCENE template. Select the name of the SCENE template at step 3 of the SCENE template on the remote control. Notes • Once the desired SCENE templates are assigned to the corresponding 6SCENE buttons, you want to customize is only available for the assigned 6SCENE...
... mark (*) appears by the name of the original SCENE template. Select the name of the SCENE template at step 3 of the SCENE template on the remote control. Notes • Once the desired SCENE templates are assigned to the corresponding 6SCENE buttons, you want to customize is only available for the assigned 6SCENE...

Owner's Manual
Page 36
y Press the 6SCENE button again to operate the input source component. * POWER POWER STANDBY POWER TV AV A XM SIRIUS MUTE CD MD/CD-R TUNER DVD DTV/CBL DVR TV CH V-AUX/DOCK B C AMP TV INPUT TV MUTE TV VOL SCENE 1 2 3 4 BAND LEVEL ... for details of the function of each input source in advance (see page 75). ■ Setting input source of the customized SCENE template on the remote control If you customize the input source of the selected SCENE template, you must set the input source of the SCENE template on the...
y Press the 6SCENE button again to operate the input source component. * POWER POWER STANDBY POWER TV AV A XM SIRIUS MUTE CD MD/CD-R TUNER DVD DTV/CBL DVR TV CH V-AUX/DOCK B C AMP TV INPUT TV MUTE TV VOL SCENE 1 2 3 4 BAND LEVEL ... for details of the function of each input source in advance (see page 75). ■ Setting input source of the customized SCENE template on the remote control If you customize the input source of the selected SCENE template, you must set the input source of the SCENE template on the...

Owner's Manual
Page 45
... display automatically dims. y While DIRECT mode is activated, the front panel display turns on momentarily when an operation is turned on the remote control and then 8k / n to select the speaker you increase or decrease the high-frequency or the low-frequency sound to turn off the... "AUTO SETUP" (see page 24) and "SP LEVEL" (see page 63) settings (except for speaker level settings) are stored independently. 1 Press KTONE CONTROL repeatedly to select the high-frequency response (TREBLE) or the low-frequency response (BASS). 2 Press LPROGRAM l / h repeatedly to adjust the balance of bass...
... display automatically dims. y While DIRECT mode is activated, the front panel display turns on momentarily when an operation is turned on the remote control and then 8k / n to select the speaker you increase or decrease the high-frequency or the low-frequency sound to turn off the... "AUTO SETUP" (see page 24) and "SP LEVEL" (see page 63) settings (except for speaker level settings) are stored independently. 1 Press KTONE CONTROL repeatedly to select the high-frequency response (TREBLE) or the low-frequency response (BASS). 2 Press LPROGRAM l / h repeatedly to adjust the balance of bass...

Owner's Manual
Page 49
...Flashes 4 Press BPRESET/TUNING again. l / h) repeatedly to select the desired preset station group (A to E). See "Selecting preset stations" on the remote control. 3 Select preset station "A5" using DA/B/C/D/E and EPRESET/TUNING/CH l / h. Exchanging preset station You can exchange the assignments of the two ...AM tuning Selecting preset stations You can tune into any desired station simply by pressing the numeric buttons on this operation with the remote control, press 4TUNER to select "TUNER" as the input source. 1 Press DA/B/C/D/E (or 8A-E/CAT. "EXCHANGE E1-A5" appears...
...Flashes 4 Press BPRESET/TUNING again. l / h) repeatedly to select the desired preset station group (A to E). See "Selecting preset stations" on the remote control. 3 Select preset station "A5" using DA/B/C/D/E and EPRESET/TUNING/CH l / h. Exchanging preset station You can exchange the assignments of the two ...AM tuning Selecting preset stations You can tune into any desired station simply by pressing the numeric buttons on this operation with the remote control, press 4TUNER to select "TUNER" as the input source. 1 Press DA/B/C/D/E (or 8A-E/CAT. "EXCHANGE E1-A5" appears...

Owner's Manual
Page 52
... follows. 2 Press DCATEGORY (or 8A-E/CAT. y You can search for a channel within all channels. For details, see "Setting XM Satellite Radio preset channels" on the remote control. ■ Direct Number Access mode 1 Press MSRCH MODE repeatedly to select "ALL CH SEARCH" or "CAT SEARCH". 2 Press the numeric buttons (G) to tune into the...
... follows. 2 Press DCATEGORY (or 8A-E/CAT. y You can search for a channel within all channels. For details, see "Setting XM Satellite Radio preset channels" on the remote control. ■ Direct Number Access mode 1 Press MSRCH MODE repeatedly to select "ALL CH SEARCH" or "CAT SEARCH". 2 Press the numeric buttons (G) to tune into the...

Owner's Manual
Page 54
... again. • XM status messages also appear in the OSD. • You can select the amount of the XM Mini-Tuner Dock cannot receive the signals, "NO SIGNAL" appears in the front panel display. ■ Displaying the XM Satellite Radio information in the OSD Press ODISPLAY. Press... by this unit, the character will be displayed with a space. • To hold the XM Satellite Radio information, press 8ENTER on the remote control while it is displayed in the OSD. XM Satellite Radio tuning Displaying the XM Satellite Radio information You can display the XM Satellite Radio information...
... again. • XM status messages also appear in the OSD. • You can select the amount of the XM Mini-Tuner Dock cannot receive the signals, "NO SIGNAL" appears in the front panel display. ■ Displaying the XM Satellite Radio information in the OSD Press ODISPLAY. Press... by this unit, the character will be displayed with a space. • To hold the XM Satellite Radio information, press 8ENTER on the remote control while it is displayed in the OSD. XM Satellite Radio tuning Displaying the XM Satellite Radio information You can display the XM Satellite Radio information...

Owner's Manual
Page 57
...channels to the previous or next category by pressing the numeric buttons (1 to 8) (G). ■ Direct Number Access mode 1 Press MSRCH MODE on the remote control repeatedly to select "ALL CH SEARCH" or "CAT SEARCH". 2 Press the numeric buttons (G) to enter the desired three-digit channel number. Enter the... Number Access mode procedure. • If the selected channel is locked (see "Setting the SIRIUS Satellite Radio™ preset channels" on the remote control and then press TENT to cancel. the channel is locked, "PIN:____" appears in the Preset Search mode, you do not subscribe to...
...channels to the previous or next category by pressing the numeric buttons (1 to 8) (G). ■ Direct Number Access mode 1 Press MSRCH MODE on the remote control repeatedly to select "ALL CH SEARCH" or "CAT SEARCH". 2 Press the numeric buttons (G) to enter the desired three-digit channel number. Enter the... Number Access mode procedure. • If the selected channel is locked (see "Setting the SIRIUS Satellite Radio™ preset channels" on the remote control and then press TENT to cancel. the channel is locked, "PIN:____" appears in the Preset Search mode, you do not subscribe to...

Owner's Manual
Page 58
... channel number 5 Press FMEMORY (or 9MEMORY) to set the Parental Lock code number (PIN) and select the channels to be locked. 1 Press 5AMP on the remote control and then press MMENU to display. 2 Press 8n to 8) while the MEMORY indicator is flashing in the front panel display. You can then recall any...
... channel number 5 Press FMEMORY (or 9MEMORY) to set the Parental Lock code number (PIN) and select the channels to be locked. 1 Press 5AMP on the remote control and then press MMENU to display. 2 Press 8n to 8) while the MEMORY indicator is flashing in the front panel display. You can then recall any...

Owner's Manual
Page 61
...; Once you have stationed your iPod in a Yamaha iPod universal dock (such as YDS-10, sold separately) connected to the DOCK terminal of this unit (see page 19), you can enjoy playback of your iPod using the supplied remote control without it (simple remote mode). ■ Remote control operation Before performing the following operations, press 4 V-AUX...
...; Once you have stationed your iPod in a Yamaha iPod universal dock (such as YDS-10, sold separately) connected to the DOCK terminal of this unit (see page 19), you can enjoy playback of your iPod using the supplied remote control without it (simple remote mode). ■ Remote control operation Before performing the following operations, press 4 V-AUX...

Owner's Manual
Page 62
... or video clips stored on your iPod. 1 Press 4V-AUX/DOCK and then O DISPLAY. You can browse the songs stored on your iPod. • The Yamaha logo appears in the display window of your iPod. • There are some characters that cannot be changed or adjusted only in the OSD. y •... done with underscores "_". • The "Settings" parameters can be displayed in the front panel display or in the OSD of your iPod using the supplied remote control when you can select the amount of time the iPod menu and play albums in random order. Further, you connect this unit to repeat one...
... or video clips stored on your iPod. 1 Press 4V-AUX/DOCK and then O DISPLAY. You can browse the songs stored on your iPod. • The Yamaha logo appears in the display window of your iPod. • There are some characters that cannot be changed or adjusted only in the OSD. y •... done with underscores "_". • The "Settings" parameters can be displayed in the front panel display or in the OSD of your iPod using the supplied remote control when you can select the amount of time the iPod menu and play albums in random order. Further, you connect this unit to repeat one...
Owner's Manual
Page 66
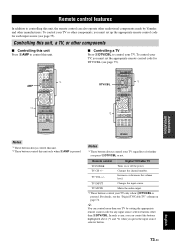
... of the front panel display and the way in the OSD. Displays the current reception level of sound field programs. Pair the connected Yamaha Bluetooth adapter (such as YBA-10, sold separately) with a Bluetooth component (see page 54). Page 70 70 71 71 71 72...Press 8ENTER to access and adjust each parameter. Locks sound field program parameters and other "SET MENU" settings. p p p p Using SET MENU Use the remote control to enter "MANUAL SETUP". Designates the default audio input jack select setting for the input sources connected to enter "SET MENU". INI E)BLUETOOTH SET F)XM...
... of the front panel display and the way in the OSD. Displays the current reception level of sound field programs. Pair the connected Yamaha Bluetooth adapter (such as YBA-10, sold separately) with a Bluetooth component (see page 54). Page 70 70 71 71 71 72...Press 8ENTER to access and adjust each parameter. Locks sound field program parameters and other "SET MENU" settings. p p p p Using SET MENU Use the remote control to enter "MANUAL SETUP". Designates the default audio input jack select setting for the input sources connected to enter "SET MENU". INI E)BLUETOOTH SET F)XM...

Owner's Manual
Page 72
... . [IN1];;; XM SIRIUS CD MD/CD-R TUNER or DVD DTV/CBL DVR MULTI CH IN V-AUX/DOCK 2 Press 5AMP and then press 8l / h on the remote control to place the "_" (underscore) under the space or the character you want to edit. 3 Press 8k / n to select the character you want to change the...
... . [IN1];;; XM SIRIUS CD MD/CD-R TUNER or DVD DTV/CBL DVR MULTI CH IN V-AUX/DOCK 2 Press 5AMP and then press 8l / h on the remote control to place the "_" (underscore) under the space or the character you want to edit. 3 Press 8k / n to select the character you want to change the...
Owner's Manual
Page 77
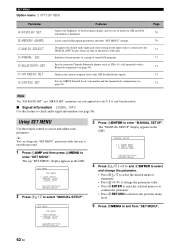
... ■ Controlling a TV Press 4DTV/CBL to control your TV, you must set up the appropriate remote control code for any input source selector buttons other than one TV by Yamaha and other ...manufacturers. DECODE 3 4 STRAIGHT DIRECT 5 6 NIGHT PARAMETER 7 8 MULTI CH IN AUDIO SEL 9 0 SLEEP 10 ENT *1 ADVANCED OPERATION Notes *1 These buttons always control this unit. *2 These buttons control this unit. To control your TV. AMP *2 POWER POWER STANDBY POWER TV AV...
... ■ Controlling a TV Press 4DTV/CBL to control your TV, you must set up the appropriate remote control code for any input source selector buttons other than one TV by Yamaha and other ...manufacturers. DECODE 3 4 STRAIGHT DIRECT 5 6 NIGHT PARAMETER 7 8 MULTI CH IN AUDIO SEL 9 0 SLEEP 10 ENT *1 ADVANCED OPERATION Notes *1 These buttons always control this unit. *2 These buttons control this unit. To control your TV. AMP *2 POWER POWER STANDBY POWER TV AV...


