Owner's Manual
Page 5
...and network features 68 USB and network menu tree 68 Navigating USB and network menus 69 Using a USB storage device or a USB portable audio player 69 Using a PC server or Yamaha ... and Zone 3 components ... 117 Controlling Zone 2 or Zone 3 119 Advanced setup 121 Using the advanced setup menu 121 ADDITIONAL INFORMATION Troubleshooting 124 Resetting the system 138 Operation modes of front ...Radio™ information 63 Using Bluetooth™ components 64 Pairing the Bluetooth™ receiver and your headphones 38 Muting the audio output 38 Displaying the input source information 38...
...and network features 68 USB and network menu tree 68 Navigating USB and network menus 69 Using a USB storage device or a USB portable audio player 69 Using a PC server or Yamaha ... and Zone 3 components ... 117 Controlling Zone 2 or Zone 3 119 Advanced setup 121 Using the advanced setup menu 121 ADDITIONAL INFORMATION Troubleshooting 124 Resetting the system 138 Operation modes of front ...Radio™ information 63 Using Bluetooth™ components 64 Pairing the Bluetooth™ receiver and your headphones 38 Muting the audio output 38 Displaying the input source information 38...
Owner's Manual
Page 6
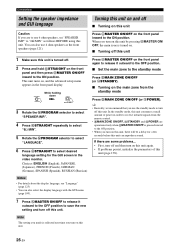
.... Input Select → (input source) → (submenu) → Volume Trim (page 85) Setting the background video for speakers and headphones individually. Setup → Option → Display Set → Front Panel Display → Dimmer (page 98) Turning on or off the short message display, select "Off... in the GUI menu. You can adjust the dynamic range for discrete multichannel input If you want to fully mute audio when you receive a call while watching your listening environment, you can configure them according to be connected to processing problems. In this setting. The...
.... Input Select → (input source) → (submenu) → Volume Trim (page 85) Setting the background video for speakers and headphones individually. Setup → Option → Display Set → Front Panel Display → Dimmer (page 98) Turning on or off the short message display, select "Off... in the GUI menu. You can adjust the dynamic range for discrete multichannel input If you want to fully mute audio when you receive a call while watching your listening environment, you can configure them according to be connected to processing problems. In this setting. The...
Owner's Manual
Page 7
... for Asia model) - model only) via LAN ◆ DHCP automatic or manual network configuration ◆ Web control capability of this unit to suit your individual audiovisual system ◆...video signal (30/36 bit) transmission capability Supplied accessories Check that allows you received all sources ◆ Adaptive dynamic range controlling capability ◆ Adaptive DSP effect...2/ZONE 3 using a Web browser Automatic speaker setup features ◆ Advanced YPAO (Yamaha Parametric room Acoustic Optimizer) for automatic speaker setup ◆ Multi-point measurement feature for multiple ...
... for Asia model) - model only) via LAN ◆ DHCP automatic or manual network configuration ◆ Web control capability of this unit to suit your individual audiovisual system ◆...video signal (30/36 bit) transmission capability Supplied accessories Check that allows you received all sources ◆ Adaptive dynamic range controlling capability ◆ Adaptive DSP effect...2/ZONE 3 using a Web browser Automatic speaker setup features ◆ Advanced YPAO (Yamaha Parametric room Acoustic Optimizer) for automatic speaker setup ◆ Multi-point measurement feature for multiple ...

Owner's Manual
Page 15
...from any or all channels, but also for reproducing the high fidelity sound of a subwoofer with a built-in amplifier, such as the Yamaha Active Servo Processing Subwoofer System, is better to -back transitions. For 6.1-channel speaker layout, surround back left and right channel signals are ..., are not highly directional. For 5.1-channel speaker layout, surround back left and right channel signals are used for effect and surround sounds. Use the automatic setup feature (page 30) or set "Front Presence" to "Yes" (page 88). 0.5 to 1 m (1 to 3 ft) 0.5 to 1 m (1 to reduce wall reflections...
...from any or all channels, but also for reproducing the high fidelity sound of a subwoofer with a built-in amplifier, such as the Yamaha Active Servo Processing Subwoofer System, is better to -back transitions. For 6.1-channel speaker layout, surround back left and right channel signals are ..., are not highly directional. For 5.1-channel speaker layout, surround back left and right channel signals are used for effect and surround sounds. Use the automatic setup feature (page 30) or set "Front Presence" to "Yes" (page 88). 0.5 to 1 m (1 to 3 ft) 0.5 to 1 m (1 to reduce wall reflections...
Owner's Manual
Page 30
... you use 4 ohm speakers as follows BEFORE using this unit. When you turn on this unit. 26 En This unit turns on, and the advanced setup menu appears in the video monitor. If there are some problems... • First, turn off ■ Turning on this unit Caution If you are operational... Turning this unit on and off and then turn on this unit again. • If problems persist, initialize the parameters of power in order to receive infrared signals from the standby mode Press BMAIN ZONE ON/OFF (or EPOWER). to the ON position.
... you use 4 ohm speakers as follows BEFORE using this unit. When you turn on this unit. 26 En This unit turns on, and the advanced setup menu appears in the video monitor. If there are some problems... • First, turn off ■ Turning on this unit Caution If you are operational... Turning this unit on and off and then turn on this unit again. • If problems persist, initialize the parameters of power in order to receive infrared signals from the standby mode Press BMAIN ZONE ON/OFF (or EPOWER). to the ON position.
Owner's Manual
Page 31
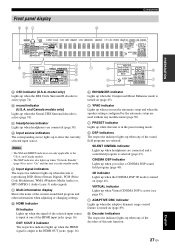
...the CINEMA DSP 3D mode is selected (page 45). CINEMA DSP indicator Lights up when you run the automatic setup and when the speaker settings configured by the automatic setup are used without any modifications (page 30). i YPAO indicator Lights up when headphones are connected and a ...sound field program is turned on (page 89). l ADAPTIVE DRC indicator Lights up when "Network Standby" (page 96) is input at the ...
...the CINEMA DSP 3D mode is selected (page 45). CINEMA DSP indicator Lights up when you run the automatic setup and when the speaker settings configured by the automatic setup are used without any modifications (page 30). i YPAO indicator Lights up when headphones are connected and a ...sound field program is turned on (page 89). l ADAPTIVE DRC indicator Lights up when "Network Standby" (page 96) is input at the ...
Owner's Manual
Page 32
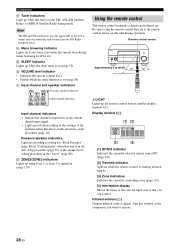
... while the remote control is tuned into the HD Radio reception band. Connections n Tuner indicators Light up when this unit is in the automatic setup procedure (page 30). model and used when this unit is in the FM, AM, XM Satellite Radio, or SIRIUS Satellite Radio tuning mode.... q VOLUME level indicator • Indicates the current volume level. • Flashes while the mute function is in the auto setup procedure (page 30) or the speaker level setting procedure in the "Level" (page 89). Remote control sensor Approximately 6 m (20 ft) 30 30 6 ...
... while the remote control is tuned into the HD Radio reception band. Connections n Tuner indicators Light up when this unit is in the automatic setup procedure (page 30). model and used when this unit is in the FM, AM, XM Satellite Radio, or SIRIUS Satellite Radio tuning mode.... q VOLUME level indicator • Indicates the current volume level. • Flashes while the mute function is in the auto setup procedure (page 30) or the speaker level setting procedure in the "Level" (page 89). Remote control sensor Approximately 6 m (20 ft) 30 30 6 ...

Owner's Manual
Page 34
...of this feature to optimize the setup of a subwoofer (example) The following check points before starting the automatic setup Make sure of the following screen appears in your listening room This unit employs the YPAO (Yamaha Parametric room Acoustic Optimizer) technology which... lets you avoid troublesome listening-based speaker setup and achieves highly accurate sound adjustments ...
...of this feature to optimize the setup of a subwoofer (example) The following check points before starting the automatic setup Make sure of the following screen appears in your listening room This unit employs the YPAO (Yamaha Parametric room Acoustic Optimizer) technology which... lets you avoid troublesome listening-based speaker setup and achieves highly accurate sound adjustments ...

Owner's Manual
Page 35
...the parameters to count down from each speaker. COMPLETED PLS UNPLUG MIC Note If an error or warning message appears, see "Advanced automatic setup" (page 33). When you selected last time. y If you perform the next operation, this unit for multiple listening positions. Before... the box. For more accurate measurements, we recommended that you are not around during the measurement. ERROR: E-01 PRESS ENTER Basic automatic setup Use this feature to be optimized. Please keep quiet or leave the room. y • To start the measurement immediately, press 9ENTER again...
...the parameters to count down from each speaker. COMPLETED PLS UNPLUG MIC Note If an error or warning message appears, see "Advanced automatic setup" (page 33). When you selected last time. y If you perform the next operation, this unit for multiple listening positions. Before... the box. For more accurate measurements, we recommended that you are not around during the measurement. ERROR: E-01 PRESS ENTER Basic automatic setup Use this feature to be optimized. Please keep quiet or leave the room. y • To start the measurement immediately, press 9ENTER again...

Owner's Manual
Page 36
...0RETURN. It takes approximately 3 minutes. 6 Press 9ENTER to start the measurement immediately, press 9ENTER again. • To cancel the automatic setup and return to select "Start". Optimizing the speaker setting for your listening room Parameter Descriptions Distance This unit checks and adjusts the distance of... 9l to return to the previous menu level. • To return to the wall where speakers are not around during the automatic setup procedure, carry out one of each channel. For more accurate measurements, we recommended that you perform the next operation, this unit....
...0RETURN. It takes approximately 3 minutes. 6 Press 9ENTER to start the measurement immediately, press 9ENTER again. • To cancel the automatic setup and return to select "Start". Optimizing the speaker setting for your listening room Parameter Descriptions Distance This unit checks and adjusts the distance of... 9l to return to the previous menu level. • To return to the wall where speakers are not around during the automatic setup procedure, carry out one of each channel. For more accurate measurements, we recommended that you perform the next operation, this unit....

Owner's Manual
Page 37
...to the wall where speakers are measured, the following illustration shows how to place the optimizer microphone in order to optimize the setup of this unit for seven listening positions for multiple listening positions. The following message appears. This unit starts to count down from... each speaker during the measurement. 9 Press 9ENTER to start the measurement immediately, press 9ENTER again. • To cancel the automatic setup and return to set the number of listening positions and press 9l. The GUI menu appears in 10 seconds. PREPARATION Optimizing the speaker...
...to the wall where speakers are measured, the following illustration shows how to place the optimizer microphone in order to optimize the setup of this unit for seven listening positions for multiple listening positions. The following message appears. This unit starts to count down from... each speaker during the measurement. 9 Press 9ENTER to start the measurement immediately, press 9ENTER again. • To cancel the automatic setup and return to set the number of listening positions and press 9l. The GUI menu appears in 10 seconds. PREPARATION Optimizing the speaker...

Owner's Manual
Page 38
...page 79) is displayed, press and hold IMENU to display the top GUI menu. 2 Press 9k / n repeatedly to select "Setup" and then press 9h. 3 Press 9k / n repeatedly to select "Auto Setup" and then press 9h. 4 Press 9k to select "Information" and then press 9h. 5 Press 9k / n repeatedly to... select the parameter of the automatic setup. Note If you reload the automatic setup parameters, the settings you want to review the result of which you have made the measurement at the remaining listening positions, "Measurement...
...page 79) is displayed, press and hold IMENU to display the top GUI menu. 2 Press 9k / n repeatedly to select "Setup" and then press 9h. 3 Press 9k / n repeatedly to select "Auto Setup" and then press 9h. 4 Press 9k to select "Information" and then press 9h. 5 Press 9k / n repeatedly to... select the parameter of the automatic setup. Note If you reload the automatic setup parameters, the settings you want to review the result of which you have made the measurement at the remaining listening positions, "Measurement...

Owner's Manual
Page 39
.... Recommended if all of your subwoofer or external amplifiers if you change speakers, speaker positions, or the layout of your listening environment, run the automatic setup again to adjust the frequency response of the warning message(s) appear in the result display by pressing 9h repeatedly. You can set for each speaker...
.... Recommended if all of your subwoofer or external amplifiers if you change speakers, speaker positions, or the layout of your listening environment, run the automatic setup again to adjust the frequency response of the warning message(s) appear in the result display by pressing 9h repeatedly. You can set for each speaker...

Owner's Manual
Page 51
... quality of the surround speakers may not match that of the selected source. Note This operation will override the level adjustments made in the automatic setup (page 30) and "Level" (page 89). 1 Press CLEVEL and then 9k / n repeatedly to select the speaker you increase or decrease the high-frequency or the...
... quality of the surround speakers may not match that of the selected source. Note This operation will override the level adjustments made in the automatic setup (page 30) and "Level" (page 89). 1 Press CLEVEL and then 9k / n repeatedly to select the speaker you increase or decrease the high-frequency or the...

Owner's Manual
Page 72
... • For further details about networking, refer to enjoy WAV (PCM format only), MP3, MPEG-4 AAC, and WMA files saved on your USB storage device, USB portable audio player, PC and Yamaha MCX-2000 or access the Internet Radio. For details, see "Account setup for sale in the GUI screen..., see "Music Content menu operations" (page 65). For information on your region. *4The account setup screen appears if you to the operation manuals supplied with your network devices. USB ...
... • For further details about networking, refer to enjoy WAV (PCM format only), MP3, MPEG-4 AAC, and WMA files saved on your USB storage device, USB portable audio player, PC and Yamaha MCX-2000 or access the Internet Radio. For details, see "Account setup for sale in the GUI screen..., see "Music Content menu operations" (page 65). For information on your region. *4The account setup screen appears if you to the operation manuals supplied with your network devices. USB ...

Owner's Manual
Page 74
... this unit is same as "CLXXXXX"), the automatic configuration is complete. Using USB and network features Using a PC server or Yamaha MCX-2000 Use this feature to the instruction manual of MCX-2000) and then select "NETWORK" in "ADVANCED SETUP" on this unit (page 122). • The client control functions of MusicCAST over ... to the same subnet as it will stop the playback on your PC. y You can also play back such files immediately unless you set the "Receive PCM Stream" setting of this unit. • Some WAV, MP3, MPEG-4 AAC, and WMA files on your PC may not be playable or...
... this unit is same as "CLXXXXX"), the automatic configuration is complete. Using USB and network features Using a PC server or Yamaha MCX-2000 Use this feature to the instruction manual of MCX-2000) and then select "NETWORK" in "ADVANCED SETUP" on this unit (page 122). • The client control functions of MusicCAST over ... to the same subnet as it will stop the playback on your PC. y You can also play back such files immediately unless you set the "Receive PCM Stream" setting of this unit. • Some WAV, MP3, MPEG-4 AAC, and WMA files on your PC may not be playable or...
Owner's Manual
Page 75
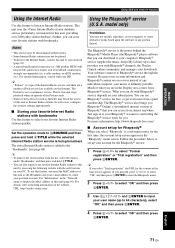
... use Rhapsody® service for free, or get even more information, http://www.rhapsody-free.com/. ■ Account setup for Rhapsody® When you see in the "Network" menu to display the MAC address of this unit, providing over 2000 radio station database. Just sign in the "...infinitely portable. English 71 En This unit uses the vTuner Internet Radio station database service particularly customized for the first time, the account setup screen appears in to your favorite stations with Rhapsody® service depends on servers instead of what you select "Rhapsody" as a ...
... use Rhapsody® service for free, or get even more information, http://www.rhapsody-free.com/. ■ Account setup for Rhapsody® When you see in the "Network" menu to display the MAC address of this unit, providing over 2000 radio station database. Just sign in the "...infinitely portable. English 71 En This unit uses the vTuner Internet Radio station database service particularly customized for the first time, the account setup screen appears in to your favorite stations with Rhapsody® service depends on servers instead of what you select "Rhapsody" as a ...

Owner's Manual
Page 76
... you selected "Remove account", press 9l / h to select "OK" and then press 9ENTER to delete your account. • If you press 0SUBMENU. Using USB and network features 5 Use 9k / n / l / h and 9ENTER to input your password (up M E M O R Y PRESET 1 SONG 72 En Add Album to My Library... account", "Remove account" or "Show trial info" and then press 9ENTER. • If you selected "Upgrade account", follow steps 2 to 5 in "Account setup for each sub input source. ■ Assigning the items to the numeric button (1-8) (B) 1 Select a desired content you want to assign to a numeric button ...
... you selected "Remove account", press 9l / h to select "OK" and then press 9ENTER to delete your account. • If you press 0SUBMENU. Using USB and network features 5 Use 9k / n / l / h and 9ENTER to input your password (up M E M O R Y PRESET 1 SONG 72 En Add Album to My Library... account", "Remove account" or "Show trial info" and then press 9ENTER. • If you selected "Upgrade account", follow steps 2 to 5 in "Account setup for each sub input source. ■ Assigning the items to the numeric button (1-8) (B) 1 Select a desired content you want to assign to a numeric button ...

Owner's Manual
Page 80
Graphical user interface (GUI) menu ■ GUI menu tree Stereo/Surround (page 80) Input Select (page 85) Music Content (page 87) Setup SIRIUS SATELLITE RADIO (U.S.A. and Canada models only) TUNER MULTI CH PHONO CD TV MD/CD-R BD/HD DVD DVD CBL/SAT DVR VCR VIDEO AUX ...DOCK* USB PC/MCX NET RADIO Rhapsody (U.S.A. model only) Auto Setup (page 30) Speaker (page 87) Configuration Front Center Surround Surround Back Front Presence Subwoofer Distance Level Test Tone Volume (page 89) Adaptive DRC Adaptive DSP...
Graphical user interface (GUI) menu ■ GUI menu tree Stereo/Surround (page 80) Input Select (page 85) Music Content (page 87) Setup SIRIUS SATELLITE RADIO (U.S.A. and Canada models only) TUNER MULTI CH PHONO CD TV MD/CD-R BD/HD DVD DVD CBL/SAT DVR VCR VIDEO AUX ...DOCK* USB PC/MCX NET RADIO Rhapsody (U.S.A. model only) Auto Setup (page 30) Speaker (page 87) Configuration Front Center Surround Surround Back Front Presence Subwoofer Distance Level Test Tone Volume (page 89) Adaptive DRC Adaptive DSP...

Owner's Manual
Page 82
...interface (GUI) menu that appears in the front panel display or in the GUI menu. Input Select Music Content Setup Language Stereo/Surround Sound Video HDMI System Memory Network ■ Stereo/Surround (Stereo/Surround menu) Use this feature to select the sound field programs and customize the... (Sound menu) See page 90 for details. Network (Network menu) See page 95 for details about the basic operations in the GUI menu of this unit. model only) (page 87). ■ Setup (Setup menu) Use this feature to run the automatic setup and specify which speaker parameters to "GUI menu ...
...interface (GUI) menu that appears in the front panel display or in the GUI menu. Input Select Music Content Setup Language Stereo/Surround Sound Video HDMI System Memory Network ■ Stereo/Surround (Stereo/Surround menu) Use this feature to select the sound field programs and customize the... (Sound menu) See page 90 for details. Network (Network menu) See page 95 for details about the basic operations in the GUI menu of this unit. model only) (page 87). ■ Setup (Setup menu) Use this feature to run the automatic setup and specify which speaker parameters to "GUI menu ...

