
Owners Manual
Page 5
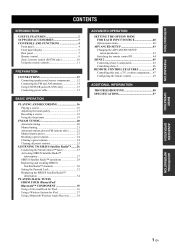
... SUPPLIED ACCESSORIES 3 CONTROLS AND FUNCTIONS 4 Front panel 4 Front panel display 6 Rear panel 7 Remote control 8 Zone 2 remote control (R-S700 only 10 Using the remote controls 11 PREPARATION CONNECTIONS 12 Connecting speakers and source components.......... 12 Connecting the FM and AM antennas 14 Using ...8482; COMPONENT 35 Using a Universal Dock for iPod 36 Using a Wireless System for iPod 37 Using a Bluetooth Wireless Audio Receiver 38 ADVANCED OPERATION SETTING THE OPTION MENU FOR EACH INPUT SOURCE 40 Option menu items 40 ADVANCED SETUP 43 Changing the ADVANCED SETUP...
... SUPPLIED ACCESSORIES 3 CONTROLS AND FUNCTIONS 4 Front panel 4 Front panel display 6 Rear panel 7 Remote control 8 Zone 2 remote control (R-S700 only 10 Using the remote controls 11 PREPARATION CONNECTIONS 12 Connecting speakers and source components.......... 12 Connecting the FM and AM antennas 14 Using ...8482; COMPONENT 35 Using a Universal Dock for iPod 36 Using a Wireless System for iPod 37 Using a Bluetooth Wireless Audio Receiver 38 ADVANCED OPERATION SETTING THE OPTION MENU FOR EACH INPUT SOURCE 40 Option menu items 40 ADVANCED SETUP 43 Changing the ADVANCED SETUP...

Owners Manual
Page 7
...dusty places • Use AAA, R03, UM-4 batteries for the remote control. • Use a CR2025 battery for the Zone 2 remote control (R-S700 only). • Insert batteries according to the polarity markings (+ and -). • Change all of extremely low temperatures - Clean the battery compartment thoroughly ...• Dispose of batteries (such as near a bath - If the leaked material comes into contact with new ones. Batteries that you received all batteries if you find leaking batteries, discard the batteries immediately, taking care not to leak. • Do not use old batteries ...
...dusty places • Use AAA, R03, UM-4 batteries for the remote control. • Use a CR2025 battery for the Zone 2 remote control (R-S700 only). • Insert batteries according to the polarity markings (+ and -). • Change all of extremely low temperatures - Clean the battery compartment thoroughly ...• Dispose of batteries (such as near a bath - If the leaked material comes into contact with new ones. Batteries that you received all batteries if you find leaking batteries, discard the batteries immediately, taking care not to leak. • Do not use old batteries ...

Owners Manual
Page 8
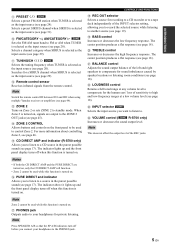
...of this unit's Main Zone unit or sets the Main Zone to standby mode (see page 16). CONTROLS AND FUNCTIONS CONTROLS AND FUNCTIONS Front panel (R-S700) y indicates buttons and controls that is connected using a Universal Dock for iPod. 6 MEMORY Stores the current FM/AM station as a preset ... SPEAKERS A/B Turns on the rear panel each time the corresponding button is pressed (see page 16). 4 DIMMER Changes the brightness level of power to receive infrared signals from 3 levels by pressing this unit. 5 FM MODE/INFO Changes the FM radio wave reception mode (stereo or monaural) when TUNER is...
...of this unit's Main Zone unit or sets the Main Zone to standby mode (see page 16). CONTROLS AND FUNCTIONS CONTROLS AND FUNCTIONS Front panel (R-S700) y indicates buttons and controls that is connected using a Universal Dock for iPod. 6 MEMORY Stores the current FM/AM station as a preset ... SPEAKERS A/B Turns on the rear panel each time the corresponding button is pressed (see page 16). 4 DIMMER Changes the brightness level of power to receive infrared signals from 3 levels by pressing this unit. 5 FM MODE/INFO Changes the FM radio wave reception mode (stereo or monaural) when TUNER is...
Owners Manual
Page 9
...as the input source (see page 20). C ZONE 2 Turns on the front panel to be used to control Zone 2. E CD DIRECT AMP and indicator (R-S700 only) Allows you to record the selected source while listening to a CD source in the purest possible sound (see page 17). CONTROLS AND FUNCTIONS H REC... channel when SIRIUS is selected as the input source (see page 17). Note Switch the remote control ID between ID1 and ID2 when using multiple Yamaha receivers or amplifiers (see page 18). When Zone 2 is turned on , signals are turned on, only the CD DIRECT AMP will function. • Zone 2 ...
...as the input source (see page 20). C ZONE 2 Turns on the front panel to be used to control Zone 2. E CD DIRECT AMP and indicator (R-S700 only) Allows you to record the selected source while listening to a CD source in the purest possible sound (see page 17). CONTROLS AND FUNCTIONS H REC... channel when SIRIUS is selected as the input source (see page 17). Note Switch the remote control ID between ID1 and ID2 when using multiple Yamaha receivers or amplifiers (see page 18). When Zone 2 is turned on , signals are turned on, only the CD DIRECT AMP will function. • Zone 2 ...
Owners Manual
Page 11
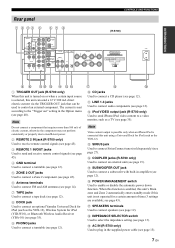
... the component may not perform consistently or properly due to insufficient power. 2 REMOTE 2 IN jack (R-S700 only) Used to receive remote control signals (see page 45). 3 REMOTE 1 IN/OUT jacks Used to send and receive remote control signals (see page 45). 4 GND terminal Used to connect a turntable (see page 12...Used to connect a tape deck (see page 12). 8 DOCK jack Used to connect an optional Yamaha Universal Dock for iPod (such as the YDS-12), Wireless System for iPod (YID-W10), or Bluetooth Wireless Audio Receiver (YBA-10) (see page 35). 9 PHONO jacks Used to connect a turntable (see page...
... the component may not perform consistently or properly due to insufficient power. 2 REMOTE 2 IN jack (R-S700 only) Used to receive remote control signals (see page 45). 3 REMOTE 1 IN/OUT jacks Used to send and receive remote control signals (see page 45). 4 GND terminal Used to connect a turntable (see page 12...Used to connect a tape deck (see page 12). 8 DOCK jack Used to connect an optional Yamaha Universal Dock for iPod (such as the YDS-12), Wireless System for iPod (YID-W10), or Bluetooth Wireless Audio Receiver (YBA-10) (see page 35). 9 PHONO jacks Used to connect a turntable (see page...

Owners Manual
Page 12
... 40). After using the Option menu (see page 40). For more information about Zone 2, see pages 45 and 46. 2 RECEIVER A Turns this unit or other components made by Yamaha or other external components (see page 40). 8 SPEAKERS A/B Turns on the rear panel of this unit when the corresponding button ... menu display when using the remote control to control one of your other manufacturers. A RETURN Returns to the previous volume level. 0 VOLUME +/- ( R-S700 only) Increases or decreases the sound output level. ■ Common controls The following buttons can be sent to control Zone 2.
... 40). After using the Option menu (see page 40). For more information about Zone 2, see pages 45 and 46. 2 RECEIVER A Turns this unit or other components made by Yamaha or other external components (see page 40). 8 SPEAKERS A/B Turns on the rear panel of this unit when the corresponding button ... menu display when using the remote control to control one of your other manufacturers. A RETURN Returns to the previous volume level. 0 VOLUME +/- ( R-S700 only) Increases or decreases the sound output level. ■ Common controls The following buttons can be sent to control Zone 2.
Owners Manual
Page 20
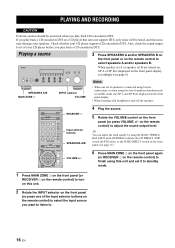
...A or SP B is connected using bi-wire connections, or when using the BASS, TREBLE, BALANCE and LOUDNESS controls, the CD DIRECT AMP switch (R-S700 only), or the PURE DIRECT switch on the remote control to . 16 En Playing a source 3 Press SPEAKERS A and/or SPEAKERS B on the ...front panel or on the front panel (see page 6). RECEIVER A Input selector buttons SPEAKERS A/B 4 Play the source. 5 Rotate the VOLUME control on the remote control) to turn off the speakers. When speaker set ...
...A or SP B is connected using bi-wire connections, or when using the BASS, TREBLE, BALANCE and LOUDNESS controls, the CD DIRECT AMP switch (R-S700 only), or the PURE DIRECT switch on the remote control to . 16 En Playing a source 3 Press SPEAKERS A and/or SPEAKERS B on the ...front panel or on the front panel (see page 6). RECEIVER A Input selector buttons SPEAKERS A/B 4 Play the source. 5 Rotate the VOLUME control on the remote control) to turn off the speakers. When speaker set ...
Owners Manual
Page 39
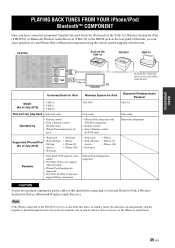
... Bluetooth Wireless Audio Receiver Model (As of... with this unit. (R-S700) Such as the YDS... • Zone 2 Remote control (R-S700 only) • iPhone/iPod connected to ...; Remote control • Zone 2 Remote control (R-S700 only) Bluetooth components Supported iPhone/iPod (As of...3G • iPhone 3GS Remarks • Only the R-S700 supports video output. • The YDS-10 does not...call is received, set the iPhone to the YID-W10 receives a ...-W10), or Bluetooth Wireless Audio Receiver (YBA-10) to the DOCK...iPod or a Bluetooth Wireless Audio Receiver. iPhone/iPod charging also supported. ...
... Bluetooth Wireless Audio Receiver Model (As of... with this unit. (R-S700) Such as the YDS... • Zone 2 Remote control (R-S700 only) • iPhone/iPod connected to ...; Remote control • Zone 2 Remote control (R-S700 only) Bluetooth components Supported iPhone/iPod (As of...3G • iPhone 3GS Remarks • Only the R-S700 supports video output. • The YDS-10 does not...call is received, set the iPhone to the YID-W10 receives a ...-W10), or Bluetooth Wireless Audio Receiver (YBA-10) to the DOCK...iPod or a Bluetooth Wireless Audio Receiver. iPhone/iPod charging also supported. ...
Owners Manual
Page 49
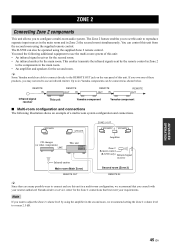
... the following illustration shows an example of this unit: • An infrared signal receiver for the second room. • An infrared emitter for the second room. Up to six Yamaha components can also be connected as shown below. The R-S700 can be operated using the supplied Zone 2 remote control. You need to use...
... the following illustration shows an example of this unit: • An infrared signal receiver for the second room. • An infrared emitter for the second room. Up to six Yamaha components can also be connected as shown below. The R-S700 can be operated using the supplied Zone 2 remote control. You need to use...


