

Firmware Update Guide
Page 1
...; Corporation in the United States and other countries. ・ The company names and product names in this guide are for choosing a Yamaha product. This guide explains how to update the QL series (QL5 and QL1) firmware and its built-in Dante module firmware. ■ Precautions (Please be sure to read this section first...
...; Corporation in the United States and other countries. ・ The company names and product names in this guide are for choosing a Yamaha product. This guide explains how to update the QL series (QL5 and QL1) firmware and its built-in Dante module firmware. ■ Precautions (Please be sure to read this section first...

Firmware Update Guide
Page 2
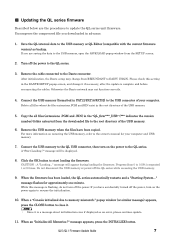
...FAT12/FAT16/FAT32) USB memory In the QL series unit, memory of 4GB or larger will need the following items ready to execute the update procedure. ● A Windows computer equipped with the computer or its OS. ● The QL series firmware Download the latest firmware from ... Connector An Ethernet connector that supports a data transfer rate of the firmware in a computer, refer to "QL5/ QL1 Reference Manual." http://www.yamahaproaudio.com/downloads/ QL5/QL1 Firmware Update Guide 2 ■ Checking the version number You may check the QL main firmware version number and the ...
...FAT12/FAT16/FAT32) USB memory In the QL series unit, memory of 4GB or larger will need the following items ready to execute the update procedure. ● A Windows computer equipped with the computer or its OS. ● The QL series firmware Download the latest firmware from ... Connector An Ethernet connector that supports a data transfer rate of the firmware in a computer, refer to "QL5/ QL1 Reference Manual." http://www.yamahaproaudio.com/downloads/ QL5/QL1 Firmware Update Guide 2 ■ Checking the version number You may check the QL main firmware version number and the ...
Firmware Update Guide
Page 3
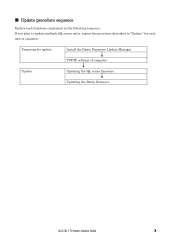
Preparing for each firmware component in the following sequence. ■ Update procedure sequence Update each unit in sequence. If you plan to update multiple QL series units, repeat the procedure described in "Update" for update Install the Dante Firmware Update Manager TCP/IP settings of computer Update Updating the QL series firmware Updating the Dante firmware QL5/QL1 Firmware Update Guide 3
Preparing for each firmware component in the following sequence. ■ Update procedure sequence Update each unit in sequence. If you plan to update multiple QL series units, repeat the procedure described in "Update" for update Install the Dante Firmware Update Manager TCP/IP settings of computer Update Updating the QL series firmware Updating the Dante firmware QL5/QL1 Firmware Update Guide 3
Firmware Update Guide
Page 4
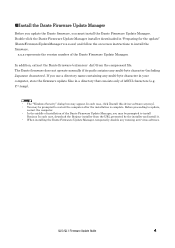
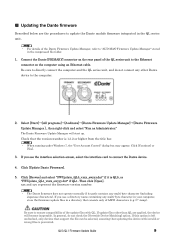
...]. ・ You may be prompted to install Bonjour. QL5/QL1 Firmware Update Guide 4 ■Install the Dante Firmware Update Manager Before you update the Dante firmware, you use a directory name containing any multi-byte character in your computer, store the firmware update files in "Preparing for the update" (DanteFirmwareUpdateManager-x.x.x.exe) and follow the on-screen instructions...
...]. ・ You may be prompted to install Bonjour. QL5/QL1 Firmware Update Guide 4 ■Install the Dante Firmware Update Manager Before you update the Dante firmware, you use a directory name containing any multi-byte character in your computer, store the firmware update files in "Preparing for the update" (DanteFirmwareUpdateManager-x.x.x.exe) and follow the on-screen instructions...
Firmware Update Guide
Page 5
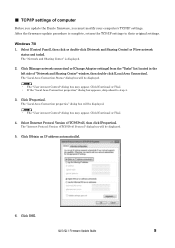
... and tasks]. Click [Manage network connection] or [Change Adapter settings] from the "Tasks" list located in the left side of computer Before you update the Dante firmware, you must modify your computer's TCP/IP settings. Click [OK]. Windows 7/8 1. Click [Continue] or [Yes]. ・ If... Connection Status" dialog box will be displayed. ・ The "User Account Control" dialog box may appear. Click [Continue] or [Yes]. 4. QL5/QL1 Firmware Update Guide 5 ■ TCP/IP settings of "Network and Sharing Center" window, then double-click [Local Area Connection]. After the firmware...
... and tasks]. Click [Manage network connection] or [Change Adapter settings] from the "Tasks" list located in the left side of computer Before you update the Dante firmware, you must modify your computer's TCP/IP settings. Click [OK]. Windows 7/8 1. Click [Continue] or [Yes]. ・ If... Connection Status" dialog box will be displayed. ・ The "User Account Control" dialog box may appear. Click [Continue] or [Yes]. 4. QL5/QL1 Firmware Update Guide 5 ■ TCP/IP settings of "Network and Sharing Center" window, then double-click [Local Area Connection]. After the firmware...
Firmware Update Guide
Page 6
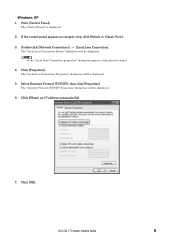
If the control panel appears as category view, click [Switch to step 5. 4. QL5/QL1 Firmware Update Guide 6 Click [Control Panel]. The "Internet Protocol (TCP/IP) Properties" dialog box will be displayed. ・ If the "Local Area Connection properties" dialog box appears, ...
If the control panel appears as category view, click [Switch to step 5. 4. QL5/QL1 Firmware Update Guide 6 Click [Control Panel]. The "Internet Protocol (TCP/IP) Properties" dialog box will be displayed. ・ If the "Local Area Connection properties" dialog box appears, ...
Firmware Update Guide
Page 7
...flashing, do not turn on the power to the USB memory or QL Editor (compatible with the current firmware version) as an error, please continue update. 11. Copy the all files when the files extensions.PGM and.BIN exist in the root directory of the USB memory. 5. A "Start ...will be displayed. 8. When an "Initialize All Memories ?" For more information on the power again to DAISY CHAIN. message flashes for your computer. QL5/QL1 Firmware Update Guide 7 Delete all files (extensions .PGM and .BIN) in the DANTE SETUP popup screen, and change from the SETUP screen. 2. If you ...
...flashing, do not turn on the power to the USB memory or QL Editor (compatible with the current firmware version) as an error, please continue update. 11. Copy the all files when the files extensions.PGM and.BIN exist in the root directory of the USB memory. 5. A "Start ...will be displayed. 8. When an "Initialize All Memories ?" For more information on the power again to DAISY CHAIN. message flashes for your computer. QL5/QL1 Firmware Update Guide 7 Delete all files (extensions .PGM and .BIN) in the DANTE SETUP popup screen, and change from the SETUP screen. 2. If you ...

Firmware Update Guide
Page 8
Remove the USB memory after confirming the ACCESS indicator has disappeared in the SETUP screen. QL5/QL1 Firmware Update Guide 8 message appears, press the OK button. 12. When the initialization is complete, press the EXIT button. 14. If necessary, confirm the firmware was correctly updated in the version field in the function access area. 15. Initializing the internal memory will be started. 13. When an "Are you sure ?"
Remove the USB memory after confirming the ACCESS indicator has disappeared in the SETUP screen. QL5/QL1 Firmware Update Guide 8 message appears, press the OK button. 12. When the initialization is complete, press the EXIT button. 14. If necessary, confirm the firmware was correctly updated in the version field in the function access area. 15. Initializing the internal memory will be started. 13. When an "Are you sure ?"
Firmware Update Guide
Page 9
... the QL series unit to the Ethernet connector on the rear panel of the Dante Firmware Update Manager, refer to connect the Dante device. 4. C:\temp). If update files other Dante device to the computer. 2. QL5/QL1 Firmware Update Guide 9 Click [Continue] or [Yes]. 3. If you use a directory name containing any multi-byte character in...
... the QL series unit to the Ethernet connector on the rear panel of the Dante Firmware Update Manager, refer to connect the Dante device. 4. C:\temp). If update files other Dante device to the computer. 2. QL5/QL1 Firmware Update Guide 9 Click [Continue] or [Yes]. 3. If you use a directory name containing any multi-byte character in...

Firmware Update Guide
Page 10
... properly configured, and the QL is not completed after that, the computer and the QL are not connected properly. The update operation will begin. If update fails due to disconnection of the power cable during updating. QL5/QL1 Firmware Update Guide 10 6. Check the QL to 4 minutes. If it is completed. "Done" is displayed once...
... properly configured, and the QL is not completed after that, the computer and the QL are not connected properly. The update operation will begin. If update fails due to disconnection of the power cable during updating. QL5/QL1 Firmware Update Guide 10 6. Check the QL to 4 minutes. If it is completed. "Done" is displayed once...
Firmware Update Guide
Page 11
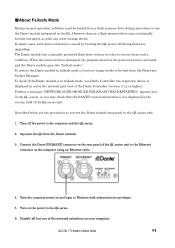
...use the Dante module integrated in order to the Ethernet connector on your computer. Turn off during operations to be sent from the Firmware Update Manager. appears also in the QL screen, so you may occasionally become corrupted, as with administrative privileges. 5. Turn the computer power ... to recover the Dante module integrated in the QL series unit. 1. Further, a message "NETWORK AUDIO MODULE FAILED AND WAS RESTARTED." QL5/QL1 Firmware Update Guide 11 The Dante module has a specially protected flash drive section in the QL. To check if the Dante module is displayed in...
...use the Dante module integrated in order to the Ethernet connector on your computer. Turn off during operations to be sent from the Firmware Update Manager. appears also in the QL screen, so you may occasionally become corrupted, as with administrative privileges. 5. Turn the computer power ... to recover the Dante module integrated in the QL series unit. 1. Further, a message "NETWORK AUDIO MODULE FAILED AND WAS RESTARTED." QL5/QL1 Firmware Update Guide 11 The Dante module has a specially protected flash drive section in the QL. To check if the Dante module is displayed in...
Firmware Update Guide
Page 12
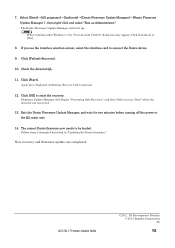
... the device(s) are completed. If you wish to connect the Dante device. 9. Click [Start]. Follow steps 2 through 9 described in "Updating the Dante firmware." QL5/QL1 Firmware Update Guide C.S.G., PA Development Division © 2014 Yamaha Corporation A0 12 Click [Failsafe Recovery]. 10. Click [OK] to start up is displayed confirming that you see the interface...
... the device(s) are completed. If you wish to connect the Dante device. 9. Click [Start]. Follow steps 2 through 9 described in "Updating the Dante firmware." QL5/QL1 Firmware Update Guide C.S.G., PA Development Division © 2014 Yamaha Corporation A0 12 Click [Failsafe Recovery]. 10. Click [OK] to start up is displayed confirming that you see the interface...

Owner's Manual
Page 2
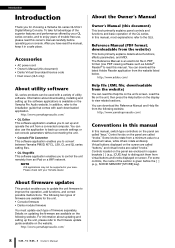
Contents PRECAUTIONS 5 Introduction 8 Accessories 8 About utility software 8 About firmware updates 8 About the Owner's Manual 8 Conventions in this manual 8 An overview of the QL series 9 Features 9 About the models 10 Controls and functions 11 Top panel ...
Contents PRECAUTIONS 5 Introduction 8 Accessories 8 About utility software 8 About firmware updates 8 About the Owner's Manual 8 Conventions in this manual 8 An overview of the QL series 9 Features 9 About the models 10 Controls and functions 11 Top panel ...
Owner's Manual
Page 8
...it in PDF format. Virtual buttons displayed on the screen are called "buttons," and virtual knobs are available for choosing a Yamaha QL series QL5/QL1 Digital Mixing Console. The following two types of the section is an electronic file in a safe place. Reference Manual ... [CUE] key) to distinguish them from the website) This book primarily explains details about functions, effects parameters, and MIDI. Details on updating the firmware are called "keys." Introduction Introduction Thank you to control the unit remotely from an iPad on a WiFi network. http://www....
...it in PDF format. Virtual buttons displayed on the screen are called "buttons," and virtual knobs are available for choosing a Yamaha QL series QL5/QL1 Digital Mixing Console. The following two types of the section is an electronic file in a safe place. Reference Manual ... [CUE] key) to distinguish them from the website) This book primarily explains details about functions, effects parameters, and MIDI. Details on updating the firmware are called "keys." Introduction Introduction Thank you to control the unit remotely from an iPad on a WiFi network. http://www....

Owner's Manual
Page 49
... Does the channel being input, but it takes a certain amount of time for each channel's voice input and output, the indication may be updated? Could user level restrictions have been specified? You turn on each INPUT channel and OUTPUT PORT is set in such a way that is... channel name display, because of the response speed of LCDs and not a malfunction. Owner's Manual 49 The panel LEDs or LCD display are not updated. Could that channel or parameter be playing back? Cannot control the QL unit from StageMix. Is the WiFi setting in the ...
... Does the channel being input, but it takes a certain amount of time for each channel's voice input and output, the indication may be updated? Could user level restrictions have been specified? You turn on each INPUT channel and OUTPUT PORT is set in such a way that is... channel name display, because of the response speed of LCDs and not a malfunction. Owner's Manual 49 The panel LEDs or LCD display are not updated. Could that channel or parameter be playing back? Cannot control the QL unit from StageMix. Is the WiFi setting in the ...

Ql Editor Installation Guide
Page 1
... backup copy is violated, the Agreement shall terminate automatically and immediately without permission of the SOFTWARE may not be used for any updates to be protected under relevant copyrights. • You may use the SOFTWARE to the following restrictions which you are subject to.... YOU ARE ONLY PERMITTED TO USE THIS SOFTWARE PURSUANT TO THE TERMS AND CONDITIONS OF THIS AGREEMENT. The SOFTWARE is owned by Yamaha and/or Yamaha's licensor(s), and is on your sole risk. RESTRICTIONS • You may not engage in reverse engineering, disassembly, decompilation or otherwise...
... backup copy is violated, the Agreement shall terminate automatically and immediately without permission of the SOFTWARE may not be used for any updates to be protected under relevant copyrights. • You may use the SOFTWARE to the following restrictions which you are subject to.... YOU ARE ONLY PERMITTED TO USE THIS SOFTWARE PURSUANT TO THE TERMS AND CONDITIONS OF THIS AGREEMENT. The SOFTWARE is owned by Yamaha and/or Yamaha's licensor(s), and is on your sole risk. RESTRICTIONS • You may not engage in reverse engineering, disassembly, decompilation or otherwise...

Ql Editor Installation Guide
Page 4
..." window appears, click [Continue] or [Yes]. *** indicates the version number. 2 Follow the on the particular operating system. Keep in mind that the software is often updated and the system requirements are applied to the QL Editor version 1.0.0. Software installation Minimum System Requirements The system requirements below may differ slightly depending on...
..." window appears, click [Continue] or [Yes]. *** indicates the version number. 2 Follow the on the particular operating system. Keep in mind that the software is often updated and the system requirements are applied to the QL Editor version 1.0.0. Software installation Minimum System Requirements The system requirements below may differ slightly depending on...

Ql Editor Owner's Manual
Page 1
...software. • The screen displays as illustrated in this owner's manual are for information purposes only. reserves the right to version update of the application, please visit the following website: http://www.yamahaproaudio.com/ • Windows is expressly forbidden without prior notice....The company names and product names in this Owner's Manual are the trademarks or registered trademarks of their respective companies. ❏ Yamaha Pro Audio Global Site http://www.yamahaproaudio.com/ Contents Getting Started 2 Master window 9 Overview window 12 Selected Channel window 25 ...
...software. • The screen displays as illustrated in this owner's manual are for information purposes only. reserves the right to version update of the application, please visit the following website: http://www.yamahaproaudio.com/ • Windows is expressly forbidden without prior notice....The company names and product names in this Owner's Manual are the trademarks or registered trademarks of their respective companies. ❏ Yamaha Pro Audio Global Site http://www.yamahaproaudio.com/ Contents Getting Started 2 Master window 9 Overview window 12 Selected Channel window 25 ...

Ql Editor Owner's Manual
Page 8
... because QL Editor loads the sampling frequency from the [Synchronization] with the PC -> Console option to your console, select [Re-Synchronize] from the console and updates the display. NOTE Some effect parameters in the Master window. Therefore, you must first match the parameter settings on the console and the parameter settings...
... because QL Editor loads the sampling frequency from the [Synchronization] with the PC -> Console option to your console, select [Re-Synchronize] from the console and updates the display. NOTE Some effect parameters in the Master window. Therefore, you must first match the parameter settings on the console and the parameter settings...

Ql Stagemix V4.2 User Guide
Page 43
... Note: the [DEC SCENE] and [INC SCENE] buttons will cause it is changed. Yamaha Professional Audio QL StageMix User Guide Current Scene is 005, pressing the [INC SCENE] button will appear. Then press the [UPDATE RANGE] button in StageMix, a Scene Range can be sent from Scene 0 to access ...other Scenes. Enter a number for the First and/or Last Scenes in the list to 300. To minimize the time required to update the Scene List in this selected Scene will be displayed to access the iPad's onscreen keyboard. These details include the following: Page 43 Drag...
... Note: the [DEC SCENE] and [INC SCENE] buttons will cause it is changed. Yamaha Professional Audio QL StageMix User Guide Current Scene is 005, pressing the [INC SCENE] button will appear. Then press the [UPDATE RANGE] button in StageMix, a Scene Range can be sent from Scene 0 to access ...other Scenes. Enter a number for the First and/or Last Scenes in the list to 300. To minimize the time required to update the Scene List in this selected Scene will be displayed to access the iPad's onscreen keyboard. These details include the following: Page 43 Drag...
