
Owners Manual
Page 2
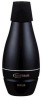
Contents of Set ● Pickup Mute™ PM9/PM7/PM6/PM5/PM3/PM2/PM1 ● Cable ● Owner's Manual * Personal Studio™ ST9 is not included. 11 In order to read this Owner's Manual in a safe place for purchasing the Yamaha SILENT BRASS™ Pickup Mute™. Please keep this Owner's Manual thoroughly before using. Pickup Mute™ Thank you to obtain the maximum performance and enjoyment from your Pickup Mute™, we urge you for later reference.
Contents of Set ● Pickup Mute™ PM9/PM7/PM6/PM5/PM3/PM2/PM1 ● Cable ● Owner's Manual * Personal Studio™ ST9 is not included. 11 In order to read this Owner's Manual in a safe place for purchasing the Yamaha SILENT BRASS™ Pickup Mute™. Please keep this Owner's Manual thoroughly before using. Pickup Mute™ Thank you to obtain the maximum performance and enjoyment from your Pickup Mute™, we urge you for later reference.
Owners Manual
Page 3
... mm (7-1/2" x 16-1/8") 380 x 980 mm (14-15/16" x 38-9/16") * assembled size Width at handle - - - - 150mm 220mm 430mm ● Common specifications for all models: Internal Microphone: Electric condenser microphone, Nominal Level: -25dB to -35dB, Material: ABS resin * Specifications and design are subject to change without notice. Weight 80g (2.8oz.) 120g (4.2oz.) 270g (9.5oz.) 300g (10.5oz.) 800g (1lbs...
... mm (7-1/2" x 16-1/8") 380 x 980 mm (14-15/16" x 38-9/16") * assembled size Width at handle - - - - 150mm 220mm 430mm ● Common specifications for all models: Internal Microphone: Electric condenser microphone, Nominal Level: -25dB to -35dB, Material: ABS resin * Specifications and design are subject to change without notice. Weight 80g (2.8oz.) 120g (4.2oz.) 270g (9.5oz.) 300g (10.5oz.) 800g (1lbs...

Owners Manual
Page 4
... SPECIFICATIONS SUBJECT TO CHANGE: The information contained in the user-maintenance instructions. NOTICE: Service charges incurred due to a lack of knowledge relating to how a function or effect works (when the unit is unable to assist you experience any of the specifications without notice or obligation to update existing units. Do not attempt to service this manual is uncomfortable. If you , please contact Yamaha...
... SPECIFICATIONS SUBJECT TO CHANGE: The information contained in the user-maintenance instructions. NOTICE: Service charges incurred due to a lack of knowledge relating to how a function or effect works (when the unit is unable to assist you experience any of the specifications without notice or obligation to update existing units. Do not attempt to service this manual is uncomfortable. If you , please contact Yamaha...

Owners Manual
Page 5
Set up and Use ■ Personal Studio™ ST9 Connecting Cable Stereo Earphones PM7 for TRUMPET PM6 for FLUGELHORN PM5 for TROMBONE Lock Nut PM9 for PICCOLO TRUMPET Handle (P. 17) Handle 14 PM3 for FRENCH HORN PM2 for EUPHONIUM
Set up and Use ■ Personal Studio™ ST9 Connecting Cable Stereo Earphones PM7 for TRUMPET PM6 for FLUGELHORN PM5 for TROMBONE Lock Nut PM9 for PICCOLO TRUMPET Handle (P. 17) Handle 14 PM3 for FRENCH HORN PM2 for EUPHONIUM
Owners Manual
Page 6
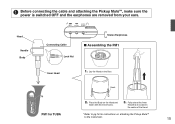
Place the Body on the floor. Fully extend the Inner Head that is switched OFF and the earphones are removed from your ears. Lay the Head on the Head and fasten with the three hooks. 3. Before connecting the cable and attaching the Pickup Mute™, make sure the power is located in the center of the Head. * Refer to pg.16 for TUBA 2. Hook PM1 for instructions on attaching the Pickup Mute™ to the instrument. 15 Head Handle Body Connecting Cable Lock Nut Stereo Earphones ■ Assembling the PM1 Inner Head 1.
Place the Body on the floor. Fully extend the Inner Head that is switched OFF and the earphones are removed from your ears. Lay the Head on the Head and fasten with the three hooks. 3. Before connecting the cable and attaching the Pickup Mute™, make sure the power is located in the center of the Head. * Refer to pg.16 for TUBA 2. Hook PM1 for instructions on attaching the Pickup Mute™ to the instrument. 15 Head Handle Body Connecting Cable Lock Nut Stereo Earphones ■ Assembling the PM1 Inner Head 1.
Owners Manual
Page 7
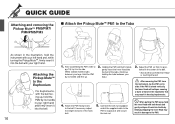
...by its side. Adjust the PM1 so that may result in damage to the PM1. Connect the lock nut... noise in the earphones that it is touching the bell. Strongly dropping the Inner Head may result in hearing impairments. 4. After assembling the PM1 (refer to pg. 15)...adjust the length (tension) of the supplied cable to the PM1's output jack and secure the lock nut. QUICK GUIDE Attaching and removing the Pickup Mute™ PM9/PM7/ PM6/PM5/PM3 ■ Attach the Pickup Mute™ PM1 to the Tuba As shown in the illustration, hold the instrument with your left hand and, while turning...
...by its side. Adjust the PM1 so that may result in damage to the PM1. Connect the lock nut... noise in the earphones that it is touching the bell. Strongly dropping the Inner Head may result in hearing impairments. 4. After assembling the PM1 (refer to pg. 15)...adjust the length (tension) of the supplied cable to the PM1's output jack and secure the lock nut. QUICK GUIDE Attaching and removing the Pickup Mute™ PM9/PM7/ PM6/PM5/PM3 ■ Attach the Pickup Mute™ PM1 to the Tuba As shown in the illustration, hold the instrument with your left hand and, while turning...
Owners Manual
Page 8
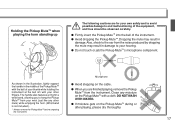
...your thumb while holding the instrument at the bell rim with a cloth. Also, shock to the ear from the noise produced by dropping the mute may result in damage. Microphone As shown in the illustration, lightly support the handle in damage ...features a ring for your other mute) while emptying the horn. (Wrist band is not included.) * Always remove the Pickup Mute™ before emptying the instrument. ● Avoid stepping on the Pickup Mute™ during or after playing, please dry thoroughly. 17 Clean any other fingers. Holding the Pickup Mute™ when playing the horn standing...
...your thumb while holding the instrument at the bell rim with a cloth. Also, shock to the ear from the noise produced by dropping the mute may result in damage. Microphone As shown in the illustration, lightly support the handle in damage ...features a ring for your other mute) while emptying the horn. (Wrist band is not included.) * Always remove the Pickup Mute™ before emptying the instrument. ● Avoid stepping on the Pickup Mute™ during or after playing, please dry thoroughly. 17 Clean any other fingers. Holding the Pickup Mute™ when playing the horn standing...

Owners Manual
Page 9
Do not disturb your neighbours during late hours. The sudden noise may also may result in hearing impairments. Don't step on the cable * Personal Studio™ ST9 and stereo earphones are not included. 18 Disconnecting the cable while the power is ON may result in damage to the Pickup Mute™ output jack and tighten the LOCK NUT. QUICK GUIDE Stereo Earphones Signal path From OUTPUT/ PHONES ST9 To INPUT Pickup Mute TM Insert firmly Tighten the Lock Nut Connect the supplied cable to the unit.
Do not disturb your neighbours during late hours. The sudden noise may also may result in hearing impairments. Don't step on the cable * Personal Studio™ ST9 and stereo earphones are not included. 18 Disconnecting the cable while the power is ON may result in damage to the Pickup Mute™ output jack and tighten the LOCK NUT. QUICK GUIDE Stereo Earphones Signal path From OUTPUT/ PHONES ST9 To INPUT Pickup Mute TM Insert firmly Tighten the Lock Nut Connect the supplied cable to the unit.

