
Owners Manual
Page 2
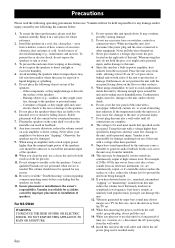
... faulty. 13. The cabinet should be taken not to exceed the maximum input of this unit by falling objects. For NS-SW40 WARNING TO REDUCE THE RISK OF FIRE OR ELECTRIC SHOCK, DO NOT EXPOSE THIS APPLIANCE TO RAIN OR MOISTURE. 1. Do not operate this ... amplifier, heat radiates from the turntable. 10. Containers of electrical humming (e.g., transformers and motors). Placing the speakers on a TV. Do not attempt to this case, move the unit away from the rear panel. Yamaha is not responsible for damage resulting from being damaged. 11. When moving this unit, first disconnect the...
... faulty. 13. The cabinet should be taken not to exceed the maximum input of this unit by falling objects. For NS-SW40 WARNING TO REDUCE THE RISK OF FIRE OR ELECTRIC SHOCK, DO NOT EXPOSE THIS APPLIANCE TO RAIN OR MOISTURE. 1. Do not operate this ... amplifier, heat radiates from the turntable. 10. Containers of electrical humming (e.g., transformers and motors). Placing the speakers on a TV. Do not attempt to this case, move the unit away from the rear panel. Yamaha is not responsible for damage resulting from being damaged. 11. When moving this unit, first disconnect the...
Owners Manual
Page 3
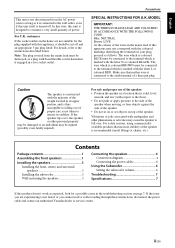
...recommended (metal fittings or chains, etc.). Contents Package contents 1 Assembling the front speakers 1 Installing the speakers 3 Installing the front, center, and surround speakers 3 Installing the subwoofer 3 Wall-mounting the speakers 3 Connecting the speakers 4 Connection diagram 4 Connecting the power cables 6 Using the Subwoofer 6 Setting...in the troubleshooting section on top of the speaker is not listed, or you cannot resolve it after reading through these instructions, disconnect the power cable and contact an authorized Yamaha dealer or service center. If the issue ...
...recommended (metal fittings or chains, etc.). Contents Package contents 1 Assembling the front speakers 1 Installing the speakers 3 Installing the front, center, and surround speakers 3 Installing the subwoofer 3 Wall-mounting the speakers 3 Connecting the speakers 4 Connection diagram 4 Connecting the power cables 6 Using the Subwoofer 6 Setting...in the troubleshooting section on top of the speaker is not listed, or you cannot resolve it after reading through these instructions, disconnect the power cable and contact an authorized Yamaha dealer or service center. If the issue ...
Owners Manual
Page 4
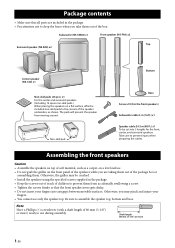
...5 lengths for the front, center, and surround speakers. Be sure to prevent injury when preparing the cables. Take care to assemble the speaker top, bottom and base. Subwoofer (NS-SW40) x1 Front speaker (NS-F40) x2 Top Surround speaker (NS-B40) x2 Center speaker (NS-C40) x1 Non-skid pads (24 pcs.) ...x1 For the center and surround speakers. (Including 12 spare non-skid pads.) When...
...5 lengths for the front, center, and surround speakers. Be sure to prevent injury when preparing the cables. Take care to assemble the speaker top, bottom and base. Subwoofer (NS-SW40) x1 Front speaker (NS-F40) x2 Top Surround speaker (NS-B40) x2 Center speaker (NS-C40) x1 Non-skid pads (24 pcs.) ...x1 For the center and surround speakers. (Including 12 spare non-skid pads.) When...

Owners Manual
Page 5
... to affix the base to the Bottom. Rotate approximately twelve times clockwise. Approx. 12 rotations 2 En Bottom (Front side) 2 Base Assembling the front speakers 1 Attach the Base to the Bottom. 1 Insert the three projections on the Base into this opening. 2 Attach the Top to the Bottom. 1... Base on the Base faces in the same direction as shown in the package) from the underside of the Bottom, which includes a groove for a speaker cable. 2 Insert four screws (included in the figure. English 1 Base Bottom (Front side) Base 1 Projection Bottom (Front side) Base This notch...
... to affix the base to the Bottom. Rotate approximately twelve times clockwise. Approx. 12 rotations 2 En Bottom (Front side) 2 Base Assembling the front speakers 1 Attach the Base to the Bottom. 1 Insert the three projections on the Base into this opening. 2 Attach the Top to the Bottom. 1... Base on the Base faces in the same direction as shown in the package) from the underside of the Bottom, which includes a groove for a speaker cable. 2 Insert four screws (included in the figure. English 1 Base Bottom (Front side) Base 1 Projection Bottom (Front side) Base This notch...
Owners Manual
Page 6
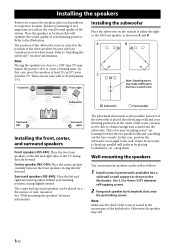
... (8") away from the subwoofer. Center Subwoofer Subwoofer Front speaker Surround left Surround right Installing the front, center, and surround speakers Front speakers (NS-F40): Place the two front speakers on the outside of either the right or the left front speaker, as it difficult to the illustration. Surround speakers (NS-B40): Place the left and right sides of...
... (8") away from the subwoofer. Center Subwoofer Subwoofer Front speaker Surround left Surround right Installing the front, center, and surround speakers Front speakers (NS-F40): Place the two front speakers on the outside of either the right or the left front speaker, as it difficult to the illustration. Surround speakers (NS-B40): Place the left and right sides of...

Owners Manual
Page 7
... to a wall using nails, adhesives, or unstable hardware. English Wall/wall support 6 mm (1/4") Minimum 20 mm (3/4") 150 mm (5-7/8") NS-B40 0.59 kg (1.30 lbs.) NS-C40 0.73 kg (1.61 lbs.) Connecting the speakers Warning • Do not mount the speakers on thin plywood or on your other AV components are not sure of the...
... to a wall using nails, adhesives, or unstable hardware. English Wall/wall support 6 mm (1/4") Minimum 20 mm (3/4") 150 mm (5-7/8") NS-B40 0.59 kg (1.30 lbs.) NS-C40 0.73 kg (1.61 lbs.) Connecting the speakers Warning • Do not mount the speakers on thin plywood or on your other AV components are not sure of the...
Owners Manual
Page 8
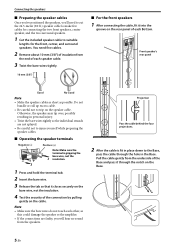
...Press and hold the terminal tab. 2 Insert the bare wire. 3 Release the tab so that it closes securely on the Base. 5 En Otherwise, the speaker may tip over, possibly resulting in the Base. Projection Pass the cable behind the four projections. 2 After the cable is fit in place down to... suitable lengths for connecting the two front speakers, center speaker, and the two surround speakers. 1 Cut the included speaker cable to the Base, pass the cable through the hole in personal injury. • Twist the bare wires tightly...
...Press and hold the terminal tab. 2 Insert the bare wire. 3 Release the tab so that it closes securely on the Base. 5 En Otherwise, the speaker may tip over, possibly resulting in the Base. Projection Pass the cable behind the four projections. 2 After the cable is fit in place down to... suitable lengths for connecting the two front speakers, center speaker, and the two surround speakers. 1 Cut the included speaker cable to the Base, pass the cable through the hole in personal injury. • Twist the bare wires tightly...
Owners Manual
Page 9
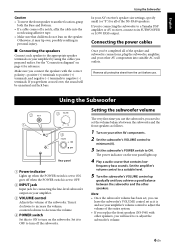
...the unit before use your amplifier's volume control to adjust the volume of the speaker and subwoofer connections, plug the subwoofer, amplifier, and your amplifier. 3 VOLUME control Adjusts the volume of the NS-PA40 speakers. goes off when the POWER switch is and use . frequency bass sounds. ...level. 5 Turn the subwoofer's VOLUME control up when the POWER switch is set as follows. 1 Turn on your other speakers, you 're connecting the subwoofer to a Yamaha DSP amplifier or AV receiver, connect to its SUBWOOFER or LOW PASS output. English Caution • To move the front...
...the unit before use your amplifier's volume control to adjust the volume of the speaker and subwoofer connections, plug the subwoofer, amplifier, and your amplifier. 3 VOLUME control Adjusts the volume of the NS-PA40 speakers. goes off when the POWER switch is and use . frequency bass sounds. ...level. 5 Turn the subwoofer's VOLUME control up when the POWER switch is set as follows. 1 Turn on your other speakers, you 're connecting the subwoofer to a Yamaha DSP amplifier or AV receiver, connect to its SUBWOOFER or LOW PASS output. English Caution • To move the front...
Owners Manual
Page 10
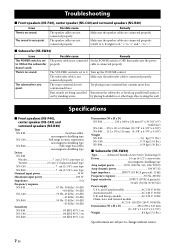
...x 39-3/8" x 9") (with base) NS-C40......276 x 111 x 118 mm (10-7/8" x 4-3/8" x 4-5/8") NS-B40......112 x 176 x 116 mm (4-3/8" x 6-7/8" x 4-5/8") Weight NS-F40 3.6 kg (7.9 lbs.) NS-C40 0.73 kg (1.61 lbs.) NS-B40 0.59 kg (1.30 lbs.) ■ Subwoofer (NS-SW40) Type Advanced Yamaha Active Servo Technology II Driver 16 cm ...The source material doesn't contain much bass. by standing waves. Troubleshooting ■ Front speakers (NS-F40), center speaker (NS-C40) and surround speakers (NS-B40) Issue There's no sound. Make sure the subwoofer cable is too quiet. Remedy Make sure the...
...x 39-3/8" x 9") (with base) NS-C40......276 x 111 x 118 mm (10-7/8" x 4-3/8" x 4-5/8") NS-B40......112 x 176 x 116 mm (4-3/8" x 6-7/8" x 4-5/8") Weight NS-F40 3.6 kg (7.9 lbs.) NS-C40 0.73 kg (1.61 lbs.) NS-B40 0.59 kg (1.30 lbs.) ■ Subwoofer (NS-SW40) Type Advanced Yamaha Active Servo Technology II Driver 16 cm ...The source material doesn't contain much bass. by standing waves. Troubleshooting ■ Front speakers (NS-F40), center speaker (NS-C40) and surround speakers (NS-B40) Issue There's no sound. Make sure the subwoofer cable is too quiet. Remedy Make sure the...


