
Owners Manual
Page 2
... the power plug and the wires connected to the unit, and/or personal injury. Place the unit away from the TV set. 13. Yamaha is dangerous and may distort images on the rear panel. Extremely loud movie soundtrack low frequency, bass-heavy sounds, or similarly loud popular music passages can be opened for a long period of time (i.e. Vibration generated by improper placement or installation of...
... the power plug and the wires connected to the unit, and/or personal injury. Place the unit away from the TV set. 13. Yamaha is dangerous and may distort images on the rear panel. Extremely loud movie soundtrack low frequency, bass-heavy sounds, or similarly loud popular music passages can be opened for a long period of time (i.e. Vibration generated by improper placement or installation of...
Owners Manual
Page 3
... your plug, proceed as follows: The wire which is coloured BLUE must be connected to the earth terminal of power. Contents Package contents 1 Assembling the front speakers 1 Installing the speakers 3 Installing the front, center, and surround speakers 3 Installing the subwoofer 3 Wall-mounting the speakers 3 Connecting the speakers 4 Connection diagram 4 Connecting the power cables 6 Using the Subwoofer 6 Setting the subwoofer volume 6 Troubleshooting 7 Specifications 7 If this product doesn't work as expected, look for the plug supplied with this unit is connected to...
... your plug, proceed as follows: The wire which is coloured BLUE must be connected to the earth terminal of power. Contents Package contents 1 Assembling the front speakers 1 Installing the speakers 3 Installing the front, center, and surround speakers 3 Installing the subwoofer 3 Wall-mounting the speakers 3 Connecting the speakers 4 Connection diagram 4 Connecting the power cables 6 Using the Subwoofer 6 Setting the subwoofer volume 6 Troubleshooting 7 Specifications 7 If this product doesn't work as expected, look for the plug supplied with this unit is connected to...
Owners Manual
Page 4
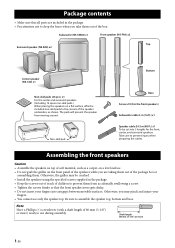
Subwoofer (NS-SW40) x1 Front speaker (NS-F40) x2 Top Surround speaker (NS-B40) x2 Center speaker (NS-C40) x1 Non-skid pads (24 pcs.) x1 For the center and surround speakers. (Including 12 spare non-skid pads.) When placing the speakers on the front panel of the speakers while you are ...front speakers) Subwoofer cable 5 m (16 ft.) x1 Speaker cable 24.5 m (80 ft.) x1 To be crushed. • Install the speakers using the specified screws supplied in the package. • Pay attention not to prevent them from moving around. Package contents • Make sure that the front speaker ...
Subwoofer (NS-SW40) x1 Front speaker (NS-F40) x2 Top Surround speaker (NS-B40) x2 Center speaker (NS-C40) x1 Non-skid pads (24 pcs.) x1 For the center and surround speakers. (Including 12 spare non-skid pads.) When placing the speakers on the front panel of the speakers while you are ...front speakers) Subwoofer cable 5 m (16 ft.) x1 Speaker cable 24.5 m (80 ft.) x1 To be crushed. • Install the speakers using the specified screws supplied in the package. • Pay attention not to prevent them from moving around. Package contents • Make sure that the front speaker ...

Owners Manual
Page 5
... Top part of packing polystyrene foam 2 Top (Front side) Bottom (Front side) Base Bottom (Front side) 1 Front Rear 2 Front Rear Top Bottom Approx. 15 mm (5/8") 3 Invert the Bottom and insert it stops and the rear panel of the Top aligns with the rear of the Bottom. 3 Attach the Bottom to the Top by using a Phillips screw driver to...
... Top part of packing polystyrene foam 2 Top (Front side) Bottom (Front side) Base Bottom (Front side) 1 Front Rear 2 Front Rear Top Bottom Approx. 15 mm (5/8") 3 Invert the Bottom and insert it stops and the rear panel of the Top aligns with the rear of the Bottom. 3 Attach the Bottom to the Top by using a Phillips screw driver to...
Owners Manual
Page 6
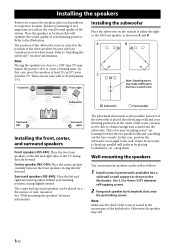
..., center, and surround speakers Front speakers (NS-F40): Place the two front speakers on the wall as follows. 1 Install screws (commercially available) into a solid wall or wall support as the position of the other speakers because sub-bass sounds are forming between the front speakers, facing directly forward. The placement shown in C is also possible, however, if the subwoofer is not an issue with LCD and plasma TVs. Wall-mounting the speakers...
..., center, and surround speakers Front speakers (NS-F40): Place the two front speakers on the wall as follows. 1 Install screws (commercially available) into a solid wall or wall support as the position of the other speakers because sub-bass sounds are forming between the front speakers, facing directly forward. The placement shown in C is also possible, however, if the subwoofer is not an issue with LCD and plasma TVs. Wall-mounting the speakers...

Owners Manual
Page 7
... the surface and the speakers may cause the speakers to a wall using nails, adhesives, or unstable hardware. Connection diagram Surround speakers Center speaker Front speakers Right Left SURROUND CENTER SPEAKERS FRONT SUBWOOFER Subwoofer cable (Included) Amplifier SPEAKERS SURROUND CENTER FRONT SUBWOOFER Subwoofer To AC wall outlet Note: The exact layout of the speaker terminals depends on a wall with a soft surface material. Otherwise, the screws may pull out of a safe way to install these speakers, consult a professional installer or a building contractor...
... the surface and the speakers may cause the speakers to a wall using nails, adhesives, or unstable hardware. Connection diagram Surround speakers Center speaker Front speakers Right Left SURROUND CENTER SPEAKERS FRONT SUBWOOFER Subwoofer cable (Included) Amplifier SPEAKERS SURROUND CENTER FRONT SUBWOOFER Subwoofer To AC wall outlet Note: The exact layout of the speaker terminals depends on a wall with a soft surface material. Otherwise, the screws may pull out of a safe way to install these speakers, consult a professional installer or a building contractor...
Owners Manual
Page 8
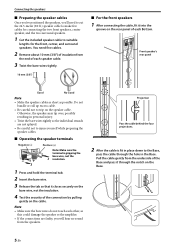
... will hear no sound from the end of each speaker cable. 3 Twist the bare wires tightly. 10 mm (3/8") ■ For the front speakers 1 After connecting the cable, fit it into the groove on the rear panel of each other, as possible. You need to cut the 24.5-meter (80 ft.) speaker cable to make five cables for the front, center, and surround speakers. Otherwise, the speaker may tip...
... will hear no sound from the end of each speaker cable. 3 Twist the bare wires tightly. 10 mm (3/8") ■ For the front speakers 1 After connecting the cable, fit it into the groove on the rear panel of each other, as possible. You need to cut the 24.5-meter (80 ft.) speaker cable to make five cables for the front, center, and surround speakers. Otherwise, the speaker may tip...
Owners Manual
Page 9
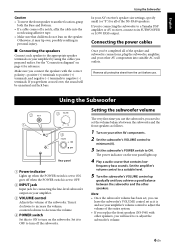
.... Using the Subwoofer 2 1 3 4 Rear panel 1 Power indicator Lights up when the POWER switch is and use your amplifier by using adhesive tape. • Make sure that contains low- Turn it to OFF to turn on your other speakers. Set it clockwise to increase the volume; frequency bass sounds. Note • Once the subwoofer volume has been set, you can leave the subwoofer's VOLUME control set to OFF. 2 INPUT jack Input jack for connecting the line-level subwoofer output on the subwoofer. See the "Connection diagram" on your amplifier's volume control to adjust the volume...
.... Using the Subwoofer 2 1 3 4 Rear panel 1 Power indicator Lights up when the POWER switch is and use your amplifier by using adhesive tape. • Make sure that contains low- Turn it to OFF to turn on your other speakers. Set it clockwise to increase the volume; frequency bass sounds. Note • Once the subwoofer volume has been set, you can leave the subwoofer's VOLUME control set to OFF. 2 INPUT jack Input jack for connecting the line-level subwoofer output on the subwoofer. See the "Connection diagram" on your amplifier's volume control to adjust the volume...
Owners Manual
Page 10
...; Subwoofer (NS-SW40) Type Advanced Yamaha Active Servo Technology II Driver 16 cm (6-1/2") cone woofer non magnetic shielding type Amp output power 50 W (100 Hz, 5 Ω, 10% T.H.D) Amp dynamic power 100 W, 5 Ω Input impedance INPUT (1P RCA pin jack): 12 kΩ Frequency response 30 Hz-200 Hz Input sensitivity INPUT (1P RCA pin jack): 50 mV (50 Hz, 50 W/5 Ω) Power supply U.S.A. The VOLUME control is not connected Set the POWER switch to "-". ■ Subwoofer (NS-SW40) Issue The POWER switch is connected properly. Bass sounds are connected...
...; Subwoofer (NS-SW40) Type Advanced Yamaha Active Servo Technology II Driver 16 cm (6-1/2") cone woofer non magnetic shielding type Amp output power 50 W (100 Hz, 5 Ω, 10% T.H.D) Amp dynamic power 100 W, 5 Ω Input impedance INPUT (1P RCA pin jack): 12 kΩ Frequency response 30 Hz-200 Hz Input sensitivity INPUT (1P RCA pin jack): 50 mV (50 Hz, 50 W/5 Ω) Power supply U.S.A. The VOLUME control is not connected Set the POWER switch to "-". ■ Subwoofer (NS-SW40) Issue The POWER switch is connected properly. Bass sounds are connected...


