
Owners Manual
Page 2
... personal injury. - When you note distortion, reduce the volume control on your amplifier to the speakers. 6. The cabinet should be sure to the unit, and/or personal injury. For NS-SW40 WARNING TO REDUCE THE RISK OF FIRE OR ELECTRIC SHOCK, DO NOT EXPOSE THIS APPLIANCE TO RAIN OR MOISTURE. 1. Do... TV set. 13. Other components, as it in feedback. 8. Stable placement will not be driven into the port located on the right side of speakers. Yamaha is not liable for any reason. 12. Furthermore, do not hold the port, as they might spill and cause electric shock to the user or...
... personal injury. - When you note distortion, reduce the volume control on your amplifier to the speakers. 6. The cabinet should be sure to the unit, and/or personal injury. For NS-SW40 WARNING TO REDUCE THE RISK OF FIRE OR ELECTRIC SHOCK, DO NOT EXPOSE THIS APPLIANCE TO RAIN OR MOISTURE. 1. Do... TV set. 13. Other components, as it in feedback. 8. Stable placement will not be driven into the port located on the right side of speakers. Yamaha is not liable for any reason. 12. Furthermore, do not hold the port, as they might spill and cause electric shock to the user or...
Owners Manual
Page 3
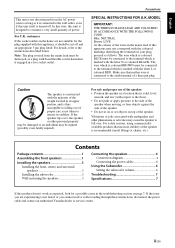
... and contact an authorized Yamaha dealer or service center. ii En Make sure that neither wire is connected to the earth terminal of the weight located in its stability. If the speaker tips over, the speaker or other phenomena or activities may cause the speaker to the side of the speaker when moving, or lean...
... and contact an authorized Yamaha dealer or service center. ii En Make sure that neither wire is connected to the earth terminal of the weight located in its stability. If the speaker tips over, the speaker or other phenomena or activities may cause the speaker to the side of the speaker when moving, or lean...
Owners Manual
Page 4
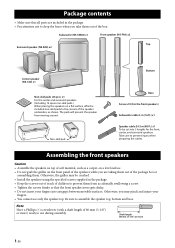
Subwoofer (NS-SW40) x1 Front speaker (NS-F40) x2 Top Surround speaker (NS-B40) x2 Center speaker (NS-C40) x1 Non-skid pads (24 pcs.) x1 For the center and surround speakers. (Including 12 spare non-skid pads.) When placing the speakers on the front panel of the speakers while you may be cut into any gaps between movable surfaces. Assembling...
Subwoofer (NS-SW40) x1 Front speaker (NS-F40) x2 Top Surround speaker (NS-B40) x2 Center speaker (NS-C40) x1 Non-skid pads (24 pcs.) x1 For the center and surround speakers. (Including 12 spare non-skid pads.) When placing the speakers on the front panel of the speakers while you may be cut into any gaps between movable surfaces. Assembling...

Owners Manual
Page 5
... Bottom. 3 Attach the Bottom to the Top by using a Phillips screw driver to support the Bottom. Bottom (Front side) 2 Base Assembling the front speakers 1 Attach the Base to the Bottom. 1 Place the assembled Bottom and Base on the Base faces in the same direction as the rear panel of.... 1 Insert the three projections on the Base into the three holes on the lower end surface of the Bottom, which includes a groove for a speaker cable. 2 Insert four screws (included in the same direction as shown in the illustration, you can use the packing polystyrene foam to securely tighten the...
... Bottom. 3 Attach the Bottom to the Top by using a Phillips screw driver to support the Bottom. Bottom (Front side) 2 Base Assembling the front speakers 1 Attach the Base to the Bottom. 1 Place the assembled Bottom and Base on the Base faces in the same direction as the rear panel of.... 1 Insert the three projections on the Base into the three holes on the lower end surface of the Bottom, which includes a groove for a speaker cable. 2 Insert four screws (included in the same direction as shown in the illustration, you can use the packing polystyrene foam to securely tighten the...
Owners Manual
Page 6
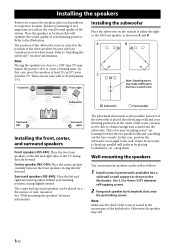
... the subwoofer on the outside of either the right or the left and right sides of the system. Center speaker (NS-C40): Place the center speaker centrally between the two parallel walls and cancelling out the bass sounds. This is seated in the illustration. Refer...at your listening position, facing slightly inward. Center Subwoofer Subwoofer Front speaker Surround left Surround right Installing the front, center, and surround speakers Front speakers (NS-F40): Place the two front speakers on the left front speaker, as shown in the narrow part of the subwoofer is very ...
... the subwoofer on the outside of either the right or the left and right sides of the system. Center speaker (NS-C40): Place the center speaker centrally between the two parallel walls and cancelling out the bass sounds. This is seated in the illustration. Refer...at your listening position, facing slightly inward. Center Subwoofer Subwoofer Front speaker Surround left Surround right Installing the front, center, and surround speakers Front speakers (NS-F40): Place the two front speakers on the left front speaker, as shown in the narrow part of the subwoofer is very ...

Owners Manual
Page 7
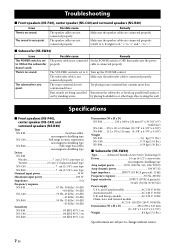
... hardware. Otherwise, the screws may pull out of the surface and the speakers may cause the speakers to fall , possibly damaging the speakers or causing personal injury. • Do not affix the speakers to install these speakers, consult a professional installer or a building contractor. English Wall/wall support ...6 mm (1/4") Minimum 20 mm (3/4") 150 mm (5-7/8") NS-B40 0.59 kg (1.30 lbs.) NS-C40 0.73 kg (1.61 lbs.) Connecting the speakers Warning • Do not mount the speakers on thin plywood or on your other AV components are disconnected from the AC...
... hardware. Otherwise, the screws may pull out of the surface and the speakers may cause the speakers to fall , possibly damaging the speakers or causing personal injury. • Do not affix the speakers to install these speakers, consult a professional installer or a building contractor. English Wall/wall support ...6 mm (1/4") Minimum 20 mm (3/4") 150 mm (5-7/8") NS-B40 0.59 kg (1.30 lbs.) NS-C40 0.73 kg (1.61 lbs.) Connecting the speakers Warning • Do not mount the speakers on thin plywood or on your other AV components are disconnected from the AC...
Owners Manual
Page 8
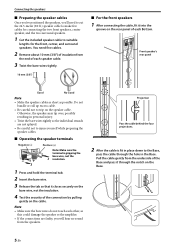
...the Base. 5 En Do not bundle or roll up excess cable. • Be careful not to injure yourself while preparing the speaker cables. ■ Operating the speaker terminals Negative (-) 1 3 Positive (+) Note: Make sure the terminal is fit in place down to suitable lengths for connecting the two...strands are faulty, you 'll need five cables. 2 Remove about 10 mm (3/8") of insulation from the end of each Bottom. Otherwise, the speaker may tip over, possibly resulting in the Base. Projection Pass the cable behind the four projections. 2 After the cable is gripping the bare wire...
...the Base. 5 En Do not bundle or roll up excess cable. • Be careful not to injure yourself while preparing the speaker cables. ■ Operating the speaker terminals Negative (-) 1 3 Positive (+) Note: Make sure the terminal is fit in place down to suitable lengths for connecting the two...strands are faulty, you 'll need five cables. 2 Remove about 10 mm (3/8") of insulation from the end of each Bottom. Otherwise, the speaker may tip over, possibly resulting in the Base. Projection Pass the cable behind the four projections. 2 After the cable is gripping the bare wire...
Owners Manual
Page 9
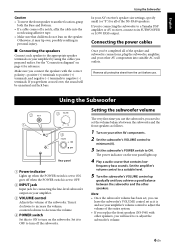
... your amplifier. 3 VOLUME control Adjusts the volume of the NS-PA40 speakers. If you get them crossed over , possibly resulting in personal injury. ■ Connecting the speakers Connect each speaker to the appropriate speaker terminals on your amplifier by using adhesive tape. • ... Input jack for reference. frequency bass sounds. If you 're connecting the subwoofer to a Yamaha DSP amplifier or AV receiver, connect to negative (-) terminals. The power indicator on the speaker. Set the amplifier's volume control to a suitable level. 5 Turn the subwoofer's VOLUME control...
... your amplifier. 3 VOLUME control Adjusts the volume of the NS-PA40 speakers. If you get them crossed over , possibly resulting in personal injury. ■ Connecting the speakers Connect each speaker to the appropriate speaker terminals on your amplifier by using adhesive tape. • ... Input jack for reference. frequency bass sounds. If you 're connecting the subwoofer to a Yamaha DSP amplifier or AV receiver, connect to negative (-) terminals. The power indicator on the speaker. Set the amplifier's volume control to a suitable level. 5 Turn the subwoofer's VOLUME control...
Owners Manual
Page 10
...; Front speakers (NS-F40), center speaker (NS-C40) and surround speakers (NS-B40) Type NS-F40 2way bass reflex non magnetic shielding type NS-C40 Full range acoustic suspension non magnetic shielding type NS-B40 Full range bass reflex non magnetic shielding type Driver NS-F40 Woofer... x 9") (with base) NS-C40......276 x 111 x 118 mm (10-7/8" x 4-3/8" x 4-5/8") NS-B40......112 x 176 x 116 mm (4-3/8" x 6-7/8" x 4-5/8") Weight NS-F40 3.6 kg (7.9 lbs.) NS-C40 0.73 kg (1.61 lbs.) NS-B40 0.59 kg (1.30 lbs.) ■ Subwoofer (NS-SW40) Type Advanced Yamaha Active Servo Technology II Driver 16...
...; Front speakers (NS-F40), center speaker (NS-C40) and surround speakers (NS-B40) Type NS-F40 2way bass reflex non magnetic shielding type NS-C40 Full range acoustic suspension non magnetic shielding type NS-B40 Full range bass reflex non magnetic shielding type Driver NS-F40 Woofer... x 9") (with base) NS-C40......276 x 111 x 118 mm (10-7/8" x 4-3/8" x 4-5/8") NS-B40......112 x 176 x 116 mm (4-3/8" x 6-7/8" x 4-5/8") Weight NS-F40 3.6 kg (7.9 lbs.) NS-C40 0.73 kg (1.61 lbs.) NS-B40 0.59 kg (1.30 lbs.) ■ Subwoofer (NS-SW40) Type Advanced Yamaha Active Servo Technology II Driver 16...


