
Owner's Manual
Page 2
... for any potential negative effects on human health and the environment which this product is considered uneconomic to clean the speakers with chemical solvents as Yamaha may not be held responsible for a period of two years from inappropriate waste handling. In the absence of this... find full details on our website (http://www.yamaha-hifi.com/ or http://www.yamaha-uk.com/ for having chosen a Yamaha product. CONSUMER PRECAUTIONS Read these precautions carefully before setting up your NS-IC600/NS-IC800 speakers. • When mounting these speakers, be sure to work with two or more ...
... for any potential negative effects on human health and the environment which this product is considered uneconomic to clean the speakers with chemical solvents as Yamaha may not be held responsible for a period of two years from inappropriate waste handling. In the absence of this... find full details on our website (http://www.yamaha-hifi.com/ or http://www.yamaha-uk.com/ for having chosen a Yamaha product. CONSUMER PRECAUTIONS Read these precautions carefully before setting up your NS-IC600/NS-IC800 speakers. • When mounting these speakers, be sure to work with two or more ...
Owner's Manual
Page 3
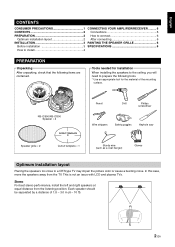
... with LCD and plasma TVs. Each speaker should be separated by a distance of the mounting surface. Stereo For best stereo performance, install the left and right speakers at equal distance from the TV. NS-IC600/NS-IC800 Speaker × 2 Pencil Drill Philips screwdriver... Wire strippers Safety goggles Keyhole saw Speaker grille × 2 Cutout template × 1 Sturdy wire (such as...
... with LCD and plasma TVs. Each speaker should be separated by a distance of the mounting surface. Stereo For best stereo performance, install the left and right speakers at equal distance from the TV. NS-IC600/NS-IC800 Speaker × 2 Pencil Drill Philips screwdriver... Wire strippers Safety goggles Keyhole saw Speaker grille × 2 Cutout template × 1 Sturdy wire (such as...
Owner's Manual
Page 4
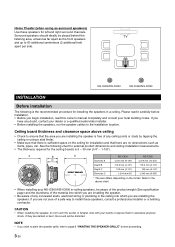
... of the product weight (See specification page) and the sturdiness of a safe way to install these speakers for installation and that there are no obstructions such as ducts, pipes, etc. A B D NS-IC600 NS-IC800 C Diameter A φ 231 mm (9-1/8") φ 272 mm (10-3/4") Depth B 113.5... feet) apart per side. NOTE • If you are installing the speaker is free of any concealed studs, electrical wiring or plumbing in a ceiling. NS-IC600/NS-IC800 NS-IC600/NS-IC800 INSTALLATION Before installation The following chart for external product dimensions and ceiling ...
... of the product weight (See specification page) and the sturdiness of a safe way to install these speakers for installation and that there are no obstructions such as ducts, pipes, etc. A B D NS-IC600 NS-IC800 C Diameter A φ 231 mm (9-1/8") φ 272 mm (10-3/4") Depth B 113.5... feet) apart per side. NOTE • If you are installing the speaker is free of any concealed studs, electrical wiring or plumbing in a ceiling. NS-IC600/NS-IC800 NS-IC600/NS-IC800 INSTALLATION Before installation The following chart for external product dimensions and ceiling ...
Owner's Manual
Page 5
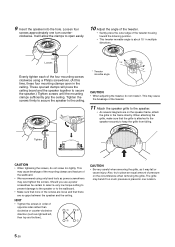
... obstruction. • If there is any obstruction, patch the hole and select another location. 360° CAUTION • When installing the speaker, do not touch the tweeter dome or woofer cone directly. This may cause a malfunction. • Make sure that mounting clamps are installing the... speaker. 2 Trace a line around the circular outline. WARNING • When using a keyhole saw or cutting tool, use safety goggles for the center...
... obstruction. • If there is any obstruction, patch the hole and select another location. 360° CAUTION • When installing the speaker, do not touch the tweeter dome or woofer cone directly. This may cause a malfunction. • Make sure that mounting clamps are installing the... speaker. 2 Trace a line around the circular outline. WARNING • When using a keyhole saw or cutting tool, use safety goggles for the center...
Owner's Manual
Page 6
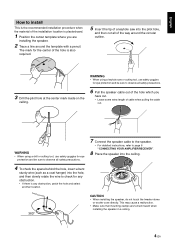
...may fall or cause injury. Loosen four screws approximately one location. 5 En Loosen *15° Evenly tighten each of pressure on the speaker frame, attach the grille to place an equal amount of the four mounting screws clockwise using only hand tools as it . Tighten the...the ceiling. clockwise. Tighten CAUTION • When tightening the screws, do not rotate it may bend if too much pressure is attached to the speaker securely to the ceiling. *15° * Tweeter movable angle CAUTION • When adjusting the tweeter, do not screw too tightly. CAUTION &#...
...may fall or cause injury. Loosen four screws approximately one location. 5 En Loosen *15° Evenly tighten each of pressure on the speaker frame, attach the grille to place an equal amount of the four mounting screws clockwise using only hand tools as it . Tighten the...the ceiling. clockwise. Tighten CAUTION • When tightening the screws, do not rotate it may bend if too much pressure is attached to the speaker securely to the ceiling. *15° * Tweeter movable angle CAUTION • When adjusting the tweeter, do not screw too tightly. CAUTION &#...
Owner's Manual
Page 7
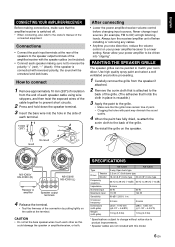
L A -+ B NS-IC600/ NS-IC800 (L) Speaker output terminals 4 Release the terminal. • Test the firmness of the connection by pulling lightly on the cable at the rear of the speakers to the speaker output terminals of the amplifier/receiver with the speaker cables (not included). • Connect each terminal....dried, re-attach the scrim cloth to the owner's manual of the grille. 5 Re-install the grille on the speaker. 3 No Good Good -+ -+ NS-IC600/ NS-IC800 (R) Receiver or amplifier R +- Connections • Connect the push input terminals at the terminal. Never change without...
L A -+ B NS-IC600/ NS-IC800 (L) Speaker output terminals 4 Release the terminal. • Test the firmness of the connection by pulling lightly on the cable at the rear of the speakers to the speaker output terminals of the amplifier/receiver with the speaker cables (not included). • Connect each terminal....dried, re-attach the scrim cloth to the owner's manual of the grille. 5 Re-install the grille on the speaker. 3 No Good Good -+ -+ NS-IC600/ NS-IC800 (R) Receiver or amplifier R +- Connections • Connect the push input terminals at the terminal. Never change without...


