Owner's Manual
Page 2
... cause beyond Yamaha's control. (5) Defects of the system into the EEA and/or Switzerland, not by an unauthorised third party. (2) Inadequate packaging or mishandling, when the product is considered uneconomic to repair. CONSUMER PRECAUTIONS Read these precautions carefully before setting up your NS-IC600/NS-IC800 speakers. • When mounting these speakers, be sure to work with two or more information about...
... cause beyond Yamaha's control. (5) Defects of the system into the EEA and/or Switzerland, not by an unauthorised third party. (2) Inadequate packaging or mishandling, when the product is considered uneconomic to repair. CONSUMER PRECAUTIONS Read these precautions carefully before setting up your NS-IC600/NS-IC800 speakers. • When mounting these speakers, be sure to work with two or more information about...
Owner's Manual
Page 3
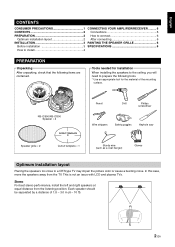
... PRECAUTIONS 1 CONNECTING YOUR AMPLIFIER/RECEIVER .......... 6 CONTENTS 2 Connections 6 PREPARATION 2 How to connect 6 Optimum installation layout 2 After connecting 6 INSTALLATION 3 PAINTING THE SPEAKER GRILLE 6 Before installation 3 SPECIFICATIONS 6 How to install 4 PREPARATION Unpacking After unpacking, check that the following tools. * Use an appropriate tool for installation When installing the speakers to the ceiling, you will need to prepare the following items are contained. NS-IC600/NS-IC800 Speaker × 2 Pencil Drill Philips screwdriver Wire strippers Safety...
... PRECAUTIONS 1 CONNECTING YOUR AMPLIFIER/RECEIVER .......... 6 CONTENTS 2 Connections 6 PREPARATION 2 How to connect 6 Optimum installation layout 2 After connecting 6 INSTALLATION 3 PAINTING THE SPEAKER GRILLE 6 Before installation 3 SPECIFICATIONS 6 How to install 4 PREPARATION Unpacking After unpacking, check that the following tools. * Use an appropriate tool for installation When installing the speakers to the ceiling, you will need to prepare the following items are contained. NS-IC600/NS-IC800 Speaker × 2 Pencil Drill Philips screwdriver Wire strippers Safety...
Owner's Manual
Page 4
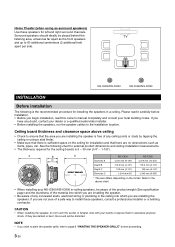
... owner's manual completely and consult your dealer or a qualified audio/video installer. • Before installing the speakers, run the speaker cables to install these speakers for left and right surround channels. A B D NS-IC600 NS-IC800 C Diameter A φ 231 mm (9-1/8") φ 272 mm (10-3/4") Depth B 113.5 mm (4-1/2") 113.5 mm (4-1/2") Depth C 109 mm (4-1/4") 109 mm (4-1/4") Diameter D φ 204 mm (8") φ 245 mm (9-5/8") * The size differs depending on the ceiling...
... owner's manual completely and consult your dealer or a qualified audio/video installer. • Before installing the speakers, run the speaker cables to install these speakers for left and right surround channels. A B D NS-IC600 NS-IC800 C Diameter A φ 231 mm (9-1/8") φ 272 mm (10-3/4") Depth B 113.5 mm (4-1/2") 113.5 mm (4-1/2") Depth C 109 mm (4-1/4") 109 mm (4-1/4") Diameter D φ 204 mm (8") φ 245 mm (9-5/8") * The size differs depending on the ceiling...
Owner's Manual
Page 5
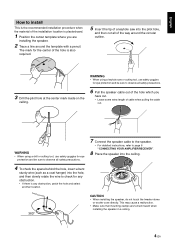
... tweeter dome or woofer cone directly. This may cause a malfunction. • Make sure that mounting clamps are installing the speaker. 2 Trace a line around the circular outline. WARNING • When using a drill or cutting tool, use safety goggles for eye protection and be sure to observe all safety precautions. 3 Drill the pilot hole at the center mark made on the ceiling. 6 Pull the speaker cable...
... tweeter dome or woofer cone directly. This may cause a malfunction. • Make sure that mounting clamps are installing the speaker. 2 Trace a line around the circular outline. WARNING • When using a drill or cutting tool, use safety goggles for eye protection and be sure to observe all safety precautions. 3 Drill the pilot hole at the center mark made on the ceiling. 6 Pull the speaker cable...
Owner's Manual
Page 6
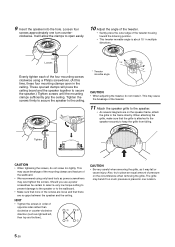
... between the speaker and the ceiling. Should you use a power screwdriver be certain to select a very low torque setting to prevent damage to the speaker or to secure the speaker.) Tighten screws until the mounting clamps sufficiently grip the ceiling. clockwise. Loosen *15° Evenly tighten each of pressure on the speaker frame, attach the grille to open in multiple directions. This may...
... between the speaker and the ceiling. Should you use a power screwdriver be certain to select a very low torque setting to prevent damage to the speaker or to secure the speaker.) Tighten screws until the mounting clamps sufficiently grip the ceiling. clockwise. Loosen *15° Evenly tighten each of pressure on the speaker frame, attach the grille to open in multiple directions. This may...
Owner's Manual
Page 7
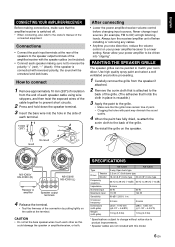
... sound will be painted to match your room décor. Never allow your power amplifier/receiver to a lower setting. English CONNECTING YOUR AMPLIFIER/RECEIVER Before making sure not to reverse the polarity "+" (red), "-" (black). SPECIFICATIONS Type Tweeter Driver Woofer Frequency response Impedance Nominal input Maximum input Sensitivity Crossover frequency Dimensions (with grille) Weight (with the speaker cables (not included). • Connect each other as this model. 6 En Always turn the receiver/amplifier unit off . • When connecting, also refer to the owner's manual...
... sound will be painted to match your room décor. Never allow your power amplifier/receiver to a lower setting. English CONNECTING YOUR AMPLIFIER/RECEIVER Before making sure not to reverse the polarity "+" (red), "-" (black). SPECIFICATIONS Type Tweeter Driver Woofer Frequency response Impedance Nominal input Maximum input Sensitivity Crossover frequency Dimensions (with grille) Weight (with the speaker cables (not included). • Connect each other as this model. 6 En Always turn the receiver/amplifier unit off . • When connecting, also refer to the owner's manual...


