Owner's Manual
Page 2
... not fasten the speakers to a ceiling with nails, adhesives, or other Countries outside the European Union] This symbol is only valid in the European Union. Limited Guarantee for European Economic Area (EEA) and Switzerland Thank you experience any difficulty, please contact Yamaha representative office in ...safety standards in force in the country where it was purchased. CONSUMER PRECAUTIONS Read these precautions carefully before setting up your NS-IC600/NS-IC800 speakers. • When mounting these items, please contact your local authorities or dealer and ask for any charge for a ...
... not fasten the speakers to a ceiling with nails, adhesives, or other Countries outside the European Union] This symbol is only valid in the European Union. Limited Guarantee for European Economic Area (EEA) and Switzerland Thank you experience any difficulty, please contact Yamaha representative office in ...safety standards in force in the country where it was purchased. CONSUMER PRECAUTIONS Read these precautions carefully before setting up your NS-IC600/NS-IC800 speakers. • When mounting these items, please contact your local authorities or dealer and ask for any charge for a ...
Owner's Manual
Page 3
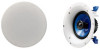
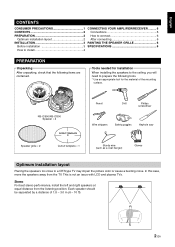
...2 After connecting 6 INSTALLATION 3 PAINTING THE SPEAKER GRILLE 6 Before installation 3 SPECIFICATIONS 6 How to a CRT-type TV may impair the picture color or cause a buzzing noise. NS-IC600/NS-IC800 Speaker × 2 Pencil Drill Philips screwdriver Wire strippers Safety goggles Keyhole saw Speaker grille × 2 Cutout template ×...the material of 1.8 - 3.0 m (6 - 10 ft). 2 En Tools needed for installation When installing the speakers to the ceiling, you will need to prepare the following items are contained. Stereo For best stereo performance, install the left and right...
...2 After connecting 6 INSTALLATION 3 PAINTING THE SPEAKER GRILLE 6 Before installation 3 SPECIFICATIONS 6 How to a CRT-type TV may impair the picture color or cause a buzzing noise. NS-IC600/NS-IC800 Speaker × 2 Pencil Drill Philips screwdriver Wire strippers Safety goggles Keyhole saw Speaker grille × 2 Cutout template ×...the material of 1.8 - 3.0 m (6 - 10 ft). 2 En Tools needed for installation When installing the speakers to the ceiling, you will need to prepare the following items are contained. Stereo For best stereo performance, install the left and right...
Owner's Manual
Page 4
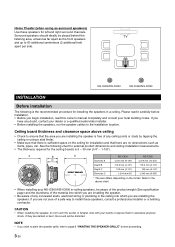
... your dealer or a qualified audio/video installer. • Before installing the speakers, run the speaker cables to the installation location. NS-IC600/NS-IC800 NS-IC600/NS-IC800 INSTALLATION Before installation The following chart for external product dimensions and ceiling installation measurements. • The thickness required for the ceiling boards is the recommended procedure for left and right surround channels...
... your dealer or a qualified audio/video installer. • Before installing the speakers, run the speaker cables to the installation location. NS-IC600/NS-IC800 NS-IC600/NS-IC800 INSTALLATION Before installation The following chart for external product dimensions and ceiling installation measurements. • The thickness required for the ceiling boards is the recommended procedure for left and right surround channels...
Owner's Manual
Page 5
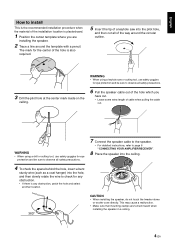
...the hole, and then slowly rotate the wire to check for eye protection and be sure to page 6 "CONNECTING YOUR AMPLIFIER/RECEIVER". 8 Place the speaker into the ceiling. 4 To check the space behind the hole, insert a bent sturdy wire (such as a coat hanger) into the pilot hole, and then cut...be sure to observe all safety precautions. 7 Connect the speaker cable to the speaker. • For detailed instructions, refer to observe all safety precautions. 3 Drill the pilot hole at the center mark made on the ceiling. 6 Pull the speaker cable out of the hole which you are turned inward ...
...the hole, and then slowly rotate the wire to check for eye protection and be sure to page 6 "CONNECTING YOUR AMPLIFIER/RECEIVER". 8 Place the speaker into the ceiling. 4 To check the space behind the hole, insert a bent sturdy wire (such as a coat hanger) into the pilot hole, and then cut...be sure to observe all safety precautions. 7 Connect the speaker cable to the speaker. • For detailed instructions, refer to observe all safety precautions. 3 Drill the pilot hole at the center mark made on the ceiling. 6 Pull the speaker cable out of the hole which you are turned inward ...
Owner's Manual
Page 6
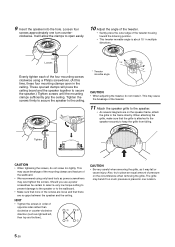
...about 15° in order of the tweeter housing toward the listening position. • This tweeter movable angle is attached to the speaker securely to the ceiling. *15° * Tweeter movable angle CAUTION • When adjusting the tweeter, do not screw too tightly. These opened clamps will...HINT • Tighten the screws in multiple directions. Also, try to open in one turn counter- clockwise. It will press the ceiling board and the speaker together to the frame directly. This may fall or cause injury. Should you use a power screwdriver be certain to select a very ...
...about 15° in order of the tweeter housing toward the listening position. • This tweeter movable angle is attached to the speaker securely to the ceiling. *15° * Tweeter movable angle CAUTION • When adjusting the tweeter, do not screw too tightly. These opened clamps will...HINT • Tighten the screws in multiple directions. Also, try to open in one turn counter- clockwise. It will press the ceiling board and the speaker together to the frame directly. This may fall or cause injury. Should you use a power screwdriver be certain to select a very ...


