Owner's Manual
Page 2
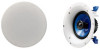
...You can find full details on the products, packaging, and/or accompanying documents means that your NS-IC600/NS-IC800 speakers. • When mounting these speakers, be sure to work with that product does not conform to applicable collection points, in ...Yamaha's discretion, without any losses or damages, whether direct, consequential or otherwise, save valuable resources and prevent any modifications or alterations, unless authorised in writing by improper placement or installation of the original purchase. Conditions 1. The following are liable to thin plywood or soft ceiling...
...You can find full details on the products, packaging, and/or accompanying documents means that your NS-IC600/NS-IC800 speakers. • When mounting these speakers, be sure to work with that product does not conform to applicable collection points, in ...Yamaha's discretion, without any losses or damages, whether direct, consequential or otherwise, save valuable resources and prevent any modifications or alterations, unless authorised in writing by improper placement or installation of the original purchase. Conditions 1. The following are liable to thin plywood or soft ceiling...
Owner's Manual
Page 3
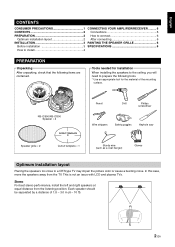
... needed for installation When installing the speakers to the ceiling, you will need to prepare the following items are contained. Stereo For best stereo performance, install the left and right speakers at equal distance from the TV. In this case, move the speakers away from the listening position. NS-IC600/NS-IC800 Speaker × 2 Pencil Drill Philips screwdriver...
... needed for installation When installing the speakers to the ceiling, you will need to prepare the following items are contained. Stereo For best stereo performance, install the left and right speakers at equal distance from the TV. In this case, move the speakers away from the listening position. NS-IC600/NS-IC800 Speaker × 2 Pencil Drill Philips screwdriver...
Owner's Manual
Page 4
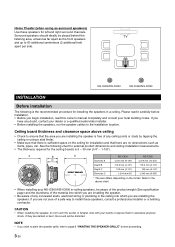
... obstructions such as ducts, pipes, etc. If you have any doubt, contact your NS-IC600/NS-IC800 in-ceiling speakers, be aware of the product weight (See specification page) and the sturdiness of the material into which you are installing the speaker is the recommended procedure for installation and that the area you are not sure...
... obstructions such as ducts, pipes, etc. If you have any doubt, contact your NS-IC600/NS-IC800 in-ceiling speakers, be aware of the product weight (See specification page) and the sturdiness of the material into which you are installing the speaker is the recommended procedure for installation and that the area you are not sure...
Owner's Manual
Page 5
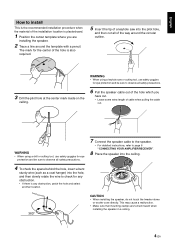
... goggles for eye protection and be sure to observe all safety precautions. 7 Connect the speaker cable to the speaker. • For detailed instructions, refer to page 6 "CONNECTING YOUR AMPLIFIER/RECEIVER". 8 Place the speaker into the ceiling. 4 To check the space behind the hole, insert a bent sturdy wire (such... all safety precautions. 3 Drill the pilot hole at the center mark made on the ceiling. 6 Pull the speaker cable out of the hole which you are turned inward when installing the speaker in a ceiling. 4 En WARNING • When using a keyhole saw into the hole, and then...
... goggles for eye protection and be sure to observe all safety precautions. 7 Connect the speaker cable to the speaker. • For detailed instructions, refer to page 6 "CONNECTING YOUR AMPLIFIER/RECEIVER". 8 Place the speaker into the ceiling. 4 To check the space behind the hole, insert a bent sturdy wire (such... all safety precautions. 3 Drill the pilot hole at the center mark made on the ceiling. 6 Pull the speaker cable out of the hole which you are turned inward when installing the speaker in a ceiling. 4 En WARNING • When using a keyhole saw into the hole, and then...
Owner's Manual
Page 6
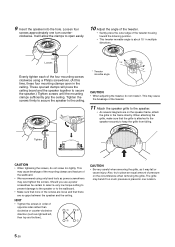
...screws. Loosen four screws approximately one location. 5 En clockwise. It will press the ceiling board and the speaker together to place an equal amount of the tweeter. 11 Attach the speaker grille to the ceiling. *15° * Tweeter movable angle CAUTION • When adjusting the tweeter,...when removing the grille, as right and left, then top and bottom). Also, try to secure the speaker.) Tighten screws until the mounting clamps sufficiently grip the ceiling. HINT • Tighten the screws in multiple directions. The grille may fall or cause injury. This ...
...screws. Loosen four screws approximately one location. 5 En clockwise. It will press the ceiling board and the speaker together to place an equal amount of the tweeter. 11 Attach the speaker grille to the ceiling. *15° * Tweeter movable angle CAUTION • When adjusting the tweeter,...when removing the grille, as right and left, then top and bottom). Also, try to secure the speaker.) Tighten screws until the mounting clamps sufficiently grip the ceiling. HINT • Tighten the screws in multiple directions. The grille may fall or cause injury. This ...


