Owners Manual
Page 7
... Specifications 204 Bus connections of EQ 29 Panning and balancing 30 Mixing into stereo 30 Applying reverb 31 Soloing a channel 32 Using the n8/n12 with Cubase 4/ Cubase Studio 4/Cubase AI 4 ........ 33 What you can do using the n8/n12 with Cubase ... 33 Computer setup for the Link function 34 Using the Link Function 37...
... Specifications 204 Bus connections of EQ 29 Panning and balancing 30 Mixing into stereo 30 Applying reverb 31 Soloing a channel 32 Using the n8/n12 with Cubase 4/ Cubase Studio 4/Cubase AI 4 ........ 33 What you can do using the n8/n12 with Cubase ... 33 Computer setup for the Link function 34 Using the Link Function 37...
Owners Manual
Page 22
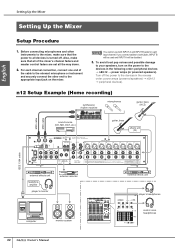
...to the appropriate input jack on the power to the devices in the following order: peripheral devices → n8/n12 → power amps (or powered speakers). Turn off . n12 Setup Example (Home recording) synthesizer, rhythm machine microphones guitar, bass (Hi-Z) MIDI cable MIDI cable sound source (CD...computer monitor system 22 Owner's Manual external effects unit player's headphones control room headphones English Setting Up the Mixer Setting Up the Mixer Setup Procedure 1. NOTE You cannot use both jacks, INPUT B will be used and INPUT A will be disabled. 3. To avoid ...
...to the appropriate input jack on the power to the devices in the following order: peripheral devices → n8/n12 → power amps (or powered speakers). Turn off . n12 Setup Example (Home recording) synthesizer, rhythm machine microphones guitar, bass (Hi-Z) MIDI cable MIDI cable sound source (CD...computer monitor system 22 Owner's Manual external effects unit player's headphones control room headphones English Setting Up the Mixer Setting Up the Mixer Setup Procedure 1. NOTE You cannot use both jacks, INPUT B will be used and INPUT A will be disabled. 3. To avoid ...

Owners Manual
Page 23
...move closer to hear higher ranges, which project at the same height as equalizing the speaker frequencies) or slightly cut the low range during the mix. ■ Distance and angle from the listening point Place L and R channel speakers so that the tweeter will emphasize the low range, ... monitor signals will be able to the walls or corners, sound reflection from the walls will be at a narrow angle. Owner's Manual 23 n8 Setup Example (Home recording) microphones synthesizer, rhythm machine Setting Up the Mixer guitar, bass (Hi-Z) MIDI cable MIDI cable sound source (CD, MD, ...
...move closer to hear higher ranges, which project at the same height as equalizing the speaker frequencies) or slightly cut the low range during the mix. ■ Distance and angle from the listening point Place L and R channel speakers so that the tweeter will emphasize the low range, ... monitor signals will be able to the walls or corners, sound reflection from the walls will be at a narrow angle. Owner's Manual 23 n8 Setup Example (Home recording) microphones synthesizer, rhythm machine Setting Up the Mixer guitar, bass (Hi-Z) MIDI cable MIDI cable sound source (CD, MD, ...
Owners Manual
Page 24
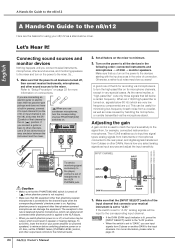
...type pickups and does not have a built-in speaker or hearing damage. To avoid this rule is used to mach the input's sensitivity to "Setup Procedure" on page 22 for recording via the microphone stand. Also, set to the input channels. Turn on ( ) position. Adjusting the gain...IN GAIN PRE PAN CHANNEL FADER 1. Make sure that the [INPUT SELECT] switch of connection. When an n12/n8 high-pass filter is applied to the rear panel, and digital signals transferred from instruments or microphones connected to the XLR inputs. • When you connect musical instruments, ...
...type pickups and does not have a built-in speaker or hearing damage. To avoid this rule is used to mach the input's sensitivity to "Setup Procedure" on page 22 for recording via the microphone stand. Also, set to the input channels. Turn on ( ) position. Adjusting the gain...IN GAIN PRE PAN CHANNEL FADER 1. Make sure that the [INPUT SELECT] switch of connection. When an n12/n8 high-pass filter is applied to the rear panel, and digital signals transferred from instruments or microphones connected to the XLR inputs. • When you connect musical instruments, ...

Owners Manual
Page 34
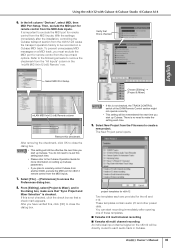
... Sample Rate from the beginning. NOTE Before using an IEEE 1394 cable, then turn off or on how to enable the driver. 2. If the Yamaha Extension dialog box is displayed while Cubase is connected. To display the pop-up . NOTE • If the message "Failed to try again. ...checks to determine whether an IEEE 1394 device is starting, click [OK]. Select Device Setup from the Devices tab to the Installation Guide. 1. English Using the n8/n12 with Cubase 4/Cubase Studio 4/Cubase AI 4 Computer setup for the Link function Follow the steps below to set up your computer so that ...
... Sample Rate from the beginning. NOTE Before using an IEEE 1394 cable, then turn off or on how to enable the driver. 2. If the Yamaha Extension dialog box is displayed while Cubase is connected. To display the pop-up . NOTE • If the message "Failed to try again. ...checks to determine whether an IEEE 1394 device is starting, click [OK]. Select Device Setup from the Devices tab to the Installation Guide. 1. English Using the n8/n12 with Cubase 4/Cubase Studio 4/Cubase AI 4 Computer setup for the Link function Follow the steps below to set up your computer so that ...
Owners Manual
Page 35
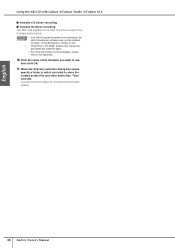
...Setup. Then, exclude the MIDI port for remote control from the File menu to remotely control Cubase from another DAW, exclude the MIDI port for the n8 and n12... port for n8/n12 Two templates each time. 9. If this...In/n12 (n8) Remote" row. Choose [Editing] → [Project & Mixer] mLAN MIDI In/n12 (...these templates. ■ Yamaha n12 multi channel recording ■ Yamaha n8 multi channel recording ... information on the n8/n12 will cause the transport operation... are provided for n8/n12 remote control from the...the Cubase transport section from the n8/n12 will be recorded on a MIDI ...
...Setup. Then, exclude the MIDI port for remote control from the File menu to remotely control Cubase from another DAW, exclude the MIDI port for the n8 and n12... port for n8/n12 Two templates each time. 9. If this...In/n12 (n8) Remote" row. Choose [Editing] → [Project & Mixer] mLAN MIDI In/n12 (...these templates. ■ Yamaha n12 multi channel recording ■ Yamaha n8 multi channel recording ... information on the n8/n12 will cause the transport operation... are provided for n8/n12 remote control from the...the Cubase transport section from the n8/n12 will be recorded on a MIDI ...
Owners Manual
Page 36
... OK. English 36 Owner's Manual Using the n8/n12 with Cubase 4/Cubase Studio 4/Cubase AI 4 ■ Yamaha n12 stereo recording ■ Yamaha n8 stereo recording The REC bus signals on the n8/n12 will be installed correctly. In the [Extensions_] folder on the TOOLS for n CD-ROM, double-click "setup.exe" and install the software again. •...
... OK. English 36 Owner's Manual Using the n8/n12 with Cubase 4/Cubase Studio 4/Cubase AI 4 ■ Yamaha n12 stereo recording ■ Yamaha n8 stereo recording The REC bus signals on the n8/n12 will be installed correctly. In the [Extensions_] folder on the TOOLS for n CD-ROM, double-click "setup.exe" and install the software again. •...

Owners Manual
Page 37
...velocity). To select a Work mode, use the WORK MODE switches in Cubase, then output to the mixer. Using the n8/n12 with Cubase 4/Cubase Studio 4/Cubase AI 4 Using the Link Function Remotely controlling the Cubase transport section and audio tracks From the n8...→ [Metronome Setup], then maximize the level of the switches to select a desired Work mode, the corresponding output destination is linked to the n8/n12 DAW monitor channels (n12: L&R, n8: L&R). When you press one switch. Cubase AUDIO TRACK AUDIO TRACK MIX AUDIO TRACK AUDIO TRACK n8/n12 STEREO BUS LR ...
...velocity). To select a Work mode, use the WORK MODE switches in Cubase, then output to the mixer. Using the n8/n12 with Cubase 4/Cubase Studio 4/Cubase AI 4 Using the Link Function Remotely controlling the Cubase transport section and audio tracks From the n8...→ [Metronome Setup], then maximize the level of the switches to select a desired Work mode, the corresponding output destination is linked to the n8/n12 DAW monitor channels (n12: L&R, n8: L&R). When you press one switch. Cubase AUDIO TRACK AUDIO TRACK MIX AUDIO TRACK AUDIO TRACK n8/n12 STEREO BUS LR ...
Owners Manual
Page 52
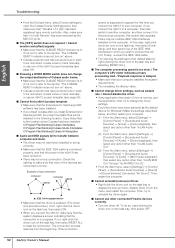
...9632; Cannot change the output destination of loop connection computer n8/n12 computer n8/n12 : IEEE 1394-equipped device • Make sure that the ...lit. C:\Program Files\Steinberg\Cubase 4\templates C:\Program Files\Steinberg\Cubase Studio 4\templates C:\Program Files\Steinberg\Cubase AI 4\templates ■ Audio... the driver icon on the task tray, then select Driver Setup, and then select one of the devices are connected in the... respond. / Cannot monitor wet (effect) signals. • Make sure that "Yamaha n 12 (n8)" has been registered as the default device for Steinberg DAW, the...
...9632; Cannot change the output destination of loop connection computer n8/n12 computer n8/n12 : IEEE 1394-equipped device • Make sure that the ...lit. C:\Program Files\Steinberg\Cubase 4\templates C:\Program Files\Steinberg\Cubase Studio 4\templates C:\Program Files\Steinberg\Cubase AI 4\templates ■ Audio... the driver icon on the task tray, then select Driver Setup, and then select one of the devices are connected in the... respond. / Cannot monitor wet (effect) signals. • Make sure that "Yamaha n 12 (n8)" has been registered as the default device for Steinberg DAW, the...

