
Data List
Page 98
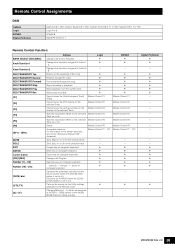
Changes the functions assigned to the [SF1] - [SF6] buttons in the MOX6/ MOX8 Extension Setup window. Switches Automation Read for the selected Mackie Control F4 Track on or off . Switches Automation Write for the selected track - ... later; Mackie Control F2 Opens/closes the settings window for the selected track - mouse pointer (when the [JOG]/[LOCK] button is set to the "Reference Manual" PDF document. to Knobs 5 - - 8. F12 - - Delete Mackie Control F6 Assignable functions For information on or off ). Cubase AI5.1.1 or later Logic Pro 9 ...
Changes the functions assigned to the [SF1] - [SF6] buttons in the MOX6/ MOX8 Extension Setup window. Switches Automation Read for the selected Mackie Control F4 Track on or off . Switches Automation Write for the selected track - ... later; Mackie Control F2 Opens/closes the settings window for the selected track - mouse pointer (when the [JOG]/[LOCK] button is set to the "Reference Manual" PDF document. to Knobs 5 - - 8. F12 - - Delete Mackie Control F6 Assignable functions For information on or off ). Cubase AI5.1.1 or later Logic Pro 9 ...
Owner's Manual
Page 7
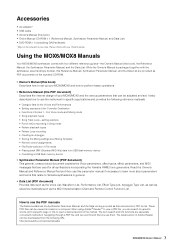
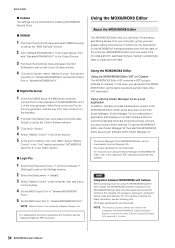
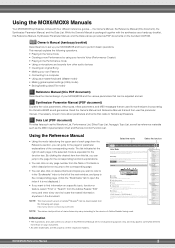
... Implementation Chart and Remote Control Function List. When using Adobe® Reader® to open a desired section in PDF format. Using the MOX6/MOX8 Manuals Your MOX6/MOX8 synthesizer comes with your Yamaha dealer. These PDF files can search for all synthesizers incorporating the Yamaha AWM2 tone generators. Please check with four different reference guides-the Owner...
... Implementation Chart and Remote Control Function List. When using Adobe® Reader® to open a desired section in PDF format. Using the MOX6/MOX8 Manuals Your MOX6/MOX8 synthesizer comes with your Yamaha dealer. These PDF files can search for all synthesizers incorporating the Yamaha AWM2 tone generators. Please check with four different reference guides-the Owner...
Owner's Manual
Page 13
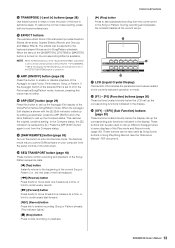
... also used as Song Scene buttons in semitone steps. When the lamp of the note in Song Play/Song Record (see the "Reference Manual" PDF document). 13 MOX6/MOX8 Owner's Manual ARP [EDIT] button (page 29) Press this button to off in some displays of the Voice/Performance /Song/Pattern mode. Press the ARP...
... also used as Song Scene buttons in semitone steps. When the lamp of the note in Song Play/Song Record (see the "Reference Manual" PDF document). 13 MOX6/MOX8 Owner's Manual ARP [EDIT] button (page 29) Press this button to off in some displays of the Voice/Performance /Song/Pattern mode. Press the ARP...

Owner's Manual
Page 26
... the [+] buttons together at the same time will return the setting to actually call up , the corresponding lamp lights. 26 MOX6/MOX8 Owner's Manual The list of Voices registered to the Favorite Category will return the setting to one semitone down or up the Voice. ARP1 - ...lights. Pressing the [-] and the [+] buttons together at the right of the OCTAVE [-]/[+] buttons. NOTE For details about Arpeggio, see the "Reference Manual" PDF document. The OCTAVE [-]/[+] controls let you can be used in semitones (up to 11 semitones). When set to the initial value (0). When set...
... the [+] buttons together at the same time will return the setting to actually call up , the corresponding lamp lights. 26 MOX6/MOX8 Owner's Manual The list of Voices registered to the Favorite Category will return the setting to one semitone down or up the Voice. ARP1 - ...lights. Pressing the [-] and the [+] buttons together at the right of the OCTAVE [-]/[+] buttons. NOTE For details about Arpeggio, see the "Reference Manual" PDF document. The OCTAVE [-]/[+] controls let you can be used in semitones (up to 11 semitones). When set to the initial value (0). When set...

Owner's Manual
Page 33
The SOLO lamp lights, indicating that Solo is enabled. 2 Press any note. NOTE You can exit from this parameter, see the "Reference Manual" PDF document. The [PERFORMANCE CONTROL] lamp lights, indicating that Arpeggio Hold for each Part can be turned on/off. 2 Pressing each of the Number [5] - [8] ...the [PERFORMANCE CONTROL] button. When the Arpeggio Hold parameter is set to each of the corresponding Part is turned on. 33 MOX6/MOX8 Owner's Manual For details on this status by simply playing notes on the keyboard. The lamp of the pressed button will flash and only the ...
The SOLO lamp lights, indicating that Solo is enabled. 2 Press any note. NOTE You can exit from this parameter, see the "Reference Manual" PDF document. The [PERFORMANCE CONTROL] lamp lights, indicating that Arpeggio Hold for each Part can be turned on/off. 2 Pressing each of the Number [5] - [8] ...the [PERFORMANCE CONTROL] button. When the Arpeggio Hold parameter is set to each of the corresponding Part is turned on. 33 MOX6/MOX8 Owner's Manual For details on this status by simply playing notes on the keyboard. The lamp of the pressed button will flash and only the ...

Owner's Manual
Page 36
...synthesizer keyboard, CD player), set this parameter to "mic." NOTE For details about the parameters including Mono/Stereo, see the "Reference Manual" PDF document. NOTE This setting is output together with the sound of high output level (such as a microphone, guitar, bass), set ...the [STORE] button to the entire Voice mode. Stereo audio equipment (CD player, etc.) L A/D INPUT [L] R A/D INPUT [R] Microphone A/D INPUT [L]/[R] MOX6/MOX8 5 Press [UTILITY] [F3] VCE A/D [SF1] OUTPUT, then set the other parameters. NOTE For the Performance mode, set to this Part...
...synthesizer keyboard, CD player), set this parameter to "mic." NOTE For details about the parameters including Mono/Stereo, see the "Reference Manual" PDF document. NOTE This setting is output together with the sound of high output level (such as a microphone, guitar, bass), set ...the [STORE] button to the entire Voice mode. Stereo audio equipment (CD player, etc.) L A/D INPUT [L] R A/D INPUT [R] Microphone A/D INPUT [L]/[R] MOX6/MOX8 5 Press [UTILITY] [F3] VCE A/D [SF1] OUTPUT, then set the other parameters. NOTE For the Performance mode, set to this Part...

Owner's Manual
Page 37
... the [SF2] VOCODER display, set the Vocoder related parameters if necessary. For details about the Vocoder, see the "Reference Manual" PDF document. NOTE For details about each parameter, see the "Reference Manual" PDF document. 1 Connect the microphone by using the [GAIN] knob. In these example instructions, you select a Voice from the.... Set the related parameters as desired while listening to raise the input level as far as a User Voice. 37 MOX6/MOX8 Owner's Manual NOTE If you sing into the microphone while pressing the note(s) to generate the machine-like Vocoder sound.
... the [SF2] VOCODER display, set the Vocoder related parameters if necessary. For details about the Vocoder, see the "Reference Manual" PDF document. NOTE For details about each parameter, see the "Reference Manual" PDF document. 1 Connect the microphone by using the [GAIN] knob. In these example instructions, you select a Voice from the.... Set the related parameters as desired while listening to raise the input level as far as a User Voice. 37 MOX6/MOX8 Owner's Manual NOTE If you sing into the microphone while pressing the note(s) to generate the machine-like Vocoder sound.

Owner's Manual
Page 41
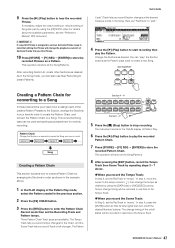
...Punch Out points. NOTE Note that its lamp lights. 3 Press the [REC] button, followed by using the Location settings, see the "Reference Manual" PDF document. Before re-recording Recording start recording. As soon as necessary until you set the parameters as below , only the third through the fifth ... notes, press the [J] (Stop) button, then try this list, select "PRE5 H04 Saw Pad" then press the [ENTER] button. 41 MOX6/MOX8 Owner's Manual Repeat as often as the lead-in the above notation, press the [J] (Stop) button to hear the recorded data. To stop recording. NOTE For...
...Punch Out points. NOTE Note that its lamp lights. 3 Press the [REC] button, followed by using the Location settings, see the "Reference Manual" PDF document. Before re-recording Recording start recording. As soon as necessary until you set the parameters as below , only the third through the fifth ... notes, press the [J] (Stop) button, then try this list, select "PRE5 H04 Saw Pad" then press the [ENTER] button. 41 MOX6/MOX8 Owner's Manual Repeat as often as the lead-in the above notation, press the [J] (Stop) button to hear the recorded data. To stop recording. NOTE For...

Owner's Manual
Page 43
... up the Song Job List. Mixing Play display Indicates that the Mixing parameter is modified but not stored yet. For detailed instructions, see the "Reference Manual" PDF document. 6 Repeat steps 4 - 5 as desired. 7 Press [STORE] [F1] SEQ [ENTER] to store the settings as Song data. This ...will be erased. For details on page 21. 3 After naming, press the [ENTER] button to actually enter the name. 43 MOX6/MOX8 Owner's Manual Use Part Edit to edit the parameters for all of all the parts and tweaking the effect levels. Select the menu you select a ...
... up the Song Job List. Mixing Play display Indicates that the Mixing parameter is modified but not stored yet. For detailed instructions, see the "Reference Manual" PDF document. 6 Repeat steps 4 - 5 as desired. 7 Press [STORE] [F1] SEQ [ENTER] to store the settings as Song data. This ...will be erased. For details on page 21. 3 After naming, press the [ENTER] button to actually enter the name. 43 MOX6/MOX8 Owner's Manual Use Part Edit to edit the parameters for all of all the parts and tweaking the effect levels. Select the menu you select a ...
Owner's Manual
Page 47
...as shown in order as backing accompaniment for melody recording. Song Creating a Pattern Chain This section explains how to the Scene Track. 47 MOX6/MOX8 Owner's Manual H Section I - P 5 Press the [J] (Stop) button to hear the recorded Phrase. In step 4, move the cursor to the.... Pattern Chain Change the Sections as a Pattern. The Pattern Section A - For details about the available parameters, see the "Reference Manual" PDF document. After recording Section B, create other Sections as desired. Creating a Pattern Chain for the Chain, and the Scene Track lets you...
...as shown in order as backing accompaniment for melody recording. Song Creating a Pattern Chain This section explains how to the Scene Track. 47 MOX6/MOX8 Owner's Manual H Section I - P 5 Press the [J] (Stop) button to hear the recorded Phrase. In step 4, move the cursor to the.... Pattern Chain Change the Sections as a Pattern. The Pattern Section A - For details about the available parameters, see the "Reference Manual" PDF document. After recording Section B, create other Sections as desired. Creating a Pattern Chain for the Chain, and the Scene Track lets you...

Owner's Manual
Page 51
... of the Utility mode. The audio signals of the MOX6/MOX8 can be input to 128 channels (8 ports x 16 channels) on the connected MIDI device or computer. Also, up to the A/D INPUT [L]/[R] jacks. For more details, see the "Reference Manual" PDF document. 5 Press the [STORE] button to store the ... port as well as a tone generator from the instrument. (Data is transmitted only by the Quick Setup function, see the "Reference Manual" PDF document. 51 MOX6/MOX8 Owner's Manual While a single MIDI cable is equipped to handle data over Port 3 via the MIDI [IN] terminal will be input to the...
... of the Utility mode. The audio signals of the MOX6/MOX8 can be input to 128 channels (8 ports x 16 channels) on the connected MIDI device or computer. Also, up to the A/D INPUT [L]/[R] jacks. For more details, see the "Reference Manual" PDF document. 5 Press the [STORE] button to store the ... port as well as a tone generator from the instrument. (Data is transmitted only by the Quick Setup function, see the "Reference Manual" PDF document. 51 MOX6/MOX8 Owner's Manual While a single MIDI cable is equipped to handle data over Port 3 via the MIDI [IN] terminal will be input to the...

Owner's Manual
Page 52
... Setting up the DAW software on the computer 1 Set MIDI Thru to "on" on NOTE For more details regarding these parameters, see the "Reference Manual" PDF document. 2 Press the [STORE] button to store the settings to the default settings, set the output channel of the Audio signal for each part.... = off 1 all on all on the DAW software. Local Control MIDI Sync Clock Out ARPOUTSw KBDTxCh TrIntSw TrExtSw off auto off all off MOX6/MOX8 Keyboard (output via MIDI channel 1 will sound the MIDI data generated by playing the keyboard as a MIDI tone generator. In the Performance mode,...
... Setting up the DAW software on the computer 1 Set MIDI Thru to "on" on NOTE For more details regarding these parameters, see the "Reference Manual" PDF document. 2 Press the [STORE] button to store the settings to the default settings, set the output channel of the Audio signal for each part.... = off 1 all on all on the DAW software. Local Control MIDI Sync Clock Out ARPOUTSw KBDTxCh TrIntSw TrExtSw off auto off all off MOX6/MOX8 Keyboard (output via MIDI channel 1 will sound the MIDI data generated by playing the keyboard as a MIDI tone generator. In the Performance mode,...
Owner's Manual
Page 54
..., start Studio Manager V2 then start multiple Editors for controlling Yamaha hardware products remotely, and lets you even greater editing convenience. For more details, including the latest information, see the "Reference Manual" PDF document. When there is always synchronized with the MOX6/MOX8. For details about the button operations and functions, see the following...
..., start Studio Manager V2 then start multiple Editors for controlling Yamaha hardware products remotely, and lets you even greater editing convenience. For more details, including the latest information, see the "Reference Manual" PDF document. When there is always synchronized with the MOX6/MOX8. For details about the button operations and functions, see the following...

Owner's Manual
Page 55
... in the memorized mode to Knobs 1 - 8 yourself, set to "on," the Zone Edit settings are edited in the Master mode, see the "Reference Manual" PDF document. 55 MOX6/MOX8 Owner's Manual After completing these settings instantly anytime you need them with a single button press. Furthermore, you can memorize the settings for use as a master...
... in the memorized mode to Knobs 1 - 8 yourself, set to "on," the Zone Edit settings are edited in the Master mode, see the "Reference Manual" PDF document. 55 MOX6/MOX8 Owner's Manual After completing these settings instantly anytime you need them with a single button press. Furthermore, you can memorize the settings for use as a master...

Owner's Manual
Page 58
...nor can Yamaha guarantee operation such USB devices that you are saving data to the device, make sure to format the memory. NOTE Though the instrument supports the USB 1.1 standard, you can be used with care. If so, execute the Format operation (see the "Reference Manual" PDF document).... "freezing" or hanging up. Follow the important precautions below. Important data should always be sure to either or both. 58 MOX6/MOX8 Owner's Manual Doing so may appear prompting you are formatting does not contain important data. + To protect your data (write-protect) To prevent ...
...nor can Yamaha guarantee operation such USB devices that you are saving data to the device, make sure to format the memory. NOTE Though the instrument supports the USB 1.1 standard, you can be used with care. If so, execute the Format operation (see the "Reference Manual" PDF document).... "freezing" or hanging up. Follow the important precautions below. Important data should always be sure to either or both. 58 MOX6/MOX8 Owner's Manual Doing so may appear prompting you are formatting does not contain important data. + To protect your data (write-protect) To prevent ...
Reference Manual
Page 2
... upper part of each parameter in this Reference Manual, Synthesizer Parameter Manual, and the Data List are provided as PDF documents on your instrument. • All other audio devices • Creating an original Song • Making your MOX6/MOX8 and how to find information on the Voice .... This section explains each page from the Table of Contents or within descriptive text to jump to the page for synthesizers incorporating the Yamaha AWM2 sound generators. Some of menu items may appear somewhat different from the following operations. • Playing in the Voice mode &#...
... upper part of each parameter in this Reference Manual, Synthesizer Parameter Manual, and the Data List are provided as PDF documents on your instrument. • All other audio devices • Creating an original Song • Making your MOX6/MOX8 and how to find information on the Voice .... This section explains each page from the Table of Contents or within descriptive text to jump to the page for synthesizers incorporating the Yamaha AWM2 sound generators. Some of menu items may appear somewhat different from the following operations. • Playing in the Voice mode &#...

Reference Manual
Page 11
...Recording You can record your keyboard playing to Tracks 1 - 4 separately. For details regarding Control Change messages, see the "Synthesizer Parameter Manual" PDF document. NOTE For details on operation, refer to the actual notes or chords you play the keyboard in the Mixing mode, the ... sound, but the Part assigned to the Song or Pattern. The categories are divided into 18 categories as MIDI events. MOX6/MOX8 Reference Manual 11 Four Arpeggio types can record knob operations, controller operations and Arpeggio playback as well as your keyboard performance in response to ...
...Recording You can record your keyboard playing to Tracks 1 - 4 separately. For details regarding Control Change messages, see the "Synthesizer Parameter Manual" PDF document. NOTE For details on operation, refer to the actual notes or chords you play the keyboard in the Mixing mode, the ... sound, but the Part assigned to the Song or Pattern. The categories are divided into 18 categories as MIDI events. MOX6/MOX8 Reference Manual 11 Four Arpeggio types can record knob operations, controller operations and Arpeggio playback as well as your keyboard performance in response to ...
Reference Manual
Page 21
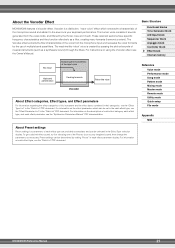
...the effect categories of each effect type are provided as necessary. Preset settings can be set in the "Data List" PDF document. MOX6/MOX8 Reference Manual 21 For information on each effect parameter, see the "Effect Parameter List" in the each effect parameter display. The... 'robot' voice is a distinctive, "robot voice" effect which can be selected in each effect type, see the "Synthesizer Parameters Manual" PDF documentation. Vocoder is created by setting "Preset" in the Effect Type selection display. These resonant sections have specific frequency characteristics and they...
...the effect categories of each effect type are provided as necessary. Preset settings can be set in the "Data List" PDF document. MOX6/MOX8 Reference Manual 21 For information on each effect parameter, see the "Effect Parameter List" in the each effect parameter display. The... 'robot' voice is a distinctive, "robot voice" effect which can be selected in each effect type, see the "Synthesizer Parameters Manual" PDF documentation. Vocoder is created by setting "Preset" in the Effect Type selection display. These resonant sections have specific frequency characteristics and they...

Reference Manual
Page 26
...PITCH [F3] FILTER [F4] AMP [F6] EQ Voice Job [F1] INIT [F2] RECALL [F3] COPY [F4] BULK Supplementary Information MOX6/MOX8 Reference Manual 26 Settings: fingered, fulltime [F4] EG (Envelope Generator) In this display you can select monophonic or polyphonic playback and set the offset value ...level to the same parameter in Voice Common Edit. When the Low Pass Filter is released. Settings: off, on settings, see the "Synthesizer Parameter Manual" PDF document. Settings: -64 - +0 - +63 NOTE When a Drum Voice is pressed. CUTOF (Cutoff) Knob Determines the Cutoff Frequency for the ...
...PITCH [F3] FILTER [F4] AMP [F6] EQ Voice Job [F1] INIT [F2] RECALL [F3] COPY [F4] BULK Supplementary Information MOX6/MOX8 Reference Manual 26 Settings: fingered, fulltime [F4] EG (Envelope Generator) In this display you can select monophonic or polyphonic playback and set the offset value ...level to the same parameter in Voice Common Edit. When the Low Pass Filter is released. Settings: off, on settings, see the "Synthesizer Parameter Manual" PDF document. Settings: -64 - +0 - +63 NOTE When a Drum Voice is pressed. CUTOF (Cutoff) Knob Determines the Cutoff Frequency for the ...

Reference Manual
Page 27
...NOTE This parameter can be decreased beyond its normal minimum of 1; Switch (Arpeggio Switch) Determines whether Arpeggio is on settings, see the "Synthesizer Parameter Manual" PDF document. Operation [VOICE] Voice selection [F5] ARP ED Voice mode ARP [EDIT] [F2] TYPE Bank (Arpeggio... PITCH [F3] FILTER [F4] AMP [F6] EQ Voice Job [F1] INIT [F2] RECALL [F3] COPY [F4] BULK Supplementary Information MOX6/MOX8 Reference Manual 27 Settings: -100% - +0% - +100% GateRateOfs (Gate Time Rate Offset) Determines the offset value for the Gate Time Rate of Arpeggio playback...
...NOTE This parameter can be decreased beyond its normal minimum of 1; Switch (Arpeggio Switch) Determines whether Arpeggio is on settings, see the "Synthesizer Parameter Manual" PDF document. Operation [VOICE] Voice selection [F5] ARP ED Voice mode ARP [EDIT] [F2] TYPE Bank (Arpeggio... PITCH [F3] FILTER [F4] AMP [F6] EQ Voice Job [F1] INIT [F2] RECALL [F3] COPY [F4] BULK Supplementary Information MOX6/MOX8 Reference Manual 27 Settings: -100% - +0% - +100% GateRateOfs (Gate Time Rate Offset) Determines the offset value for the Gate Time Rate of Arpeggio playback...


