
Owner's Manual
Page 2
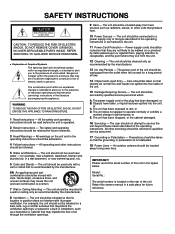
.... 3 Heed Warnings - The user should be serviced by the manufacturer. 8 Ventilation - All other servicing should be of sufficient magnitude to constitute a risk of this owners manual in the operating instructions. All the safety and operating instructions should be situated on the unit. 11 Power-Cord Protection - The unit should be mounted...
.... 3 Heed Warnings - The user should be serviced by the manufacturer. 8 Ventilation - All other servicing should be of sufficient magnitude to constitute a risk of this owners manual in the operating instructions. All the safety and operating instructions should be situated on the unit. 11 Power-Cord Protection - The unit should be mounted...
Owner's Manual
Page 3
...shielded cables. customers only) 1. This product, when installed as indicated in the instructions contained in the users manual, may void your equipment by Yamaha Corporation of assurance that your local retailer that interference will not result in FCC Regulations, Part 15 for ...radio frequencies and, if not installed and used . FCC INFORMATION (for Class "B" digital devices. Modifications not expressly approved by Yamaha may cause interference harmful to follow instructions could void your sensitive hearing. and, most out of other electronic devices. Follow all...
...shielded cables. customers only) 1. This product, when installed as indicated in the instructions contained in the users manual, may void your equipment by Yamaha Corporation of assurance that your local retailer that interference will not result in FCC Regulations, Part 15 for ...radio frequencies and, if not installed and used . FCC INFORMATION (for Class "B" digital devices. Modifications not expressly approved by Yamaha may cause interference harmful to follow instructions could void your sensitive hearing. and, most out of other electronic devices. Follow all...
Owner's Manual
Page 4
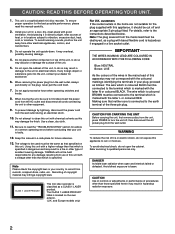
...Do not operate the unit upside-down. If any damage resulting from use of this manual carefully. 2. Using this unit with a higher voltage than that which is dangerous and may infringe copyright laws. YAMAHA will not be held responsible for any foreign object or substance gets into the unit,... COLOURED IN ACCORDANCE WITH THE FOLLOWING CODE: Blue: NEUTRAL Brown: LIVE As the colours of the wires in the mains lead of this manual in a safe place for the best possible performance, please read the "TROUBLESHOOTING" section for advice on common operating errors before concluding that ...
...Do not operate the unit upside-down. If any damage resulting from use of this manual carefully. 2. Using this unit with a higher voltage than that which is dangerous and may infringe copyright laws. YAMAHA will not be held responsible for any foreign object or substance gets into the unit,... COLOURED IN ACCORDANCE WITH THE FOLLOWING CODE: Blue: NEUTRAL Brown: LIVE As the colours of the wires in the mains lead of this manual in a safe place for the best possible performance, please read the "TROUBLESHOOTING" section for advice on common operating errors before concluding that ...
Owner's Manual
Page 8
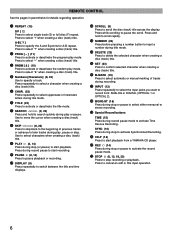
...) Press to skip back to the beginning of tracks during recording. * INPUT (13) Press repeatedly to select the input jacks you want to record from a YAMAHA CD player. ) REC ? (14) Press during record pause mode to search quickly during play mode. Press and hold to activate Time Rescue Recording. when creating... when creating a disc (track) title. & SET (23) Press to confirm selected character when creating a disc (track) title. ‡ M-MARK (15) Press to select automatic or manual marking of previous tracks or advance to stop .
...) Press to skip back to the beginning of tracks during recording. * INPUT (13) Press repeatedly to select the input jacks you want to record from a YAMAHA CD player. ) REC ? (14) Press during record pause mode to search quickly during play mode. Press and hold to activate Time Rescue Recording. when creating... when creating a disc (track) title. & SET (23) Press to confirm selected character when creating a disc (track) title. ‡ M-MARK (15) Press to select automatic or manual marking of previous tracks or advance to stop .
Owner's Manual
Page 9
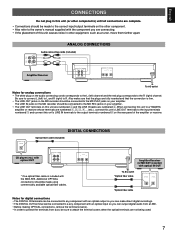
... jacks on the other component. • Also refer to the owner's manual supplied with the component you can make sure that the plugs are fully ... plug in other equipment, such as a tuner, move them farther apart. When connecting this unit to a YAMAHA amplifier or receiver whose terminals are numbered 1, 2, 3, 4 ... (etc.), connect this unit's LINE OUT ... optical fiber cables. The LINE IN jacks on the MD recorder should be connected to any component with the MDX-595. ANALOG CONNECTIONS Audio connecting cords (included) 3 PLAY 4 REC R L Amplifier/Receiver ANALOG 4 IN OUT ...
... jacks on the other component. • Also refer to the owner's manual supplied with the component you can make sure that the plugs are fully ... plug in other equipment, such as a tuner, move them farther apart. When connecting this unit to a YAMAHA amplifier or receiver whose terminals are numbered 1, 2, 3, 4 ... (etc.), connect this unit's LINE OUT ... optical fiber cables. The LINE IN jacks on the MD recorder should be connected to any component with the MDX-595. ANALOG CONNECTIONS Audio connecting cords (included) 3 PLAY 4 REC R L Amplifier/Receiver ANALOG 4 IN OUT ...
Owner's Manual
Page 17
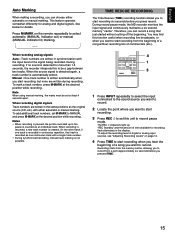
... the original source (CD, etc.) with either automatic or manual marking. To adjust the recording level of a song without cutting off the beginning. During record pause mode, the MD recorder monitors the input signal and continuously maintains a six second memory "cache". CD-P s MDX 4 1 3 1 Press INPUT repeatedly to select the input connected to...
... the original source (CD, etc.) with either automatic or manual marking. To adjust the recording level of a song without cutting off the beginning. During record pause mode, the MD recorder monitors the input signal and continuously maintains a six second memory "cache". CD-P s MDX 4 1 3 1 Press INPUT repeatedly to select the input connected to...
Owner's Manual
Page 18
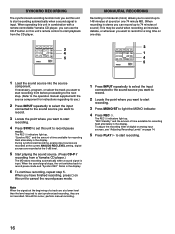
...record. 3 Locate the point where you want to start recording from before proceeding to the next step. (Refer to the operation manual supplied with a remote controllable Yamaha CD player, you can record up to 148 minutes of a track are not recorded. If necessary, program, or select the...synchronized recording, they are at the 0 dB level. 5 Start playing the sound source. (Press CD-P if recording from the CD player. CD-P s MDX 3 1 4 5 1 Load the sound source into the source component. When operating this unit in combination with the source component for instructions regarding its ...
...record. 3 Locate the point where you want to start recording from before proceeding to the next step. (Refer to the operation manual supplied with a remote controllable Yamaha CD player, you can record up to 148 minutes of a track are not recorded. If necessary, program, or select the...synchronized recording, they are at the 0 dB level. 5 Start playing the sound source. (Press CD-P if recording from the CD player. CD-P s MDX 3 1 4 5 1 Load the sound source into the source component. When operating this unit in combination with the source component for instructions regarding its ...
Owner's Manual
Page 26
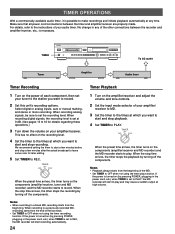
... play . When the stop recording. Select digital or analog inputs, auto or manual marking, and stereo or mono recording. For details, refer to the instructions of the MD. • Set TIMER to play function. TIMER NATURAL SOUND MINIDISC RECORDER MDX-595 POWER TIMER OFF REC PLAY )EJECT #˜* & REC RANDOM S/F REPEAT A-B DISPLAY SCROLL...
... play . When the stop recording. Select digital or analog inputs, auto or manual marking, and stereo or mono recording. For details, refer to the instructions of the MD. • Set TIMER to play function. TIMER NATURAL SOUND MINIDISC RECORDER MDX-595 POWER TIMER OFF REC PLAY )EJECT #˜* & REC RANDOM S/F REPEAT A-B DISPLAY SCROLL...


