

Owner's Manual
Page 2
...may fall into the product, c) If the product has been exposed to qualified service personnel under the following conditions: a) When the power-supply cord or plug is operated. 2 Retain Instructions - Refer all servicing to the presence of uninsulated "dangerous voltage" within an equilateral...should use instructions should never be blocked by the manufacturer. 9 A product and cart combination should be operated only from touching such power lines or circuits as a bookcase or rack unless proper ventilation is intended to alert you to qualified service personnel. 19 Damage ...
...may fall into the product, c) If the product has been exposed to qualified service personnel under the following conditions: a) When the power-supply cord or plug is operated. 2 Retain Instructions - Refer all servicing to the presence of uninsulated "dangerous voltage" within an equilateral...should use instructions should never be blocked by the manufacturer. 9 A product and cart combination should be operated only from touching such power lines or circuits as a bookcase or rack unless proper ventilation is intended to alert you to qualified service personnel. 19 Damage ...

Owner's Manual
Page 3
...mast and supporting structure, grounding of the lead-in all installation instructions. If the antenna lead-in is being affected by Yamaha Corporation of other controls may cause interference harmful to its subsidiaries. If you can be sure the service technician has used according... NATIONAL ELECTRICAL CODE ANTENNA LEAD IN WIRE ANTENNA DISCHARGE UNIT (NEC SECTION 810-20) GROUNDING CONDUCTORS (NEC SECTION 810-21) GROUND CLAMPS POWER SERVICE GROUNDING ELECTRODE SYSTEM (NEC ART 250. this product MUST be mounted to coaxial type cable. PART H) FCC INFORMATION (for the grounding...
...mast and supporting structure, grounding of the lead-in all installation instructions. If the antenna lead-in is being affected by Yamaha Corporation of other controls may cause interference harmful to its subsidiaries. If you can be sure the service technician has used according... NATIONAL ELECTRICAL CODE ANTENNA LEAD IN WIRE ANTENNA DISCHARGE UNIT (NEC SECTION 810-20) GROUNDING CONDUCTORS (NEC SECTION 810-21) GROUND CLAMPS POWER SERVICE GROUNDING ELECTRODE SYSTEM (NEC ART 250. this product MUST be mounted to coaxial type cable. PART H) FCC INFORMATION (for the grounding...
Owner's Manual
Page 4
... headphones can be exposed to excessive heat such as they may cause fire, damage to this unit with high humidity (i.e. Contact qualified Yamaha service personnel when any damage resulting from the wall outlet, grasp the plug; WARNING TO REDUCE THE RISK OF FIRE OR ELECTRIC SHOCK... Use a clean, dry cloth. 12 Only voltage specified on switches, knobs and/or cords. 10 When disconnecting the power cable from use force on this unit with chemical solvents; Yamaha will not be exposed to a wall outlet until all connections are complete. 8 Do not operate this unit. MODEL:...
... headphones can be exposed to excessive heat such as they may cause fire, damage to this unit with high humidity (i.e. Contact qualified Yamaha service personnel when any damage resulting from the wall outlet, grasp the plug; WARNING TO REDUCE THE RISK OF FIRE OR ELECTRIC SHOCK... Use a clean, dry cloth. 12 Only voltage specified on switches, knobs and/or cords. 10 When disconnecting the power cable from use force on this unit with chemical solvents; Yamaha will not be exposed to a wall outlet until all connections are complete. 8 Do not operate this unit. MODEL:...

Owner's Manual
Page 5
...61 Glossary 68 Specifications 70 Index 71 APPENDIX (at the end of this unit, a TV, or other components 6 Step 3: Turn on the power and press SCENE 1 button 8 What do you want to do with page number(s) indicates the corresponding reference page(s). INTRODUCTION PREPARATION BASIC OPERATION Contents INTRODUCTION... Using the VIDEO AUX jacks on the front panel ........ 20 Connecting the FM and AM antennas 20 Connecting the power cable 21 Turning on and off the power 21 Front panel display 22 Optimizing the speaker setting for the information about each position of the parts. •...
...61 Glossary 68 Specifications 70 Index 71 APPENDIX (at the end of this unit, a TV, or other components 6 Step 3: Turn on the power and press SCENE 1 button 8 What do you want to do with page number(s) indicates the corresponding reference page(s). INTRODUCTION PREPARATION BASIC OPERATION Contents INTRODUCTION... Using the VIDEO AUX jacks on the front panel ........ 20 Connecting the FM and AM antennas 20 Connecting the power cable 21 Turning on and off the power 21 Front panel display 22 Optimizing the speaker setting for the information about each position of the parts. •...

Owner's Manual
Page 6
...often undetectable until it at a safe level. Since hearing damage from Dolby Laboratories. We Want You Listening For A Lifetime Yamaha and the Electronic Industries Association's Consumer Electronics Group want you to optimize this unit for discrete multi-channel input ◆... ◆ Minimum RMS output power [Front, Center, Surround channels] 100 W (1 kHz, 0.9% THD, 6 Ω) SCENE select function ◆ Preset SCENE templates for various situations ◆ SCENE template customizing capability Decoders and DSP circuits ◆ Proprietary Yamaha technology for the creation of ...
...often undetectable until it at a safe level. Since hearing damage from Dolby Laboratories. We Want You Listening For A Lifetime Yamaha and the Electronic Industries Association's Consumer Electronics Group want you to optimize this unit for discrete multi-channel input ◆... ◆ Minimum RMS output power [Front, Center, Surround channels] 100 W (1 kHz, 0.9% THD, 6 Ω) SCENE select function ◆ Preset SCENE templates for various situations ◆ SCENE template customizing capability Decoders and DSP circuits ◆ Proprietary Yamaha technology for the creation of ...
Owner's Manual
Page 7
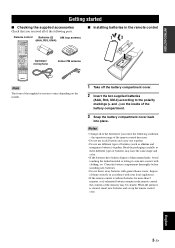
... the polarity markings (+ and -) on the inside of the battery compartment. 3 Snap the battery compartment cover back into contact with clothing, etc. Remote control POWER POWER STANDBY POWER TV AV MULTI CH IN AUDIO SEL SLEEP MUTE CD MD/CD-R TUNER DVD DTV/CBL DVR TV CH V-AUX USB AMP TV INPUT TV...
... the polarity markings (+ and -) on the inside of the battery compartment. 3 Snap the battery compartment cover back into contact with clothing, etc. Remote control POWER POWER STANDBY POWER TV AV MULTI CH IN AUDIO SEL SLEEP MUTE CD MD/CD-R TUNER DVD DTV/CBL DVR TV CH V-AUX USB AMP TV INPUT TV...

Owner's Manual
Page 8
... projector equipped with a composite video input jack. ❏ Video cable 2 Select an RCA composite video cable. ❏ Digital coaxial audio cable 1 Step 3: Turn on the power and press SCENE 1 button ☞ P. 8 Enjoy DVD playback! 4 En The minimum required speakers are not included in your DVD player and other components ☞ P. 6 The...
... projector equipped with a composite video input jack. ❏ Video cable 2 Select an RCA composite video cable. ❏ Digital coaxial audio cable 1 Step 3: Turn on the power and press SCENE 1 button ☞ P. 8 Enjoy DVD playback! 4 En The minimum required speakers are not included in your DVD player and other components ☞ P. 6 The...

Owner's Manual
Page 11
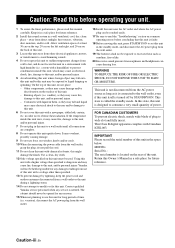
... loop antenna does not have any polarity and you can connect either end of this unit. y This unit is equipped with AC OUTLETS for the power supply of speaker combinations ☞ P. 12 • Connecting a video monitor ☞ P. 16 • Connecting a DVD player ☞ P. 16 • Connecting a DVD recorder ...; P. 20 • Connecting an outdoor FM/AM antenna ☞ P. 20 • Using the USB jack on the unit. 5 Connect the power plug of the wire to this unit and other components. See page 20 for details. Quick start guide ■ For further connections • Using the...
... loop antenna does not have any polarity and you can connect either end of this unit. y This unit is equipped with AC OUTLETS for the power supply of speaker combinations ☞ P. 12 • Connecting a video monitor ☞ P. 16 • Connecting a DVD player ☞ P. 16 • Connecting a DVD recorder ...; P. 20 • Connecting an outdoor FM/AM antenna ☞ P. 20 • Using the USB jack on the unit. 5 Connect the power plug of the wire to this unit and other components. See page 20 for details. Quick start guide ■ For further connections • Using the...

Owner's Manual
Page 12
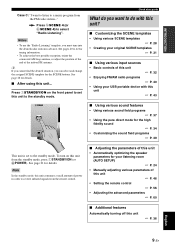
... DVD on your player. 5 Rotate 8VOLUME to adjust the volume. 1 Turn on the video monitor connected to this unit. 2 Press 1STANDBY/ON on the power and press SCENE 1 button Check the type of the connected speakers. "DVD Viewing" appears in advance. Note When you must connect a cable TV or a... the front panel display, and this room..." Press FSCENE 3 (or ESCENE 3) to select "Disc Listening". Case A: "I want to listen to enjoy playback of power in the SCENE mode. 8 En See page 16 for the DVD playback. Note To use the "TV Viewing" template, you change the input source or...
... DVD on your player. 5 Rotate 8VOLUME to adjust the volume. 1 Turn on the video monitor connected to this unit. 2 Press 1STANDBY/ON on the power and press SCENE 1 button Check the type of the connected speakers. "DVD Viewing" appears in advance. Note When you must connect a cable TV or a... the front panel display, and this room..." Press FSCENE 3 (or ESCENE 3) to select "Disc Listening". Case A: "I want to listen to enjoy playback of power in the SCENE mode. 8 En See page 16 for the DVD playback. Note To use the "TV Viewing" template, you change the input source or...
Owner's Manual
Page 13
... ☞ P. 32 • Enjoying FM/AM radio programs ☞ P. 40 • Using your listening room (AUTO SETUP) ☞ P. 24 • Manually adjusting various parameters of power in advance.
... ☞ P. 32 • Enjoying FM/AM radio programs ☞ P. 40 • Using your listening room (AUTO SETUP) ☞ P. 24 • Manually adjusting various parameters of power in advance.
Owner's Manual
Page 25
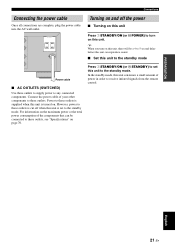
...SWITCHED) Use these outlets is supplied when this unit is turned on. For information on the maximum power or the total power consumption of the components that can be a 4 to 5-second delay before this unit can reproduce ...NSTANDBY) to set to the standby mode. y When you turn on page 70. Connect the power cable of power in order to turn on this unit to the standby mode. AC OUTLETS Turning on and off ...when this unit is cut off the power ■ Turning on this unit, there will be connected to these outlets is set this unit...
...SWITCHED) Use these outlets is supplied when this unit is turned on. For information on the maximum power or the total power consumption of the components that can be a 4 to 5-second delay before this unit can reproduce ...NSTANDBY) to set to the standby mode. y When you turn on page 70. Connect the power cable of power in order to turn on this unit to the standby mode. AC OUTLETS Turning on and off ...when this unit is cut off the power ■ Turning on this unit, there will be connected to these outlets is set this unit...

Owner's Manual
Page 41
... DSP processing. The program reproduces a wide dynamic range from the center; Downmixes multi-channel sources to play games. Using this unit is automatically set to powerful sounds. Press APROGRAM l / h (or press DAMP and then press JPROG l / h repeatedly). The program uses data collected in a large concert hall in New York. You can...
... DSP processing. The program reproduces a wide dynamic range from the center; Downmixes multi-channel sources to play games. Using this unit is automatically set to powerful sounds. Press APROGRAM l / h (or press DAMP and then press JPROG l / h repeatedly). The program uses data collected in a large concert hall in New York. You can...

Owner's Manual
Page 51
... MENU" settings. Designates the default audio input jack select setting for the input sources connected to the DIGITAL INPUT jacks when you turn on the power of the sound field programs to the factory settings. The top "SET MENU" display appears in the OSD. ;MANUAL SETUP . 1 SOUND MENU 2 INPUT MENU 3 OPTION...
... MENU" settings. Designates the default audio input jack select setting for the input sources connected to the DIGITAL INPUT jacks when you turn on the power of the sound field programs to the factory settings. The top "SET MENU" display appears in the OSD. ;MANUAL SETUP . 1 SOUND MENU 2 INPUT MENU 3 OPTION...

Owner's Manual
Page 56
... l / h (or the input selector buttons (C)). SET MENU Maximum volume MAX VOL. This feature is set to -30 dB, the volume level is turned on the power of this unit next time. is set to your needs. is 16 dB to be used if the initial settings of this unit do not..., when "MAX VOL." setting takes priority over the "INI.VOL." For example, if "INI.VOL." Use this feature to set the volume level when the power of this feature to assign the input jacks according to the component to -80 dB. setting. Once the input jacks are reassigned, you turn on...
... l / h (or the input selector buttons (C)). SET MENU Maximum volume MAX VOL. This feature is set to -30 dB, the volume level is turned on the power of this unit next time. is set to your needs. is 16 dB to be used if the initial settings of this unit do not..., when "MAX VOL." setting takes priority over the "INI.VOL." For example, if "INI.VOL." Use this feature to set the volume level when the power of this feature to assign the input jacks according to the component to -80 dB. setting. Once the input jacks are reassigned, you turn on...

Owner's Manual
Page 57
... 2 INPUT MENU C)VOLUME TRIM DVD DVD ;;;;;;0.0dB [p]/[[]:Adjust [RETURN]:Exit ■ Decoder mode D)DECODER MODE V-AUX USB 2 Press DAMP and then press Gl / h on the power of input signals and select the appropriate decoder mode. • Select "LAST" if you want to use up to 8 characters for each source. English 53...
... 2 INPUT MENU C)VOLUME TRIM DVD DVD ;;;;;;0.0dB [p]/[[]:Adjust [RETURN]:Exit ■ Decoder mode D)DECODER MODE V-AUX USB 2 Press DAMP and then press Gl / h on the power of input signals and select the appropriate decoder mode. • Select "LAST" if you want to use up to 8 characters for each source. English 53...

Owner's Manual
Page 59
INI >NO YES [p]/[[]:Select • Select "OFF" to turn on the power of this unit to play files or folders in a random order. sound field program parameters - all "SET MENU" items - You can shuffle files in a random ...
INI >NO YES [p]/[[]:Select • Select "OFF" to turn on the power of this unit to play files or folders in a random order. sound field program parameters - all "SET MENU" items - You can shuffle files in a random ...

Owner's Manual
Page 60
... input source component. PTY SEEK - Remote control features Remote control features In addition to controlling this unit and the input source component by Yamaha and other components, you must set the input source of the SCENE template on the remote control to operate the input source component correctly.... button on the SCENE feature ■ Controlling the input source components in the * area below to operate the input source component. * POWER POWER STANDBY POWER TV AV MULTI CH IN AUDIO SEL SLEEP MUTE CD MD/CD-R TUNER DVD DTV/CBL DVR TV CH V-AUX USB AMP TV INPUT...
... input source component. PTY SEEK - Remote control features Remote control features In addition to controlling this unit and the input source component by Yamaha and other components, you must set the input source of the SCENE template on the remote control to operate the input source component correctly.... button on the SCENE feature ■ Controlling the input source components in the * area below to operate the input source component. * POWER POWER STANDBY POWER TV AV MULTI CH IN AUDIO SEL SLEEP MUTE CD MD/CD-R TUNER DVD DTV/CBL DVR TV CH V-AUX USB AMP TV INPUT...

Owner's Manual
Page 61
... TV INPUT Changes the input source. *2 These buttons control your TV, you press CDTV/CBL or not. Remote control Digital TV/Cable TV TV POWER Turns on page 58. For details, see page 59). PTY SEEK - PTY SEEK - ADVANCED OPERATION English 57 En TV VOL +/- Increases or decreases...control code for DTV/CBL (see the "Digital TV/Cable TV" column on or off the power. START l PROG h ENHANCER STRAIGHT 1 2 3 4 SUR.DECODE NIGHT 5 6 DIRECT ST. 7 8 9 0 10 ENT *1 DTV/CBL POWER POWER STANDBY POWER TV AV MULTI CH IN AUDIO SEL SLEEP MUTE CD MD/CD-R TUNER DVD DTV/CBL ...
... TV INPUT Changes the input source. *2 These buttons control your TV, you press CDTV/CBL or not. Remote control Digital TV/Cable TV TV POWER Turns on page 58. For details, see page 59). PTY SEEK - PTY SEEK - ADVANCED OPERATION English 57 En TV VOL +/- Increases or decreases...control code for DTV/CBL (see the "Digital TV/Cable TV" column on or off the power. START l PROG h ENHANCER STRAIGHT 1 2 3 4 SUR.DECODE NIGHT 5 6 DIRECT ST. 7 8 9 0 10 ENT *1 DTV/CBL POWER POWER STANDBY POWER TV AV MULTI CH IN AUDIO SEL SLEEP MUTE CD MD/CD-R TUNER DVD DTV/CBL ...

Owner's Manual
Page 62
... 0 10 ENT 7 8 9 Remote control DVD player/ recorder VCR Digital TV/ Cable TV LD player CD player MD/CD recorder Tuner USB 1 AV POWER Power *1 Power *1 Power *2 Power *1 Power *1 Power *1 2 TITLE Title Band 3 PRESET/CH k Up VCR channel up Up Preset up (1-8) Up PRESET/CH n Down VCR channel down Down Preset down ... Down A/B/C/D/E l Left Left Preset down (A-E) Previous menu A/B/C/D/E h Right Right Preset up to 10 different components. 1 POWER POWER STANDBY POWER TV AV MULTI CH IN AUDIO SEL SLEEP MUTE CD MD/CD-R TUNER DVD DTV/CBL DVR TV CH V-AUX USB ...
... 0 10 ENT 7 8 9 Remote control DVD player/ recorder VCR Digital TV/ Cable TV LD player CD player MD/CD recorder Tuner USB 1 AV POWER Power *1 Power *1 Power *2 Power *1 Power *1 Power *1 2 TITLE Title Band 3 PRESET/CH k Up VCR channel up Up Preset up (1-8) Up PRESET/CH n Down VCR channel down Down Preset down ... Down A/B/C/D/E l Left Left Preset down (A-E) Previous menu A/B/C/D/E h Right Right Preset up to 10 different components. 1 POWER POWER STANDBY POWER TV AV MULTI CH IN AUDIO SEL SLEEP MUTE CD MD/CD-R TUNER DVD DTV/CBL DVR TV CH V-AUX USB ...
Owner's Manual
Page 63
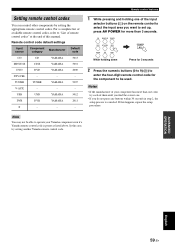
... 3 seconds. ADVANCED OPERATION English 59 En For a complete list of your Yamaha component even if a Yamaha remote control code is canceled. USB USB YAMAHA 5012 DVR DVR YAMAHA 2011 - - - TUNER TUNER YAMAHA 5007 V-AUX - - - Setting remote control codes You can control other... components by setting the appropriate remote control codes. CD MD/CD-R TUNER DVD DTV/CBL DVR V-AUX USB POWER AV While ...
... 3 seconds. ADVANCED OPERATION English 59 En For a complete list of your Yamaha component even if a Yamaha remote control code is canceled. USB USB YAMAHA 5012 DVR DVR YAMAHA 2011 - - - TUNER TUNER YAMAHA 5007 V-AUX - - - Setting remote control codes You can control other... components by setting the appropriate remote control codes. CD MD/CD-R TUNER DVD DTV/CBL DVR V-AUX USB POWER AV While ...


