Owner's Manual
Page 5
... 3 Supplied accessories 3 Installing batteries in the remote control 3 CONTROLS AND FUNCTIONS 4 Front panel 4 Remote control 6 Front panel display 8 Rear panel 9 PREPARATION CONNECTIONS 10 Placing speakers 10 Connecting speakers 11 Information on jacks and cable plugs 13 Connecting video components 14 Connecting audio components 17 Connecting the FM and AM antennas 18 Connecting...
... 3 Supplied accessories 3 Installing batteries in the remote control 3 CONTROLS AND FUNCTIONS 4 Front panel 4 Remote control 6 Front panel display 8 Rear panel 9 PREPARATION CONNECTIONS 10 Placing speakers 10 Connecting speakers 11 Information on jacks and cable plugs 13 Connecting video components 14 Connecting audio components 17 Connecting the FM and AM antennas 18 Connecting...
Owner's Manual
Page 7
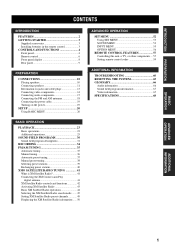
INTRODUCTION GETTING STARTED Supplied accessories Check that may be cleared. MUTE INPUT MUTE 2CH STEREO 1 MUSIC ENTERTAIN MOVIE 2 3 4 STANDARD 5 5CH STEREO 6 7 8 A SPEAKERS B 9 0 NIGHT STRAIGHT +10 ENT. Notes • Change all of batteries (such as these different types of batteries may have the same shape and color. • ...
INTRODUCTION GETTING STARTED Supplied accessories Check that may be cleared. MUTE INPUT MUTE 2CH STEREO 1 MUSIC ENTERTAIN MOVIE 2 3 4 STANDARD 5 5CH STEREO 6 7 8 A SPEAKERS B 9 0 NIGHT STRAIGHT +10 ENT. Notes • Change all of batteries (such as these different types of batteries may have the same shape and color. • ...
Owner's Manual
Page 8
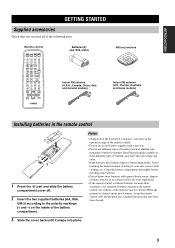
... station in order to receive infrared-signals from the remote control. • When you turn on page 42. 1 2 34 5 67 8 9 0 STANDBY /ON PHONES SILENT CINEMA SPEAKERS A/B/OFF PRESET/TUNING SEARCH MODE EDIT FM/AM XM A/B/C/D/E CATEGORY NEXT STRAIGHT EFFECT TONE CONTROL l PROGRAM h BASS/TREBLE l PRESET/TUNING/CH h SET MENU MEMORY MAN...
... station in order to receive infrared-signals from the remote control. • When you turn on page 42. 1 2 34 5 67 8 9 0 STANDBY /ON PHONES SILENT CINEMA SPEAKERS A/B/OFF PRESET/TUNING SEARCH MODE EDIT FM/AM XM A/B/C/D/E CATEGORY NEXT STRAIGHT EFFECT TONE CONTROL l PROGRAM h BASS/TREBLE l PRESET/TUNING/CH h SET MENU MEMORY MAN...
Owner's Manual
Page 9
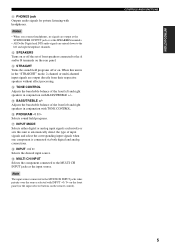
...D TONE CONTROL Adjusts the bass/treble balance of the front left and right speakers in conjunction with BASS/TREBLE +/-. Adjusts the bass/treble balance of the front left and right speakers in conjunction with TONE CONTROL. CONTROLS AND FUNCTIONS 5 When this unit to ...automatically detect the type of front speakers connected to the left and right headphone channels. F PROGRAM l / h Selects ...
...D TONE CONTROL Adjusts the bass/treble balance of the front left and right speakers in conjunction with BASS/TREBLE +/-. Adjusts the bass/treble balance of the front left and right speakers in conjunction with TONE CONTROL. CONTROLS AND FUNCTIONS 5 When this unit to ...automatically detect the type of front speakers connected to the left and right headphone channels. F PROGRAM l / h Selects ...
Owner's Manual
Page 10
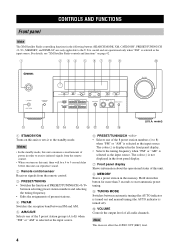
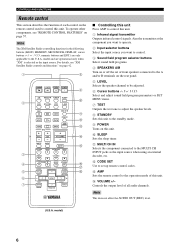
...Input selector buttons Select the input source you want to control. 3 Sound field program selector buttons Select sound field programs. 4 SPEAKERS A/B Turn on or off the set up remote control codes. A MULTI CH IN Selects the component connected to the MULTI CH... 1 STANDARD 5 MUSIC ENTERTAIN MOVIE 2 3 4 5CH STEREO 6 7 8 4 A SPEAKERS B 9 0 NIGHT STRAIGHT +10 ENT. model) 6 C AMP Sets the remote control to set of front speakers connected to the A and/or B terminals on the rear panel. 5 LEVEL Selects the speaker channel to be adjusted. 6 Cursor buttons u / d / j / i Select and...
...Input selector buttons Select the input source you want to control. 3 Sound field program selector buttons Select sound field programs. 4 SPEAKERS A/B Turn on or off the set up remote control codes. A MULTI CH IN Selects the component connected to the MULTI CH... 1 STANDARD 5 MUSIC ENTERTAIN MOVIE 2 3 4 5CH STEREO 6 7 8 4 A SPEAKERS B 9 0 NIGHT STRAIGHT +10 ENT. model) 6 C AMP Sets the remote control to set of front speakers connected to the A and/or B terminals on the rear panel. 5 LEVEL Selects the speaker channel to be adjusted. 6 Cursor buttons u / d / j / i Select and...
Owner's Manual
Page 11
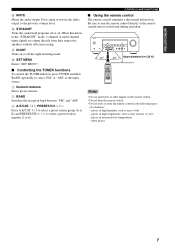
.... • Do not leave or store the remote control in the "STRAIGHT" mode, 2-channel or multi-channel input signals are output directly from their respective speakers without effect processing. places of high temperature, such as near a heater or stove - H SET MENU Enters "SET MENU". ■ Controlling the TUNER functions To control...
.... • Do not leave or store the remote control in the "STRAIGHT" mode, 2-channel or multi-channel input signals are output directly from their respective speakers without effect processing. places of high temperature, such as near a heater or stove - H SET MENU Enters "SET MENU". ■ Controlling the TUNER functions To control...
Owner's Manual
Page 12
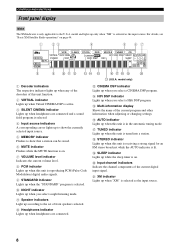
... indicator Lights up when this unit is lit. model only) 1 Decoder indicators The respective indicator lights up when any of the decoders of front speakers selected. A Speaker indicators Light up when headphones are connected. J Input channel indicators Indicate the channel components of the current program and other information when adjusting or changing...
... indicator Lights up when this unit is lit. model only) 1 Decoder indicators The respective indicator lights up when any of the decoders of front speakers selected. A Speaker indicators Light up when headphones are connected. J Input channel indicators Indicate the channel components of the current program and other information when adjusting or changing...
Owner's Manual
Page 13
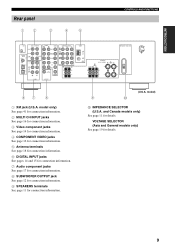
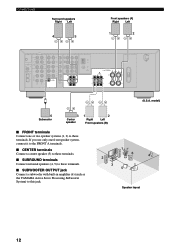
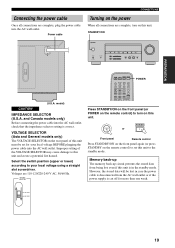
...pages 14 and 15 for connection information. 7 Audio component jacks See page 17 for connection information. 8 SUBWOOFER OUTPUT jack See page 12 for connection information. 9 SPEAKERS terminals See page 11 for details. and Canada models only) See page 11 for connection information. (U.S.A. VOLTAGE SELECTOR (Asia and General models only) See page... IN (PLAY) MD/ CD-R 1 OUT (REC) R L AUDIO IN VCR OUT MONITOR OUT R SURROUND L SUB WOOFER MONITOR OUT OUTPUT TUNER AM ANT GND FM ANT SPEAKERS CLASS 2 WIRING B FRONT CENTER R L A R FRONT L IMPEDANCE SELECTOR 67 8 1 XM jack (U.S.A.
...pages 14 and 15 for connection information. 7 Audio component jacks See page 17 for connection information. 8 SUBWOOFER OUTPUT jack See page 12 for connection information. 9 SPEAKERS terminals See page 11 for details. and Canada models only) See page 11 for connection information. (U.S.A. VOLTAGE SELECTOR (Asia and General models only) See page... IN (PLAY) MD/ CD-R 1 OUT (REC) R L AUDIO IN VCR OUT MONITOR OUT R SURROUND L SUB WOOFER MONITOR OUT OUTPUT TUNER AM ANT GND FM ANT SPEAKERS CLASS 2 WIRING B FRONT CENTER R L A R FRONT L IMPEDANCE SELECTOR 67 8 1 XM jack (U.S.A.
Owner's Manual
Page 14
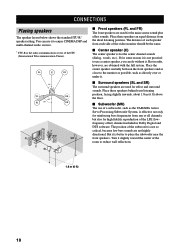
...better to place the subwoofer near the front speakers. The position of the ITU (International Telecommunication Union). Place the center speaker centrally between the front speakers and as close to the monitor as possible, such as the YAMAHA Active Servo Processing Subwoofer System, is not ...practical to use a center speaker, you can use of a subwoofer, such ...
...better to place the subwoofer near the front speakers. The position of the ITU (International Telecommunication Union). Place the center speaker centrally between the front speakers and as close to the monitor as possible, such as the YAMAHA Active Servo Processing Subwoofer System, is not ...practical to use a center speaker, you can use of a subwoofer, such ...

Owner's Manual
Page 15
... no sound will be 8 Ω or higher. ■ Before connecting to the upper position using a straight slot screwdriver. Switch position Upper Lower Speaker FRONT A or B CENTER SURROUND FRONT A or B CENTER SURROUND Impedance level The impedance of insulated cables running side by side. Remove approximately 10 mm... cable together to prevent short circuits. 10 mm (3/8") CONNECTIONS ■ Connecting to secure the wire. CAUTION • Use speakers with the monitor, place the speakers away from the end of each other or do not let them touch any metal part of this unit is a single...
... no sound will be 8 Ω or higher. ■ Before connecting to the upper position using a straight slot screwdriver. Switch position Upper Lower Speaker FRONT A or B CENTER SURROUND FRONT A or B CENTER SURROUND Impedance level The impedance of insulated cables running side by side. Remove approximately 10 mm... cable together to prevent short circuits. 10 mm (3/8") CONNECTIONS ■ Connecting to secure the wire. CAUTION • Use speakers with the monitor, place the speakers away from the end of each other or do not let them touch any metal part of this unit is a single...
Owner's Manual
Page 16
...; SUBWOOFER OUTPUT jack Connect a subwoofer with built-in amplifier (6) (such as the YAMAHA Active Servo Processing Subwoofer System) to these terminals. If you use only one or two speaker systems (1, 2) to this jack. 1 6 4 2 3 5 Speaker layout 12 CONNECTIONS Surround speakers Right Left 4 5 Front speakers (A) Right Left 1 2 XM MULTI CH INPUT FRONT SURROUND DIGITAL INPUT SUB DVD...
...; SUBWOOFER OUTPUT jack Connect a subwoofer with built-in amplifier (6) (such as the YAMAHA Active Servo Processing Subwoofer System) to these terminals. If you use only one or two speaker systems (1, 2) to this jack. 1 6 4 2 3 5 Speaker layout 12 CONNECTIONS Surround speakers Right Left 4 5 Front speakers (A) Right Left 1 2 XM MULTI CH INPUT FRONT SURROUND DIGITAL INPUT SUB DVD...
Owner's Manual
Page 20
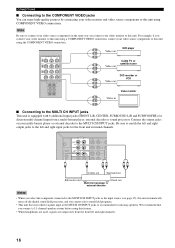
... MULTI CH INPUT jacks as the input source (see page 25), this unit automatically turns off the digital sound field processor, and you connect a 5.1-channel speaker system before using this unit using COMPONENT VIDEO connections. We recommend that you cannot select sound field programs. • This unit does not redirect signals... equipped with 6 additional input jacks (FRONT L/R, CENTER, SURROUND L/R and SUBWOOFER) for discrete multi-channel input from the front left and right input jacks for missing speakers.
... MULTI CH INPUT jacks as the input source (see page 25), this unit automatically turns off the digital sound field processor, and you connect a 5.1-channel speaker system before using this unit using COMPONENT VIDEO connections. We recommend that you cannot select sound field programs. • This unit does not redirect signals... equipped with 6 additional input jacks (FRONT L/R, CENTER, SURROUND L/R and SUBWOOFER) for discrete multi-channel input from the front left and right input jacks for missing speakers.
Owner's Manual
Page 23
STANDBY/ON IMPEDANCE SELECTOR STANDBY /ON PHONES SILENT CINEMA SPEAKERS A/B/OFF PRESET/TUNING SEARCH MODE EDIT FM/AM XM A/B/C/D/E CATEGORY NEXT STRAIGHT EFFECT TONE CONTROL l PROGRAM h BASS/TREBLE l PRESET/TUNING/CH h SET MENU MEMORY MAN'L/...
STANDBY/ON IMPEDANCE SELECTOR STANDBY /ON PHONES SILENT CINEMA SPEAKERS A/B/OFF PRESET/TUNING SEARCH MODE EDIT FM/AM XM A/B/C/D/E CATEGORY NEXT STRAIGHT EFFECT TONE CONTROL l PROGRAM h BASS/TREBLE l PRESET/TUNING/CH h SET MENU MEMORY MAN'L/...

Owner's Manual
Page 24
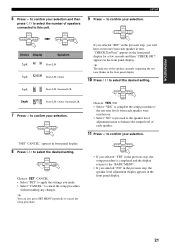
... MENU SRCH MODE + A-E/CAT. ENTER + A-E/CAT. MUTE INPUT MUTE 2CH STEREO 1 MUSIC ENTERTAIN MOVIE 2 3 4 STANDARD 5 5CH STEREO 6 7 8 A SPEAKERS B 9 0 NIGHT STRAIGHT +10 ENT. If the front panel display shows anything other than "BASIC MENU", press SET MENU repeatedly until "BASIC MENU" appears. ...your system. • Select "NONE" if you disconnect your speakers. Note Before you begin: • Press SPEAKERS on the front panel repeatedly (or press SPEAKERS A/B on the remote control) to select the front speakers you want to use. • Make sure you do not...
... MENU SRCH MODE + A-E/CAT. ENTER + A-E/CAT. MUTE INPUT MUTE 2CH STEREO 1 MUSIC ENTERTAIN MOVIE 2 3 4 STANDARD 5 5CH STEREO 6 7 8 A SPEAKERS B 9 0 NIGHT STRAIGHT +10 ENT. If the front panel display shows anything other than "BASIC MENU", press SET MENU repeatedly until "BASIC MENU" appears. ...your system. • Select "NONE" if you disconnect your speakers. Note Before you begin: • Press SPEAKERS on the front panel repeatedly (or press SPEAKERS A/B on the remote control) to select the front speakers you want to use. • Make sure you do not...
Owner's Manual
Page 25
...- ENTER + A-E/CAT. "CHECK:TestTone" appears in the front panel display. ENTER + A-E/CAT. ENTER + A-E/CAT. ENTER + A-E/CAT. y The indicator of the speaker currently outputting the test tone flashes in turn. PRESET/CH Choices: YES, NO • Select "YES" to complete the setup procedure if the test tone... for a few seconds and then "CHECK OK?" PRESET/CH • If you selected "NO" in the previous step, the speaker level adjustment display appears in the previous step, the setup procedure is completed and the display returns to cancel the setup procedure without making...
...- ENTER + A-E/CAT. "CHECK:TestTone" appears in the front panel display. ENTER + A-E/CAT. ENTER + A-E/CAT. ENTER + A-E/CAT. y The indicator of the speaker currently outputting the test tone flashes in turn. PRESET/CH Choices: YES, NO • Select "YES" to complete the setup procedure if the test tone... for a few seconds and then "CHECK OK?" PRESET/CH • If you selected "NO" in the previous step, the speaker level adjustment display appears in the previous step, the setup procedure is completed and the display returns to cancel the setup procedure without making...
Owner's Manual
Page 26
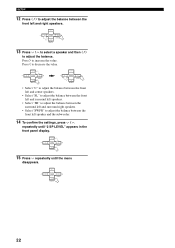
... ENTER + A-E/CAT. PRESET/CH 13 Press d / u to select a speaker and then j / i to adjust the balance between the front left and right speakers. - ENTER + A-E/CAT. Press i to adjust the balance between the surround left speaker and the subwoofer. 14 To confirm the settings, press d / u repeatedly until.../CH PRESET/CH • Select "C" to adjust the balance between the front left and center speakers. • Select "SL" to adjust the balance between the front left and surround left speakers. • Select "SR" to adjust the balance between the front left and surround right...
... ENTER + A-E/CAT. PRESET/CH 13 Press d / u to select a speaker and then j / i to adjust the balance between the front left and right speakers. - ENTER + A-E/CAT. Press i to adjust the balance between the surround left speaker and the subwoofer. 14 To confirm the settings, press d / u repeatedly until.../CH PRESET/CH • Select "C" to adjust the balance between the front left and center speakers. • Select "SL" to adjust the balance between the front left and surround left speakers. • Select "SR" to adjust the balance between the front left and surround right...
Owner's Manual
Page 27
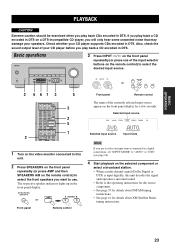
...Remote control The name of your CD player before you play back CDs encoded in DTS. Basic operations STANDBY /ON PHONES SILENT CINEMA SPEAKERS A/B/OFF PRESET/TUNING SEARCH MODE EDIT FM/AM XM A/B/C/D/E CATEGORY NEXT STRAIGHT EFFECT TONE CONTROL l PROGRAM h BASS/TREBLE l PRESET/...display for details about XM Satellite Radio tuning instructions. 23 MUTE INPUT MUTE 2CH STEREO 1 MUSIC ENTERTAIN MOVIE 2 3 4 STANDARD 5 5CH STEREO 6 7 8 A SPEAKERS B 9 0 NIGHT STRAIGHT +10 ENT. INPUT CD MD/CD-R or DVD DTV/CBL VCR V-AUX 2 6 67 3 2 CD MD/CD-R TUNER SLEEP DVD ...
...Remote control The name of your CD player before you play back CDs encoded in DTS. Basic operations STANDBY /ON PHONES SILENT CINEMA SPEAKERS A/B/OFF PRESET/TUNING SEARCH MODE EDIT FM/AM XM A/B/C/D/E CATEGORY NEXT STRAIGHT EFFECT TONE CONTROL l PROGRAM h BASS/TREBLE l PRESET/...display for details about XM Satellite Radio tuning instructions. 23 MUTE INPUT MUTE 2CH STEREO 1 MUSIC ENTERTAIN MOVIE 2 3 4 STANDARD 5 5CH STEREO 6 7 8 A SPEAKERS B 9 0 NIGHT STRAIGHT +10 ENT. INPUT CD MD/CD-R or DVD DTV/CBL VCR V-AUX 2 6 67 3 2 CD MD/CD-R TUNER SLEEP DVD ...
Owner's Manual
Page 28
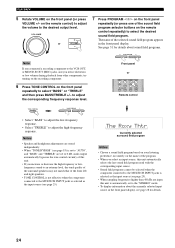
...frequency response. • Select "TREBLE" to adjust the corresponding frequency response level. to adjust the high-frequency response. Notes • Speaker and headphone adjustments are stored independently. • When "TONE BYPASS" (see page 55) is set to "AUTO", and "BASS" ... remote control repeatedly) to the desired output level. Front panel or 2CH STEREO 1 MUSIC ENTERTAIN MOVIE 2 3 4 STANDARD 5 5CH STEREO 6 7 8 A SPEAKERS B 9 0 NIGHT STRAIGHT +10 ENT. VOLUME + or VOLUME - 7 Press PROGRAM l / h on the front panel repeatedly to the MULTI CH INPUT ...
...frequency response. • Select "TREBLE" to adjust the corresponding frequency response level. to adjust the high-frequency response. Notes • Speaker and headphone adjustments are stored independently. • When "TONE BYPASS" (see page 55) is set to "AUTO", and "BASS" ... remote control repeatedly) to the desired output level. Front panel or 2CH STEREO 1 MUSIC ENTERTAIN MOVIE 2 3 4 STANDARD 5 5CH STEREO 6 7 8 A SPEAKERS B 9 0 NIGHT STRAIGHT +10 ENT. VOLUME + or VOLUME - 7 Press PROGRAM l / h on the front panel repeatedly to the MULTI CH INPUT ...

Owner's Manual
Page 30
...between this unit automatically switches to the appropriate decoder if a Dolby Digital or DTS signal is output. INPUT MODE ■ Adjusting speaker levels during playback You can also select the speaker by using a digital audio connection, be sure to set to "AUTO", this unit and the player. 1 Press INPUT l... is also possible when playing sources input at the MULTI CH INPUT jacks. 1 Press AMP on the remote control to adjust the speaker output level. VCR V-AUX DTV/CBL DVD MD/CD-R TUNER CD DVD AUTO Currently selected input source Currently selected input mode AUTO ...
...between this unit automatically switches to the appropriate decoder if a Dolby Digital or DTS signal is output. INPUT MODE ■ Adjusting speaker levels during playback You can also select the speaker by using a digital audio connection, be sure to set to "AUTO", this unit and the player. 1 Press INPUT l... is also possible when playing sources input at the MULTI CH INPUT jacks. 1 Press AMP on the remote control to adjust the speaker output level. VCR V-AUX DTV/CBL DVD MD/CD-R TUNER CD DVD AUTO Currently selected input source Currently selected input mode AUTO ...

Owner's Manual
Page 31
...INPUT jacks. 1 Press AMP on the remote control when you make in "SETUP". PLAYBACK Notes • You cannot use TEST to adjust speaker levels, the speaker levels you previously adjust during playback will also change. • If you use the test tone if headphones are connected to the PHONES jack... operation will output a test tone. PRESET/CH The control range is set with the test tone may not be to -20 dB for the front speakers and subwoofer. 4 Press TEST on the remote control and then press TEST. Remove the headphones from 0 dB to your liking. ENTER + A-E/CAT. ...
...INPUT jacks. 1 Press AMP on the remote control when you make in "SETUP". PLAYBACK Notes • You cannot use TEST to adjust speaker levels, the speaker levels you previously adjust during playback will also change. • If you use the test tone if headphones are connected to the PHONES jack... operation will output a test tone. PRESET/CH The control range is set with the test tone may not be to -20 dB for the front speakers and subwoofer. 4 Press TEST on the remote control and then press TEST. Remove the headphones from 0 dB to your liking. ENTER + A-E/CAT. ...


