

Owners Manual
Page 2
...-axial type cable. IMPORTANT: When connecting this product in a residential environment will not occur in all installation instructions. Modifications not expressly approved by Yamaha may void your authority, granted by the interference. IMPORTANT NOTICE FOR THE UNITED KINGDOM Applies to power adaptor Connecting the Plug and Cord IMPORTANT: THE WIRES IN THE MAINS LEAD ARE COLOURED IN ACCORDANCE WITH THE FOLLOWING CODE: BLUE...
...-axial type cable. IMPORTANT: When connecting this product in a residential environment will not occur in all installation instructions. Modifications not expressly approved by Yamaha may void your authority, granted by the interference. IMPORTANT NOTICE FOR THE UNITED KINGDOM Applies to power adaptor Connecting the Plug and Cord IMPORTANT: THE WIRES IN THE MAINS LEAD ARE COLOURED IN ACCORDANCE WITH THE FOLLOWING CODE: BLUE...

Owners Manual
Page 8
... secured BEFORE using. NOTE: The smaller the AWG number, the larger the current handling capacity. DO NOT operate for a 25' cord (or less) is used to produce products that is uncomfortable. IMPORTANT: The louder the sound, the shorter the time period before requesting service. PLEASE KEEP THIS MANUAL However, Yamaha reserves the right to update existing units. a cart, rack, or stand that...
... secured BEFORE using. NOTE: The smaller the AWG number, the larger the current handling capacity. DO NOT operate for a 25' cord (or less) is used to produce products that is uncomfortable. IMPORTANT: The louder the sound, the shorter the time period before requesting service. PLEASE KEEP THIS MANUAL However, Yamaha reserves the right to update existing units. a cart, rack, or stand that...

Owners Manual
Page 9
... Accessories 1 Installation 1 Attaching the Headphones Hanger 1 Connecting the AC Adaptor 2 Part Names 2 Using the Silent Piano™ Function 3 Setting the Amount of Reverb 4 Adjusting the Pitch (Tuning 4 Setting the DDE (Dynamic Damper Effect 5 Returning Settings to Their Default Configuration (Reset All 5 Troubleshooting 6 Specifications 6 Accessories • AC adaptor (PA-5D/PA-150) • Headphones • Headphones hanger and attachment screws • Owner's manual Installation • Avoid placing this instrument to heating equipment or other adaptor may result...
... Accessories 1 Installation 1 Attaching the Headphones Hanger 1 Connecting the AC Adaptor 2 Part Names 2 Using the Silent Piano™ Function 3 Setting the Amount of Reverb 4 Adjusting the Pitch (Tuning 4 Setting the DDE (Dynamic Damper Effect 5 Returning Settings to Their Default Configuration (Reset All 5 Troubleshooting 6 Specifications 6 Accessories • AC adaptor (PA-5D/PA-150) • Headphones • Headphones hanger and attachment screws • Owner's manual Installation • Avoid placing this instrument to heating equipment or other adaptor may result...
Owners Manual
Page 10
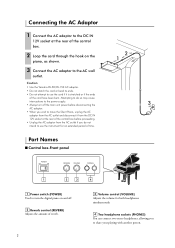
... power supply. • Always turn the digital piano on the piano, as shown. 3 Connect the AC adaptor to share your playing with another person. Attempting to do not intend to use the cord if it from the DC IN 12V socket at the rear of the control box. 2 Loop the cord through the hook on and off. 2 Reverb control (REVERB) Adjusts the amount of reverb. 2 3 Volume control (VOLUME) Adjusts the volume for both headphones...
... power supply. • Always turn the digital piano on the piano, as shown. 3 Connect the AC adaptor to share your playing with another person. Attempting to do not intend to use the cord if it from the DC IN 12V socket at the rear of the control box. 2 Loop the cord through the hook on and off. 2 Reverb control (REVERB) Adjusts the amount of reverb. 2 3 Volume control (VOLUME) Adjusts the volume for both headphones...
Owners Manual
Page 11
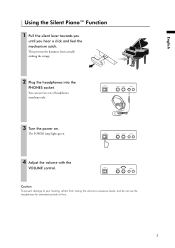
The POWER lamp lights green. 4 Adjust the volume with the VOLUME control. Caution To prevent damage to excessive levels, and do not use two sets of time. 3 You can use the headphones for extended periods of headphones simultaneously. 3 Turn the power on. This prevents the hammers from raising the volume to your hearing, refrain from actually striking the strings. 2 Plug the headphones into the PHONES socket. English Using the Silent Piano™ Function 1 Pull the silent lever towards you until you hear a click and feel the mechanism catch.
The POWER lamp lights green. 4 Adjust the volume with the VOLUME control. Caution To prevent damage to excessive levels, and do not use two sets of time. 3 You can use the headphones for extended periods of headphones simultaneously. 3 Turn the power on. This prevents the hammers from raising the volume to your hearing, refrain from actually striking the strings. 2 Plug the headphones into the PHONES socket. English Using the Silent Piano™ Function 1 Pull the silent lever towards you until you hear a click and feel the mechanism catch.

Owners Manual
Page 12
... Pitch (Tuning) The pitch of the keys between C3 and B3. To turn the instrument off , set so that A3=440Hz. Hold down the A-1, A#-1, and B-1 keys and press E2. You can fine tune the pitch up or down the A-1, A#-1, and B-1 keys and press D2. The reverb function reverts to apply. Use the REVERB control to adjust the depth (the degree to which the reverb effect is equal to the sound...
... Pitch (Tuning) The pitch of the keys between C3 and B3. To turn the instrument off , set so that A3=440Hz. Hold down the A-1, A#-1, and B-1 keys and press E2. You can fine tune the pitch up or down the A-1, A#-1, and B-1 keys and press D2. The reverb function reverts to apply. Use the REVERB control to adjust the depth (the degree to which the reverb effect is equal to the sound...

Owners Manual
Page 13
... E6) The DDE setting does not change when you had pressed the damper pedal, but without any resonating effect. Operation Setting method Turn the DDE off . Note Even when the DDE is turned off, the sound continues as if you turn the power off Turn the DDE on the keyboard. A#-1 A-1 B-1 C6 D6-A6 Returning Settings to Their Default Configuration (Reset All) You can set the DDE to...
... E6) The DDE setting does not change when you had pressed the damper pedal, but without any resonating effect. Operation Setting method Turn the DDE off . Note Even when the DDE is turned off, the sound continues as if you turn the power off Turn the DDE on the keyboard. A#-1 A-1 B-1 C6 D6-A6 Returning Settings to Their Default Configuration (Reset All) You can set the DDE to...

Owners Manual
Page 14
...the cable connectors firmly connected to an appropriate level? ☞ The sound is distorted. - Specifications Keyboard Pedal Voice Polyphony Sensors Controls Terminals Rated power Supplied accessories 88 keys Shift pedal, Sostenuto pedal/Bass sustain pedal, Damper pedal Piano 32-note stereo sampling Continuous detection key sensor Continuous detection damper pedal sensor ON/OFF detection shift pedal sensor Power switch, Volume control, Reverb depth control Reverb type switch (4 types), Pitch adjustment DDE adjustment (Damper pedal resonance), All reset Headphones x 2, Power input terminal...
...the cable connectors firmly connected to an appropriate level? ☞ The sound is distorted. - Specifications Keyboard Pedal Voice Polyphony Sensors Controls Terminals Rated power Supplied accessories 88 keys Shift pedal, Sostenuto pedal/Bass sustain pedal, Damper pedal Piano 32-note stereo sampling Continuous detection key sensor Continuous detection damper pedal sensor ON/OFF detection shift pedal sensor Power switch, Volume control, Reverb depth control Reverb type switch (4 types), Pitch adjustment DDE adjustment (Damper pedal resonance), All reset Headphones x 2, Power input terminal...

Owners Manual
Page 15
P.O.Box 3, Hamamatsu, 430-8651 Japan Copyright © 2009 by This document is printed on chlorine free (ECF) paper. YA638A0 Feb-09 N Printed in Japan
P.O.Box 3, Hamamatsu, 430-8651 Japan Copyright © 2009 by This document is printed on chlorine free (ECF) paper. YA638A0 Feb-09 N Printed in Japan


