
Owner's Manual
Page 1
E Owner's Manual Keep This Manual For Future Reference.
E Owner's Manual Keep This Manual For Future Reference.
Owner's Manual
Page 2
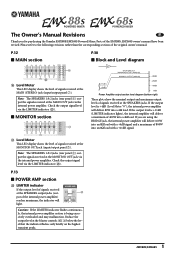
...1 & 2 jacks (rear panel 1) output the signals received at the SPEAKERS output jacks (out- If you for purchasing the Yamaha EMX88S/EMX68S Powered Mixer. The Owner's Manual Revisions E Thank you are using the BRIDGE jack, the internal power amplifier will deliver 160W into an 8Ω load ... signal level via the internal power amplifier. Please refer to the following revisions rather than the corresponding sections of the EMX88S, EMX68S owner's manual have been revised. P.13 ■ POWER AMP section M LIMITER indicator If the output level of signals received at the ...
...1 & 2 jacks (rear panel 1) output the signals received at the SPEAKERS output jacks (out- If you for purchasing the Yamaha EMX88S/EMX68S Powered Mixer. The Owner's Manual Revisions E Thank you are using the BRIDGE jack, the internal power amplifier will deliver 160W into an 8Ω load ... signal level via the internal power amplifier. Please refer to the following revisions rather than the corresponding sections of the EMX88S, EMX68S owner's manual have been revised. P.13 ■ POWER AMP section M LIMITER indicator If the output level of signals received at the ...
Owner's Manual
Page 4
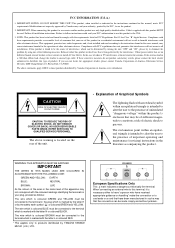
... as indicated in the instructions contained in this product in your FCC authorization to accessories and/or another product use this manual, meets FCC requirements. NO USER-SERVICEABLE PARTS INSIDE. WARNING: THIS APPARATUS MUST BE EARTHED IMPORTANT THE WIRES IN THIS MAINS... use only high quality shielded cables. IMPORTANT NOTICE: DO NOT MODIFY THIS UNIT! FCC INFORMATION (U.S.A.) 1. Modifications not expressly approved by Yamaha may not correspond with the letter L or coloured RED. * This applies only to the terminal which can be connected to products...
... as indicated in the instructions contained in this product in your FCC authorization to accessories and/or another product use this manual, meets FCC requirements. NO USER-SERVICEABLE PARTS INSIDE. WARNING: THIS APPARATUS MUST BE EARTHED IMPORTANT THE WIRES IN THIS MAINS... use only high quality shielded cables. IMPORTANT NOTICE: DO NOT MODIFY THIS UNIT! FCC INFORMATION (U.S.A.) 1. Modifications not expressly approved by Yamaha may not correspond with the letter L or coloured RED. * This applies only to the terminal which can be connected to products...
Owner's Manual
Page 5
...and electrical shock hazard. • Should this unit or allow enough free space around the unit for repair. Using the unit in this Owner's Manual or as marked on top of the power cord. Blocked ventilation holes are a fire hazard. • When rack-mounting the unit, allow...;re and electrical shock hazard. This should be10 cm at the rear to maximum. Using other types may be an electrical shock hazard. EMX88S/EMX68S-Owner's Manual 3 Precautions WARNING Installation • Connect this unit's power cord only to an AC outlet of the type stated in this instruction, fire...
...and electrical shock hazard. • Should this unit or allow enough free space around the unit for repair. Using the unit in this Owner's Manual or as marked on top of the power cord. Blocked ventilation holes are a fire hazard. • When rack-mounting the unit, allow...;re and electrical shock hazard. This should be10 cm at the rear to maximum. Using other types may be an electrical shock hazard. EMX88S/EMX68S-Owner's Manual 3 Precautions WARNING Installation • Connect this unit's power cord only to an AC outlet of the type stated in this instruction, fire...

Owner's Manual
Page 6
4 Precautions EMX88S/EMX68S-Owner's Manual
4 Precautions EMX88S/EMX68S-Owner's Manual
Owner's Manual
Page 7
... 26 Specifications 27 General specifications 27 Input specifications 28 Output specifications 28 Dimensions 29 Block and Level diagram 30 EMX88S/EMX68S-Owner's Manual 5 Introduction Thank you easily adjust the delay time. • The EMX88S/EMX68S has implemented "EEEngine", Yamaha's epochal amp drive technology to create an unrivaled high-efficiency drive. The EMX88S...
... 26 Specifications 27 General specifications 27 Input specifications 28 Output specifications 28 Dimensions 29 Block and Level diagram 30 EMX88S/EMX68S-Owner's Manual 5 Introduction Thank you easily adjust the delay time. • The EMX88S/EMX68S has implemented "EEEngine", Yamaha's epochal amp drive technology to create an unrivaled high-efficiency drive. The EMX88S...
Owner's Manual
Page 8
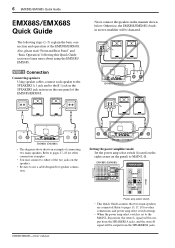
...-18 for other connection examples. • You may connect to either of the EMX88S/EMX68S. EMX88S (EMX68S) EMX88S/EMX68S-Owner's Manual Power amp select switch • This Quick Guide assumes that two main speakers are connected. 6 EMX88S/EMX68S Quick Guide EMX88S/EMX68S Quick Guide The following this Quick Guide section to learn more about using the...
...-18 for other connection examples. • You may connect to either of the EMX88S/EMX68S. EMX88S (EMX68S) EMX88S/EMX68S-Owner's Manual Power amp select switch • This Quick Guide assumes that two main speakers are connected. 6 EMX88S/EMX68S Quick Guide EMX88S/EMX68S Quick Guide The following this Quick Guide section to learn more about using the...
Owner's Manual
Page 9
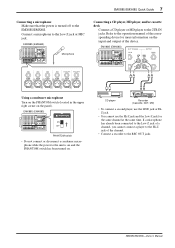
...the Hi-Z jack of the device. Connect a microphone to the 2TR IN jacks. EMX88S (EMX68S) Using a condenser microphone Turn on the PHANTOM switch (located in the upper right corner on . EMX88S/EMX68S-Owner's Manual If a microphone has already been connected to the Low-Z jack of a channel, you ...cannot connect a player to the REC OUT jacks. EMX88S/EMX68S Quick Guide 7 Connecting a microphone Make sure that the power ...
...the Hi-Z jack of the device. Connect a microphone to the 2TR IN jacks. EMX88S (EMX68S) Using a condenser microphone Turn on the PHANTOM switch (located in the upper right corner on . EMX88S/EMX68S-Owner's Manual If a microphone has already been connected to the Low-Z jack of a channel, you ...cannot connect a player to the REC OUT jacks. EMX88S/EMX68S Quick Guide 7 Connecting a microphone Make sure that the power ...
Owner's Manual
Page 10
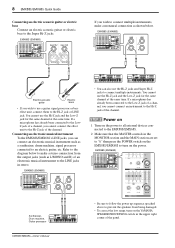
... connect multiple instruments, make a stereo connection from being damaged. • To correct the low range, turn on the YAMAHA SPEAKER PROCESSING switch in stereo. EMX88S (EMX68S) If you can also use the Hi-Z jack and the Low-Z jack for the same channel at the same time. If a ...microphone has already been connected to the Low-Z jack of the channel. EMX88S (EMX68S) Synthesizer, Drum machine, Guitar processor EMX88S/EMX68S-Owner's Manual • Be sure to follow the power up sequence specified above to the Hi-Z jack of a channel, you...
... connect multiple instruments, make a stereo connection from being damaged. • To correct the low range, turn on the YAMAHA SPEAKER PROCESSING switch in stereo. EMX88S (EMX68S) If you can also use the Hi-Z jack and the Low-Z jack for the same channel at the same time. If a ...microphone has already been connected to the Low-Z jack of the channel. EMX88S (EMX68S) Synthesizer, Drum machine, Guitar processor EMX88S/EMX68S-Owner's Manual • Be sure to follow the power up sequence specified above to the Hi-Z jack of a channel, you...
Owner's Manual
Page 11
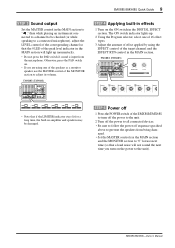
EMX88S/EMX68S-Owner's Manual EMX88S (EMX68S) STEP 4 Applying built-in effects 1 Turn on the ON switch in the MAIN section. EMX88S (EMX68S) • Note that if the LIMITER indicator stays lit...lights up momentarily. • Do not press the PAD switch if sound is input from the microphone. EMX88S/EMX68S Quick Guide 9 STEP 3 Sound output Set the MASTER control in the MAIN section to "√ ," then... on the power to adjust its volume. STEP 5 Power off 1 Press the POWER switch of the EMX88S/EMX68S to turn on . • If you turn off the power to the unit. 2 Turn off the power...
EMX88S/EMX68S-Owner's Manual EMX88S (EMX68S) STEP 4 Applying built-in effects 1 Turn on the ON switch in the MAIN section. EMX88S (EMX68S) • Note that if the LIMITER indicator stays lit...lights up momentarily. • Do not press the PAD switch if sound is input from the microphone. EMX88S/EMX68S Quick Guide 9 STEP 3 Sound output Set the MASTER control in the MAIN section to "√ ," then... on the power to adjust its volume. STEP 5 Power off 1 Press the POWER switch of the EMX88S/EMX68S to turn on . • If you turn off the power to the unit. 2 Turn off the power...

Owner's Manual
Page 12
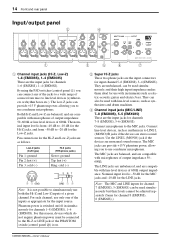
...bus. The signal of the EFFECT bus is sent to the MONITOR bus from a location after the level control (5) of each channel. EMX88S/EMX68S-Owner's Manual Note: The signal is sent to the builtin digital effect, and to the EFFECT OUT jacks (input/output panel 4). Adjust for equal volume ...on (the pressed-in the "w" position. When connecting a line level device to channels 1-6 (EMX88S), 1-4 (EMX68S), or if the mic input is sent to the EFFECT ...
...bus. The signal of the EFFECT bus is sent to the MONITOR bus from a location after the level control (5) of each channel. EMX88S/EMX68S-Owner's Manual Note: The signal is sent to the builtin digital effect, and to the EFFECT OUT jacks (input/output panel 4). Adjust for equal volume ...on (the pressed-in the "w" position. When connecting a line level device to channels 1-6 (EMX88S), 1-4 (EMX68S), or if the mic input is sent to the EFFECT ...
Owner's Manual
Page 13
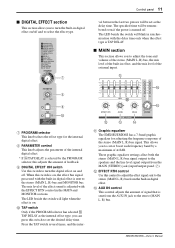
... built-in effect, and the mix level of feedback. 9 DIGITAL EFFECT ON switch Use this adjusts the amount of the external input. EMX88S/EMX68S-Owner's Manual E B C D A Graphic equalizer The EMX88S/EMX68S has a 7-band graphic equalizer for the internal digital effect. 8 PARAMETER control This knob adjusts the parameter of the internal digital effect. * If...
... built-in effect, and the mix level of feedback. 9 DIGITAL EFFECT ON switch Use this adjusts the amount of the external input. EMX88S/EMX68S-Owner's Manual E B C D A Graphic equalizer The EMX88S/EMX68S has a 7-band graphic equalizer for the internal digital effect. 8 PARAMETER control This knob adjusts the parameter of the internal digital effect. * If...
Owner's Manual
Page 14
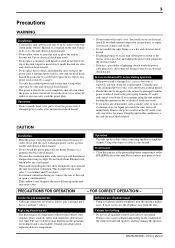
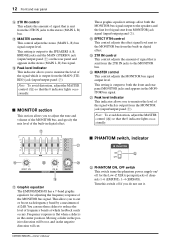
... effect. Frequency response is flat which feedback easily occurs. I G Graphic equalizer The EMX88S/EMX68S has a 7-band graphic equalizer for the Low-Z XLR type input jacks of channels 1-6 (EMX88S), 1-4 (EMX68S). K Peak level indicator This indicator allows you to cut . Turn this switch off for adjusting ...boost each frequency band by a maximum of ±12dB. This allows you do not use these sliders to the MONITOR bus. EMX88S/EMX68S-Owner's Manual 12 Front and rear panel D 2TR IN control This adjusts the amount of signal that the 0 indicator lights occasionally. Note: To ...
... effect. Frequency response is flat which feedback easily occurs. I G Graphic equalizer The EMX88S/EMX68S has a 7-band graphic equalizer for the Low-Z XLR type input jacks of channels 1-6 (EMX88S), 1-4 (EMX68S). K Peak level indicator This indicator allows you to cut . Turn this switch off for adjusting ...boost each frequency band by a maximum of ±12dB. This allows you do not use these sliders to the MONITOR bus. EMX88S/EMX68S-Owner's Manual 12 Front and rear panel D 2TR IN control This adjusts the amount of signal that the 0 indicator lights occasionally. Note: To ...
Owner's Manual
Page 15
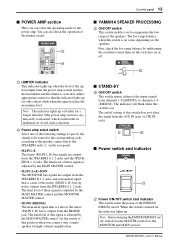
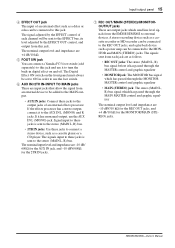
...: The indicator lights up . Control panel 13 s POWER AMP section Here you can also check the operation of the limiter circuit. M N s YAMAHA SPEAKER PROCESSING O ON/OFF switch This switch enables you to the speaker connection at the SPEAKERS jacks 1 on , the indicator lights up or flashes for...a mix of the stereo (MAIN L, R) bus is activated. Adjust appropriate control so that is a mix of the speakers. EMX88S/EMX68S-Owner's Manual N Power amp select switch Select one of the following settings to specify the signals to be routed to the corresponding jacks according to ...
...: The indicator lights up . Control panel 13 s POWER AMP section Here you can also check the operation of the limiter circuit. M N s YAMAHA SPEAKER PROCESSING O ON/OFF switch This switch enables you to the speaker connection at the SPEAKERS jacks 1 on , the indicator lights up or flashes for...a mix of the stereo (MAIN L, R) bus is activated. Adjust appropriate control so that is a mix of the speakers. EMX88S/EMX68S-Owner's Manual N Power amp select switch Select one of the following settings to specify the signals to be routed to the corresponding jacks according to ...
Owner's Manual
Page 16
... V phantom power, allowing you to the Hi-Z or LINE jacks if the PHANTOM switch (control panel L) is on /off in simultaneously for channel 8 (EMX88S), 6 (EMX68S).) EMX88S/EMX68S-Owner's Manual For this reason, devices which do not require phantom power must be used simultaneously, and their high input impedance makes them ideal for the...
... V phantom power, allowing you to the Hi-Z or LINE jacks if the PHANTOM switch (control panel L) is on /off in simultaneously for channel 8 (EMX88S), 6 (EMX68S).) EMX88S/EMX68S-Owner's Manual For this reason, devices which do not require phantom power must be used simultaneously, and their high input impedance makes them ideal for the...
Owner's Manual
Page 17
... L, R) bus. • 2TR IN jacks: Use these jacks is sent to the stereo (MAIN L, R) bus. The signals sent from this jack. EMX88S/EMX68S-Owner's Manual If the effects processor has a stereo output, connect it to this jack and use the AUX IN L (MONO) jack. If it has monaural output, use...jacks These are as a cassette recorder or MD recorder can be connected to the REC OUT jacks, and a playback device such a power amp can connect a Yamaha FC5 foot switch (sold separately) to this jack. A stereo recording device such as follows. • REC OUT jacks: The stereo (MAIN L, R) bus signal...
... L, R) bus. • 2TR IN jacks: Use these jacks is sent to the stereo (MAIN L, R) bus. The signals sent from this jack. EMX88S/EMX68S-Owner's Manual If the effects processor has a stereo output, connect it to this jack and use the AUX IN L (MONO) jack. If it has monaural output, use...jacks These are as a cassette recorder or MD recorder can be connected to the REC OUT jacks, and a playback device such a power amp can connect a Yamaha FC5 foot switch (sold separately) to this jack. A stereo recording device such as follows. • REC OUT jacks: The stereo (MAIN L, R) bus signal...
Owner's Manual
Page 18
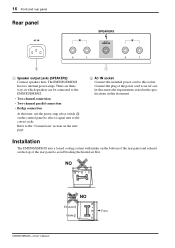
...power cord to an AC outlet that meets the requirements stated in the specifications in which speakers can be connected to the EMX88S/EMX68S. • Two-channel connection • Two-channel parallel connection • Bridge connection At this socket. Connect the plug of the rear...to the correct jacks. NO Front NO 15cm or less Exhaust Intake Front EMX88S/EMX68S-Owner's Manual 16 Front and rear panel Rear panel 2 1 Speaker output jacks (SPEAKERS) Connect speakers here. Installation The EMX88S/EMX68S uses a forced cooling system with intake on the bottom of the rear panel and...
...power cord to an AC outlet that meets the requirements stated in the specifications in which speakers can be connected to the EMX88S/EMX68S. • Two-channel connection • Two-channel parallel connection • Bridge connection At this socket. Connect the plug of the rear...to the correct jacks. NO Front NO 15cm or less Exhaust Intake Front EMX88S/EMX68S-Owner's Manual 16 Front and rear panel Rear panel 2 1 Speaker output jacks (SPEAKERS) Connect speakers here. Installation The EMX88S/EMX68S uses a forced cooling system with intake on the bottom of the rear panel and...
Owner's Manual
Page 19
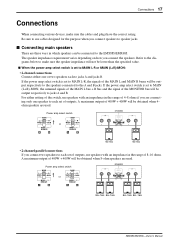
...cables designed for the purpose when you are used 8Ω-16Ω 8Ω-16Ω 8Ω-16Ω 8Ω-16Ω EMX88S/EMX68S-Owner's Manual Power amp select switch or Not used . Connections 17 Connections When connecting various devices, make sure the speaker impedance will be lower than the ...each to make sure the cables and plugs have the correct rating. Power amp select switch or Not used . Be sure to the EMX88S/EMX68S. s Connecting main speakers There are three ways in which speakers can be connected to use speakers with an impedance in the range of ...
...cables designed for the purpose when you are used 8Ω-16Ω 8Ω-16Ω 8Ω-16Ω 8Ω-16Ω EMX88S/EMX68S-Owner's Manual Power amp select switch or Not used . Connections 17 Connections When connecting various devices, make sure the speaker impedance will be lower than the ...each to make sure the cables and plugs have the correct rating. Power amp select switch or Not used . Be sure to the EMX88S/EMX68S. s Connecting main speakers There are three ways in which speakers can be connected to use speakers with an impedance in the range of ...
Owner's Manual
Page 20
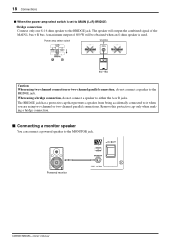
... an 8-ohm speaker is set to MAIN (L+R) BRIDGE: • Bridge connection Connect only one 8-16 ohm speaker to the MONITOR jack. VOL Powered monitor EMX88S/EMX68S-Owner's Manual 18 Connections s When the power amp select switch is used 8Ω-16Ω Caution: When using two-channel or two-channel parallel connections.
... an 8-ohm speaker is set to MAIN (L+R) BRIDGE: • Bridge connection Connect only one 8-16 ohm speaker to the MONITOR jack. VOL Powered monitor EMX88S/EMX68S-Owner's Manual 18 Connections s When the power amp select switch is used 8Ω-16Ω Caution: When using two-channel or two-channel parallel connections.
Owner's Manual
Page 21
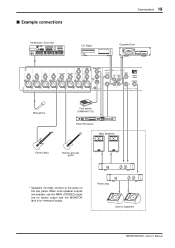
When more speaker outputs are needed, use the MAIN (STEREO) jacks are for stereo output and the MONITOR jack is for monaural output. Power amp Monitor Speakers EMX88S/EMX68S-Owner's Manual s Example connections Synthesizer, Drum Box CD Player Connections 19 Cassette Deck Microphone Foot switch (YAMAHA FC5) 88 Effect Processor Main Speakers Electric bass Electric-acoustic guitar * Speakers normally connect to the jacks on the rear panel.
When more speaker outputs are needed, use the MAIN (STEREO) jacks are for stereo output and the MONITOR jack is for monaural output. Power amp Monitor Speakers EMX88S/EMX68S-Owner's Manual s Example connections Synthesizer, Drum Box CD Player Connections 19 Cassette Deck Microphone Foot switch (YAMAHA FC5) 88 Effect Processor Main Speakers Electric bass Electric-acoustic guitar * Speakers normally connect to the jacks on the rear panel.

