

Owner's Manual
Page 1
E Owner's Manual MIC LINE INSERT I O 1 MIC LINE INSERT I O 2 MIC LINE INSERT I O 3 INPUT MIC MIC MIC LINE INSERT I O 4 LINE LINE 0dB INSERT I O 5 OUT IN 6 MIC LINE 7 MIC 9 L B LINE ... 30 30 30 30 30 40 40 40 40 40 50 50 50 50 50 1 2 3 4 5 6 7 8 9 10 11 12 MONI 1 MONI 2 EFFECT ST 1 MONO Keep This Manual For Future Reference.
E Owner's Manual MIC LINE INSERT I O 1 MIC LINE INSERT I O 2 MIC LINE INSERT I O 3 INPUT MIC MIC MIC LINE INSERT I O 4 LINE LINE 0dB INSERT I O 5 OUT IN 6 MIC LINE 7 MIC 9 L B LINE ... 30 30 30 30 30 40 40 40 40 40 50 50 50 50 50 1 2 3 4 5 6 7 8 9 10 11 12 MONI 1 MONI 2 EFFECT ST 1 MONO Keep This Manual For Future Reference.
Owner's Manual
Page 3
...Owner's Manual or as marked on a power cord covered by a carpet. • If you continue using the unit without heeding this instruction, fire or electrical shock may be careful not to oil splashes or steam, such as when going on the power to this unit for purchasing the Yamaha EMX3000... place for a replacement. Using the unit with liquid or small metal objects on top of the phone plug before turning on vacation, EMX3000-Owner's Manual Locations subject to excessive humidity or dust accumulation. • This unit has ventilation holes at the rear, and the right to the ...
...Owner's Manual or as marked on a power cord covered by a carpet. • If you continue using the unit without heeding this instruction, fire or electrical shock may be careful not to oil splashes or steam, such as when going on the power to this unit for purchasing the Yamaha EMX3000... place for a replacement. Using the unit with liquid or small metal objects on top of the phone plug before turning on vacation, EMX3000-Owner's Manual Locations subject to excessive humidity or dust accumulation. • This unit has ventilation holes at the rear, and the right to the ...
Owner's Manual
Page 4
... to create an unrivaled high-efficiency drive. The signals output to speakers can connect only one speaker for a EMX3000-Owner's Manual much louder sound. ✦In addition to the speaker output jacks, two stereo output channels for a wide range of the...output from the AC outlet. You can be applied to add reverberation or ambience to vocals or instrumental sounds. ✦The EMX3000 has implemented "EEEngine", Yamaha's epochal amp drive technology to maximum. Consult your dealer about replacing defective components. iv Introduction remove the power plug from BRIDGE ...
... to create an unrivaled high-efficiency drive. The signals output to speakers can connect only one speaker for a EMX3000-Owner's Manual much louder sound. ✦In addition to the speaker output jacks, two stereo output channels for a wide range of the...output from the AC outlet. You can be applied to add reverberation or ambience to vocals or instrumental sounds. ✦The EMX3000 has implemented "EEEngine", Yamaha's epochal amp drive technology to maximum. Consult your dealer about replacing defective components. iv Introduction remove the power plug from BRIDGE ...
Owner's Manual
Page 5
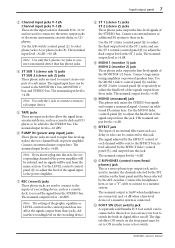
... from jacks A (phone jacks on the input/ output panel 3). 3 PEAK indicator The indicator will be input from jacks B (phono jacks on the input/output panel 3). EMX3000-Owner's Manual When the switch is pressed in the "w" position. The base frequency (or center frequency), range of boost or cut it will not be affected by...
... from jacks A (phone jacks on the input/ output panel 3). 3 PEAK indicator The indicator will be input from jacks B (phono jacks on the input/output panel 3). EMX3000-Owner's Manual When the switch is pressed in the "w" position. The base frequency (or center frequency), range of boost or cut it will not be affected by...
Owner's Manual
Page 6
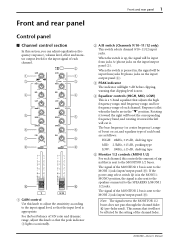
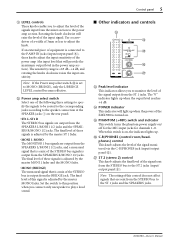
... ST 0 10 PFL ST SUB 2 A B C D A B C D A MONI 1 (monitor 1) control The MONI 1 knob adjusts the amount of the signal that is turned on the input/output panel. EMX3000-Owner's Manual Note: You can adjust the input level of the EFFECT bus is sent to the C-R/PHONES jack (input/output panel B). s Stereo sub input section In...
... ST 0 10 PFL ST SUB 2 A B C D A B C D A MONI 1 (monitor 1) control The MONI 1 knob adjusts the amount of the signal that is turned on the input/output panel. EMX3000-Owner's Manual Note: You can adjust the input level of the EFFECT bus is sent to the C-R/PHONES jack (input/output panel B). s Stereo sub input section In...
Owner's Manual
Page 7
... adjusts the level of the signal sent to the built-in section In this section, you can adjust the final level of the outputs. EMX3000-Owner's Manual
... adjusts the level of the signal sent to the built-in section In this section, you can adjust the final level of the outputs. EMX3000-Owner's Manual
Owner's Manual
Page 8
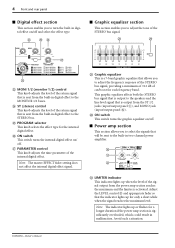
... U and appropriate fader so that the indicator lights up or flashes for each frequency band. Note: The indicator lights up for the internal digital effect. EMX3000-Owner's Manual M PN MONI 1 MONI 2 ST 0 10 0 10 0 10 789 6 10 5 11 4 12 3 13 2 14 1 16 15 ON Q PROGRAM MIN MAX PARAMETER 1 VOCAL ECHO 1 5 VOCAL REVERB 1 2 VOCAL...
... U and appropriate fader so that the indicator lights up or flashes for each frequency band. Note: The indicator lights up for the internal digital effect. EMX3000-Owner's Manual M PN MONI 1 MONI 2 ST 0 10 0 10 0 10 789 6 10 5 11 4 12 3 13 2 14 1 16 15 ON Q PROGRAM MIN MAX PARAMETER 1 VOCAL ECHO 1 5 VOCAL REVERB 1 2 VOCAL...
Owner's Manual
Page 9
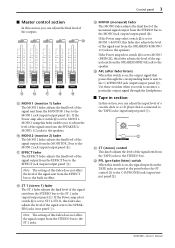
...ST 2 (stereo 2) control This knob adjusts the final level of the signal sent from the mixer section to the power amp section. EMX3000-Owner's Manual Control panel 5 U LEVEL controls These knobs enable you to adjust the level of the signals input from the STEREO bus to the ST 2 ... STEREO bus to monitor the level of these knobs adjust the input sensitivity of the power amp (the input level that is a mix of the EMX3000 is output from the BRIDGE jack. s Other indicators and controls W PEAK +8 +5 +3 +1 0 -1 -3 -5 -7 -10 -15 -20 L R ST 1 POWER PHANTOM +48V (1-8ch) ON OFF C-R/...
...ST 2 (stereo 2) control This knob adjusts the final level of the signal sent from the mixer section to the power amp section. EMX3000-Owner's Manual Control panel 5 U LEVEL controls These knobs enable you to adjust the level of the signals input from the STEREO bus to the ST 2 ... STEREO bus to monitor the level of these knobs adjust the input sensitivity of the power amp (the input level that is a mix of the EMX3000 is output from the BRIDGE jack. s Other indicators and controls W PEAK +8 +5 +3 +1 0 -1 -3 -5 -7 -10 -15 -20 L R ST 1 POWER PHANTOM +48V (1-8ch) ON OFF C-R/...

Owner's Manual
Page 10
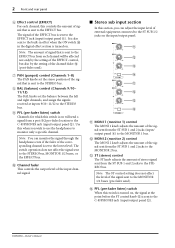
... 0 EFFECT +4dB A C-R PHONES 2 3 4 6 9B 1 Channel input jacks (MIC, LINE) 1~8 These are TRS phone jacks that enable you to the output jack of the external processor EMX3000-Owner's Manual The MIC jacks can connect any of the jacks to a wide range of sources, from mics to simultaneously use condenser microphones. These connections require a special...
... 0 EFFECT +4dB A C-R PHONES 2 3 4 6 9B 1 Channel input jacks (MIC, LINE) 1~8 These are TRS phone jacks that enable you to the output jack of the external processor EMX3000-Owner's Manual The MIC jacks can connect any of the jacks to a wide range of sources, from mics to simultaneously use condenser microphones. These connections require a special...
Owner's Manual
Page 11
... dB. Connect an additional PA system here. B C-R/PHONES (control room/headphones) jack This is a stereo phone type output jack, and is connected. EMX3000-Owner's Manual Input/output panel 7 3 Channel input jacks 9~12A Channel input jacks 9~12B These are the input jacks for channels 9/10~11/12 and are used to... A/B switch (control panel 2) to adjust the final output level at the ST 2 jacks. C FOOT SW (foot switch) jack A separately sold Yamaha FC5 foot switch can use the ST 2 control (control panel [) to adjust the final output level at the ST 1 jacks, and use your foot...
... dB. Connect an additional PA system here. B C-R/PHONES (control room/headphones) jack This is a stereo phone type output jack, and is connected. EMX3000-Owner's Manual Input/output panel 7 3 Channel input jacks 9~12A Channel input jacks 9~12B These are the input jacks for channels 9/10~11/12 and are used to... A/B switch (control panel 2) to adjust the final output level at the ST 2 jacks. C FOOT SW (foot switch) jack A separately sold Yamaha FC5 foot switch can use the ST 2 control (control panel [) to adjust the final output level at the ST 1 jacks, and use your foot...

Owner's Manual
Page 12
...The maximum output is 300W+300W with two 4Ω speakers. • Two-channel parallel connection If you use one or two speakers to the EMX3000. The speaker outputs the MONO bus signal, and the maximum output is set to ST1 L-ST1 R, the speakers connected to use two speakers per... parallel connection. If you are using a bridge connection, do not connect a speaker to an AC outlet of the voltage printed below the inlet. EMX3000-Owner's Manual The maximum output is set to, connect 4~8Ω speakers if you wish to the L/MONI1 and R/MONO jacks will output the MONITOR 1 signal ...
...The maximum output is 300W+300W with two 4Ω speakers. • Two-channel parallel connection If you use one or two speakers to the EMX3000. The speaker outputs the MONO bus signal, and the maximum output is set to ST1 L-ST1 R, the speakers connected to use two speakers per... parallel connection. If you are using a bridge connection, do not connect a speaker to an AC outlet of the voltage printed below the inlet. EMX3000-Owner's Manual The maximum output is set to, connect 4~8Ω speakers if you wish to the L/MONI1 and R/MONO jacks will output the MONITOR 1 signal ...

Owner's Manual
Page 13
...Two speakers can be connected to both jack 1 and jack 2 of the appropriate standard. Installation/Connections 9 Installation/Connections Installation The EMX3000 uses a forced cooling system with air intake on the right side and exhaust on the rear. For each can be connected to ...BRIDGE L/MONI 1 2 1 8Ω~16Ω 8Ω~16Ω Main Speaker 8Ω~16Ω 8Ω~16Ω Main/Monitor Speaker EMX3000-Owner's Manual Front Exhaust NO 30cm or less NO 30cm Intake or less Connection When connecting various devices, you must use only cables that the cooling ports...
...Two speakers can be connected to both jack 1 and jack 2 of the appropriate standard. Installation/Connections 9 Installation/Connections Installation The EMX3000 uses a forced cooling system with air intake on the right side and exhaust on the rear. For each can be connected to ...BRIDGE L/MONI 1 2 1 8Ω~16Ω 8Ω~16Ω Main Speaker 8Ω~16Ω 8Ω~16Ω Main/Monitor Speaker EMX3000-Owner's Manual Front Exhaust NO 30cm or less NO 30cm Intake or less Connection When connecting various devices, you must use only cables that the cooling ports...

Owner's Manual
Page 14
EMX3000-Owner's Manual 10 Installation/Connections • Bridge connection ST1 L MONI 1 MONO (BRIDGE) ST1 R MONO R/MONO No 2 1 connection SPEAKERS BRIDGE L/MONI 1 No 2 1 connection 8Ω~16Ω Main Speaker ...
EMX3000-Owner's Manual 10 Installation/Connections • Bridge connection ST1 L MONI 1 MONO (BRIDGE) ST1 R MONO R/MONO No 2 1 connection SPEAKERS BRIDGE L/MONI 1 No 2 1 connection 8Ω~16Ω Main Speaker ...

Owner's Manual
Page 15
... of the digital effect section. 6 Adjust the PARAMETER control of the channel equalizers and the graphic equalizer. Using the digital effect The EMX3000 has a built-in digital effect, allowing reverberation or ambiance to be added to vocals or instrumental sounds. 1 Connect a mic or...you set to ST1 L-ST1 R. 2 Connect cables to your mics and instrument, and insert the other end of a small room. EMX3000-Owner's Manual Basic operation 11 Basic operation Connecting microphones and instruments 1 Before connecting mics or instruments, make sure that each channel, rotate the equalizer ...
... of the digital effect section. 6 Adjust the PARAMETER control of the channel equalizers and the graphic equalizer. Using the digital effect The EMX3000 has a built-in digital effect, allowing reverberation or ambiance to be added to vocals or instrumental sounds. 1 Connect a mic or...you set to ST1 L-ST1 R. 2 Connect cables to your mics and instrument, and insert the other end of a small room. EMX3000-Owner's Manual Basic operation 11 Basic operation Connecting microphones and instruments 1 Before connecting mics or instruments, make sure that each channel, rotate the equalizer ...
Owner's Manual
Page 16
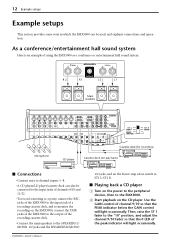
...• To record a meeting or a party, connect the REC jacks of the EMX3000 to the input jack of a recording cassette deck, and to monitor the recording on the EMX3000, connect the TAPE jacks of the EMX3000 to the output of the recording cassette deck. • Connect the main speakers to... ST1 L-ST1 R. Use the GAIN control of channel 9/10 so that the 0 LED of using the EMX3000 as a conference or entertainment hall sound system. EMX3000-Owner's Manual Then, raise the ST 1 fader to the EMX3000. 2 Start playback on the power to the peripheral devices, then to the "10" position, and adjust...
...• To record a meeting or a party, connect the REC jacks of the EMX3000 to the input jack of a recording cassette deck, and to monitor the recording on the EMX3000, connect the TAPE jacks of the EMX3000 to the output of the recording cassette deck. • Connect the main speakers to... ST1 L-ST1 R. Use the GAIN control of channel 9/10 so that the 0 LED of using the EMX3000 as a conference or entertainment hall sound system. EMX3000-Owner's Manual Then, raise the ST 1 fader to the EMX3000. 2 Start playback on the power to the peripheral devices, then to the "10" position, and adjust...
Owner's Manual
Page 17
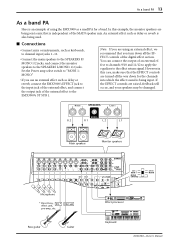
... controls of the digital effect section. Set the Power amp select switch to the EMX3000's ST SUB 1. However in this example, the monitor speakers are using the EMX3000 as a small PA for the channels into which the effect sound is being used... Note: If you are being sent a mix that you use an external effect such as delay or reverb, connect the EMX3000's EFFECT jack to the input jack of the external effect, and connect the output jack of the external effect to "MONI...50 50 50 50 MONI 1 MONI 2 EFFECT ST 1 MONO ST1 L MONI 1 MONO (BRIDGE) ST1 R MONO EMX3000-Owner's Manual
... controls of the digital effect section. Set the Power amp select switch to the EMX3000's ST SUB 1. However in this example, the monitor speakers are using the EMX3000 as a small PA for the channels into which the effect sound is being used... Note: If you are being sent a mix that you use an external effect such as delay or reverb, connect the EMX3000's EFFECT jack to the input jack of the external effect, and connect the output jack of the external effect to "MONI...50 50 50 50 MONI 1 MONI 2 EFFECT ST 1 MONO ST1 L MONI 1 MONO (BRIDGE) ST1 R MONO EMX3000-Owner's Manual

Owner's Manual
Page 18
This allows you to create a mix that is input from the monitor speakers. EMX3000-Owner's Manual Note: The MONI controls are not affected by the level settings of each channel. Follow the steps below. 1 Set the EFFECT fader of the master ...
This allows you to create a mix that is input from the monitor speakers. EMX3000-Owner's Manual Note: The MONI controls are not affected by the level settings of each channel. Follow the steps below. 1 Set the EFFECT fader of the master ...

Owner's Manual
Page 19
... 25 25 30 30 30 30 30 40 40 40 40 40 50 50 50 50 50 1 2 3 4 5 6 7 8 9 10 11 12 MONI 1 MONI 2 EFFECT ST 1 MONO Yamaha Crossover network PN90 LEFT TO POWER INPUTS AMP INPUTS RIGHT HIGH LEFT RIGHT LOW LEFT RIGHT ST1 L MONI 1 MONO (BRIDGE) ST1 R MONO Power AMP Subwoofer EMX3000-Owner's Manual
... 25 25 30 30 30 30 30 40 40 40 40 40 50 50 50 50 50 1 2 3 4 5 6 7 8 9 10 11 12 MONI 1 MONI 2 EFFECT ST 1 MONO Yamaha Crossover network PN90 LEFT TO POWER INPUTS AMP INPUTS RIGHT HIGH LEFT RIGHT LOW LEFT RIGHT ST1 L MONI 1 MONO (BRIDGE) ST1 R MONO Power AMP Subwoofer EMX3000-Owner's Manual

Owner's Manual
Page 20
... 60 Hz, 250 W Europe: 230 V AC 50 Hz, 300 W Other: 240 V AC 50 Hz, 300 W 480×125×454 mm 16 kg Power cord, Owner's Manual EMX3000-Owner's Manual Less than 0.5% @20 Hz~20 kHz, 150 W output into 4Ω (SPEAKER OUT) Less than 0.3% @20 Hz~20 kHz, +14 dB output into 600Ω (ST...
... 60 Hz, 250 W Europe: 230 V AC 50 Hz, 300 W Other: 240 V AC 50 Hz, 300 W 480×125×454 mm 16 kg Power cord, Owner's Manual EMX3000-Owner's Manual Less than 0.5% @20 Hz~20 kHz, 150 W output into 4Ω (SPEAKER OUT) Less than 0.3% @20 Hz~20 kHz, +14 dB output into 600Ω (ST...
Owner's Manual
Page 21
... Max. Sensitivity is the lowest level that can produce an output of +4 dB (1.23 V) or the nominal output level when the unit is referenced 1 Vrms. EMX3000-Owner's Manual Unbalanced. 4. Impedance balaned. (T=HOT, R=COLD, S=GND) 2. Balanced. (T=HOT, R=COLD, S=GND) 3. before cliping Connectors on mixer MIC INPUT (1-8) LINE INPUT (1-8) ST INPUT (9-12) ST SUB IN...
... Max. Sensitivity is the lowest level that can produce an output of +4 dB (1.23 V) or the nominal output level when the unit is referenced 1 Vrms. EMX3000-Owner's Manual Unbalanced. 4. Impedance balaned. (T=HOT, R=COLD, S=GND) 2. Balanced. (T=HOT, R=COLD, S=GND) 3. before cliping Connectors on mixer MIC INPUT (1-8) LINE INPUT (1-8) ST INPUT (9-12) ST SUB IN...


