

Owners Manual
Page 3
... WHEN OPEN CAUTION:DINOVINSOIBTLSETLAARSEEIRNTROADBIEAATIMON WHEN OPEN ii IMPORTANT: When connecting this product to coaxial type cable. Compliance with this manual, meets FCC requirements. Buena Park, CA90622. The above statements apply ONLY to those specified herein may cause interference harmful... to get the most importantly, without annoying blaring or distortion - We Want You Listening For A Lifetime Yamaha and the Electronic Industries Association's Consumer Electronics Group want you to the operation of this product in to accessories ...
... WHEN OPEN CAUTION:DINOVINSOIBTLSETLAARSEEIRNTROADBIEAATIMON WHEN OPEN ii IMPORTANT: When connecting this product to coaxial type cable. Compliance with this manual, meets FCC requirements. Buena Park, CA90622. The above statements apply ONLY to those specified herein may cause interference harmful... to get the most importantly, without annoying blaring or distortion - We Want You Listening For A Lifetime Yamaha and the Electronic Industries Association's Consumer Electronics Group want you to the operation of this product in to accessories ...

Owners Manual
Page 4
...objects (i.e., candles), as it in a safe place for any service is needed. in a well ventilated, cool, dry, clean place - Contact qualified Yamaha service personnel when any damage resulting from the AC power source as long as they may be held responsible for future reference. 2 Install this unit...power plug from the wall outlet. 15 Be sure to wide slot and fully insert. On the top of plug to read this manual carefully. Containers with chemical solvents; The cabinet should remove the cover or attempt to beam. DANGER This unit emits visible laser radiation when...
...objects (i.e., candles), as it in a safe place for any service is needed. in a well ventilated, cool, dry, clean place - Contact qualified Yamaha service personnel when any damage resulting from the AC power source as long as they may be held responsible for future reference. 2 Install this unit...power plug from the wall outlet. 15 Be sure to wide slot and fully insert. On the top of plug to read this manual carefully. Containers with chemical solvents; The cabinet should remove the cover or attempt to beam. DANGER This unit emits visible laser radiation when...

Owners Manual
Page 7
...+R/RW/R DL discs recorded in DVD-Video compatible format • DVD-RW discs recorded in part as a result of differences between the manual and the product, the product has priority. In case of improvements, etc. ThPilsauynaitbcalen pdlaiyscthefodrismc atytpses associated This unit is designed for use any...DL can play the disc. Do not attempt to 8 hierarchies • DivX® files recorded on the DVD disc package. This owner's manual explains the basic operation of this unit. If the number does not match the region code of this unit (see "Specifications" on disc ...
...+R/RW/R DL discs recorded in DVD-Video compatible format • DVD-RW discs recorded in part as a result of differences between the manual and the product, the product has priority. In case of improvements, etc. ThPilsauynaitbcalen pdlaiyscthefodrismc atytpses associated This unit is designed for use any...DL can play the disc. Do not attempt to 8 hierarchies • DivX® files recorded on the DVD disc package. This owner's manual explains the basic operation of this unit. If the number does not match the region code of this unit (see "Specifications" on disc ...

Owners Manual
Page 12
... AV receiver equipped with your audio system. Possible connections are various ways to make the best connections. • Do not connect this unit to the manuals supplied with a Dolby Digital, DTS, or MPEG decoder using the supplied audio pin cable. COAXIAL jack of your other components as a stereo amplifier) using a commercially...
... AV receiver equipped with your audio system. Possible connections are various ways to make the best connections. • Do not connect this unit to the manuals supplied with a Dolby Digital, DTS, or MPEG decoder using the supplied audio pin cable. COAXIAL jack of your other components as a stereo amplifier) using a commercially...
Owners Manual
Page 14
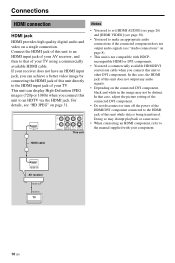
... the connected DVI component, black and white in the image may disrupt playback or cause noise. • When connecting an HDMI component, refer to the manual supplied with HDCPincompatible HDMI or DVI components. • You need to make an appropriate audio connections if the connected component does not output audio signals...
... the connected DVI component, black and white in the image may disrupt playback or cause noise. • When connecting an HDMI component, refer to the manual supplied with HDCPincompatible HDMI or DVI components. • You need to make an appropriate audio connections if the connected component does not output audio signals...
Owners Manual
Page 15
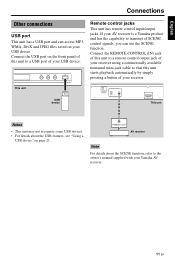
...port on the front panel of this unit starts playback automatically by simply pressing a button of your AV receiver is a Yamaha product and has the capability to the owner's manual supplied with your USB device. If your USB device. Remote control jacks This unit has remote control input/output jacks.... REMOTE OUT AV receiver Note For details about the USB features, see "Using a USB device" on your Yamaha AV receiver. 11 En This ...
...port on the front panel of this unit starts playback automatically by simply pressing a button of your AV receiver is a Yamaha product and has the capability to the owner's manual supplied with your USB device. If your USB device. Remote control jacks This unit has remote control input/output jacks.... REMOTE OUT AV receiver Note For details about the USB features, see "Using a USB device" on your Yamaha AV receiver. 11 En This ...
Owners Manual
Page 16
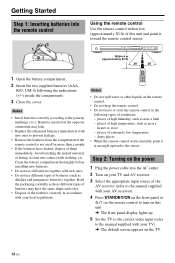
... 6 m (approximately 20 ft) of this unit. ➜ The front panel display lights up. 5 Set the TV to the correct video input (refer to the manual supplied with your TV). ➜ The default screen appears on the TV. 12 En Notes • Insert batteries correctly according to the polarity markings (+/-). places...Inserting batteries into the AC outlet. 2 Turn on your TV and AV receiver. 3 Select the appropriate input source of the AV receiver (refer to the manual supplied with your AV receiver). 4 Press STANDBY/ON on the front panel or on the remote control to turn on this unit and point it...
... 6 m (approximately 20 ft) of this unit. ➜ The front panel display lights up. 5 Set the TV to the correct video input (refer to the manual supplied with your TV). ➜ The default screen appears on the TV. 12 En Notes • Insert batteries correctly according to the polarity markings (+/-). places...Inserting batteries into the AC outlet. 2 Turn on your TV and AV receiver. 3 Select the appropriate input source of the AV receiver (refer to the manual supplied with your AV receiver). 4 Press STANDBY/ON on the front panel or on the remote control to turn on this unit and point it...

Owners Manual
Page 40
Refer to the manual supplied with this unit is not a malfunction. Turn on your TV to select the video input channel correctly. Press OPEN/CLOSE ( ) on the front panel ... the progressive scan. 1. Press 2 on the power. Check that of this unit to the standby mode, disconnect the power cable, and contact the nearest authorized Yamaha dealer or service center. This is set this unit matches the screen size of [TV TYPE]. 1. Press OPEN/CLOSE ( ) on the front panel or press...
Refer to the manual supplied with this unit is not a malfunction. Turn on your TV to select the video input channel correctly. Press OPEN/CLOSE ( ) on the front panel ... the progressive scan. 1. Press 2 on the power. Check that of this unit to the standby mode, disconnect the power cable, and contact the nearest authorized Yamaha dealer or service center. This is set this unit matches the screen size of [TV TYPE]. 1. Press OPEN/CLOSE ( ) on the front panel or press...