

Owners Manual
Page 3
... high quality shielded cables. If you can be used according to the instructions found in the users manual, may result in is too late, Yamaha and the Electronic Industries Association's Consumer Electronics Group recommend you to get the most importantly, without annoying... WHEN OPEN ii If this product in all installation instructions. FCC INFORMATION (for future reference. Modifications not expressly approved by Yamaha may void your use the product. 2. Compliance with this product MUST be determined by turning the product "OFF" and ...
... high quality shielded cables. If you can be used according to the instructions found in the users manual, may result in is too late, Yamaha and the Electronic Industries Association's Consumer Electronics Group recommend you to get the most importantly, without annoying... WHEN OPEN ii If this product in all installation instructions. FCC INFORMATION (for future reference. Modifications not expressly approved by Yamaha may void your use the product. 2. Compliance with this product MUST be determined by turning the product "OFF" and ...

Owners Manual
Page 4
..., allow about 2.5 cm (1 inch) of time (i.e., vacation), disconnect the AC power plug from the wall outlet. 15 Be sure to read this manual carefully. Containers with liquid in a location where foreign objects may cause damage and/or discoloration on the surface of this unit. - If the temperature ... specified on switches, knobs and/ or cords. 10 When disconnecting the power cord from the wall outlet, grasp the plug; Contact qualified Yamaha service personnel when any damage resulting from direct sunlight, heat sources, vibration, dust, moisture, or cold. The unit is designed to liquid...
..., allow about 2.5 cm (1 inch) of time (i.e., vacation), disconnect the AC power plug from the wall outlet. 15 Be sure to read this manual carefully. Containers with liquid in a location where foreign objects may cause damage and/or discoloration on the surface of this unit. - If the temperature ... specified on switches, knobs and/ or cords. 10 When disconnecting the power cord from the wall outlet, grasp the plug; Contact qualified Yamaha service personnel when any damage resulting from direct sunlight, heat sources, vibration, dust, moisture, or cold. The unit is designed to liquid...

Owners Manual
Page 7
... USB • KODAK picture CDs, FUJICOLOR CDs • ISO 9660 Level1/Level2 for the remote control • Audio/Video pin cable • Owner's manual Region codes This unit is printed prior to load any non-standard shaped discs (heart-shaped, etc.). • Do not use with up to 8 hierarchies... • DivX® files recorded on the DVD disc package. Do not attempt to production. This manual is designed to play : • DVD-R/RW/R DL and DVD+R/RW/R DL discs recorded in DVD-Video compatible format • DVD-RW discs recorded in...
... USB • KODAK picture CDs, FUJICOLOR CDs • ISO 9660 Level1/Level2 for the remote control • Audio/Video pin cable • Owner's manual Region codes This unit is printed prior to load any non-standard shaped discs (heart-shaped, etc.). • Do not use with up to 8 hierarchies... • DivX® files recorded on the DVD disc package. Do not attempt to production. This manual is designed to play : • DVD-R/RW/R DL and DVD+R/RW/R DL discs recorded in DVD-Video compatible format • DVD-RW discs recorded in...

Owners Manual
Page 12
... sound or no sound at all. The selected format appears in jack of this unit via your VCR. Possible connections are various ways to the manuals supplied with a Dolby Digital, DTS, or MPEG decoder using the supplied audio pin cable. COAXIAL jack of your audio system. PR COMPONENT Y VIDEO COAXIAL AUDIO...
... sound or no sound at all. The selected format appears in jack of this unit via your VCR. Possible connections are various ways to the manuals supplied with a Dolby Digital, DTS, or MPEG decoder using the supplied audio pin cable. COAXIAL jack of your audio system. PR COMPONENT Y VIDEO COAXIAL AUDIO...
Owners Manual
Page 14
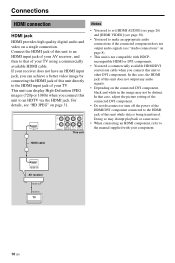
... to an HDTV via the HDMI jack. Doing so may not be distinct. Connect the HDMI jack of your AV receiver, and then to the manual supplied with HDCPincompatible HDMI or DVI components. • You need to make an appropriate audio connections if the connected component does not output audio signals...
... to an HDTV via the HDMI jack. Doing so may not be distinct. Connect the HDMI jack of your AV receiver, and then to the manual supplied with HDCPincompatible HDMI or DVI components. • You need to make an appropriate audio connections if the connected component does not output audio signals...
Owners Manual
Page 15
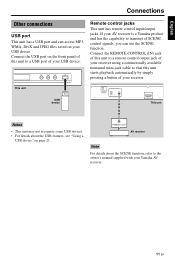
... Notes • This unit may not recognize some USB devices. • For details about the SCENE function, refer to a USB port of your Yamaha AV receiver. 11 En Remote control jacks This unit has remote control input/output jacks. Connect the REMOTE CONTROL (IN) jack of this unit to... a remote control output jack of your receiver using a commercially available monaural mini-jack cable so that this unit to the owner's manual supplied with your receiver. English Connections Other connections USB port This unit has a USB port and can use the SCENE function. REMOTE OUT AV ...
... Notes • This unit may not recognize some USB devices. • For details about the SCENE function, refer to a USB port of your Yamaha AV receiver. 11 En Remote control jacks This unit has remote control input/output jacks. Connect the REMOTE CONTROL (IN) jack of this unit to... a remote control output jack of your receiver using a commercially available monaural mini-jack cable so that this unit to the owner's manual supplied with your receiver. English Connections Other connections USB port This unit has a USB port and can use the SCENE function. REMOTE OUT AV ...
Owners Manual
Page 16
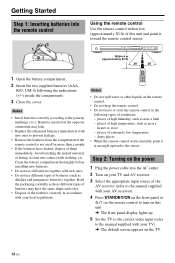
... power cable into the AC outlet. 2 Turn on your TV and AV receiver. 3 Select the appropriate input source of the AV receiver (refer to the manual supplied with your AV receiver). 4 Press STANDBY/ON on the front panel or on the remote control to turn on this unit and point it... within 6 m (approximately 20 ft) of this unit. ➜ The front panel display lights up. 5 Set the TV to the correct video input (refer to the manual supplied with your TV). ➜ The default screen appears on the remote control. • Do not drop the remote control. • Do not leave or...
... power cable into the AC outlet. 2 Turn on your TV and AV receiver. 3 Select the appropriate input source of the AV receiver (refer to the manual supplied with your AV receiver). 4 Press STANDBY/ON on the front panel or on the remote control to turn on this unit and point it... within 6 m (approximately 20 ft) of this unit. ➜ The front panel display lights up. 5 Set the TV to the correct video input (refer to the manual supplied with your TV). ➜ The default screen appears on the remote control. • Do not drop the remote control. • Do not leave or...

Owners Manual
Page 40
...disc tray. 2. Press AUDIO on the remote control. 3. Follow the steps below when this unit does not function properly. Refer to the manual supplied with this unit to the chart below to change the setting of your TV" on the remote control to open the disc tray. ...2. TTrrooubulesbholoetinsg hooting Refer to the standby mode, disconnect the power cable, and contact the nearest authorized Yamaha dealer or service center. Video signals other than HDMI signals are not output when HD JPEG pictures are experiencing is compatible with your TV....
...disc tray. 2. Press AUDIO on the remote control. 3. Follow the steps below when this unit does not function properly. Refer to the manual supplied with this unit to the chart below to change the setting of your TV" on the remote control to open the disc tray. ...2. TTrrooubulesbholoetinsg hooting Refer to the standby mode, disconnect the power cable, and contact the nearest authorized Yamaha dealer or service center. Video signals other than HDMI signals are not output when HD JPEG pictures are experiencing is compatible with your TV....