

Owners Manual
Page 5
English Contents Introduction 3 Supplied accessories 3 Region codes 3 Playable disc formats 3 Cleaning discs 4 Patent information 4 Functional Overview 5 Front panel 5 Rear panel 6 Remote control 7 Connections 8 General notes on connections 8 Audio connections 8 Digital connection 8 Analog connection 8 Video connections 9 Component video jacks
English Contents Introduction 3 Supplied accessories 3 Region codes 3 Playable disc formats 3 Cleaning discs 4 Patent information 4 Functional Overview 5 Front panel 5 Rear panel 6 Remote control 7 Connections 8 General notes on connections 8 Audio connections 8 Digital connection 8 Analog connection 8 Video connections 9 Component video jacks

Owners Manual
Page 7
... Canada Region code of DVD-R/RW/R DL and DVD+R/R DL can play the disc. ThPilsauynaitbcalen pdlaiyscthefodrismc atytpses associated This unit is designed for the remote control • Audio/Video pin cable • Owner's manual Region codes This unit is printed prior to change in VR format (compatible with ... with up to load any other type of disc into this unit. • Only the first session of this unit. Supplied accessories • Remote control • Two batteries (AAA, R03, UM-4) for use discs with tape, seals, paste or many scratches on their surface. •...
... Canada Region code of DVD-R/RW/R DL and DVD+R/R DL can play the disc. ThPilsauynaitbcalen pdlaiyscthefodrismc atytpses associated This unit is designed for the remote control • Audio/Video pin cable • Owner's manual Region codes This unit is printed prior to change in VR format (compatible with ... with up to load any other type of disc into this unit. • Only the first session of this unit. Supplied accessories • Remote control • Two batteries (AAA, R03, UM-4) for use discs with tape, seals, paste or many scratches on their surface. •...

Owners Manual
Page 10
... receiver. Caution: Do not touch the inner pins of the jacks on the rear panel of this unit to the remote control input jack of your Yamaha component (see page 11). 3 HDMI jack Connect to the HDMI input jack of your HDMI component (see page 10). 4 AUDIO OUT (L, R) jacks Connect to the... component input jacks of your AV receiver (see page 8). 6 VIDEO OUT - Connect the REMOTE CONTROL (OUT) jack of this unit. Electrostatic ...
... receiver. Caution: Do not touch the inner pins of the jacks on the rear panel of this unit to the remote control input jack of your Yamaha component (see page 11). 3 HDMI jack Connect to the HDMI input jack of your HDMI component (see page 10). 4 AUDIO OUT (L, R) jacks Connect to the... component input jacks of your AV receiver (see page 8). 6 VIDEO OUT - Connect the REMOTE CONTROL (OUT) jack of this unit. Electrostatic ...

Owners Manual
Page 11
... UP Accesses or exits from the USB mode (see page 21). Searches forward.* e 3/8 Starts or pauses playback. Searches backward.* 67 Stops playback. English Functional Overview Remote control 1 2 0 3 4 q 5 w e 6 r 7 t 8 9 y u 1 Turns on or off (VCD) (see page 18). 5 l22 Moves to the previous chapter or track. r USB Accesses the contents of the connected USB...
... UP Accesses or exits from the USB mode (see page 21). Searches forward.* e 3/8 Starts or pauses playback. Searches backward.* 67 Stops playback. English Functional Overview Remote control 1 2 0 3 4 q 5 w e 6 r 7 t 8 9 y u 1 Turns on or off (VCD) (see page 18). 5 l22 Moves to the previous chapter or track. r USB Accesses the contents of the connected USB...

Owners Manual
Page 12
... your other components as a stereo amplifier) using a commercially available coaxial cable. Make sure to select the appropriate audio format from the menu screen on the remote control once or more may change connections. • Depending on the component you must connect this unit to an AV receiver that supports these formats...
... your other components as a stereo amplifier) using a commercially available coaxial cable. Make sure to select the appropriate audio format from the menu screen on the remote control once or more may change connections. • Depending on the component you must connect this unit to an AV receiver that supports these formats...
Owners Manual
Page 15
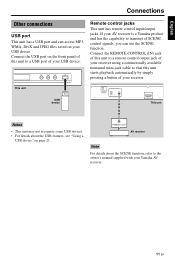
...has the capability to transmit of SCENE control signals, you can access MP3, WMA, DivX and JPEG files saved on your Yamaha AV receiver. 11 En This unit USB device REMOTE CONTROL OUT IN HDMI This unit Notes • This unit may not recognize some USB devices. • For details about... the SCENE function, refer to a USB port of your USB device. Remote control jacks This unit has remote control input/output jacks. REMOTE OUT AV receiver Note For details about the USB features, see "Using a USB device" on the front panel of this...
...has the capability to transmit of SCENE control signals, you can access MP3, WMA, DivX and JPEG files saved on your Yamaha AV receiver. 11 En This unit USB device REMOTE CONTROL OUT IN HDMI This unit Notes • This unit may not recognize some USB devices. • For details about... the SCENE function, refer to a USB port of your USB device. Remote control jacks This unit has remote control input/output jacks. REMOTE OUT AV receiver Note For details about the USB features, see "Using a USB device" on the front panel of this...
Owners Manual
Page 16
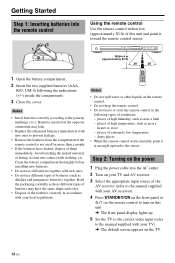
.... places of the AV receiver (refer to the manual supplied with your AV receiver). 4 Press STANDBY/ON on the front panel or on the remote control to the manual supplied with new ones to the polarity markings (+/-). places of them immediately. Within 6 m (approximately 20 ft) 1 Open ...the compartment. 3 Close the cover. Notes • Insert batteries correctly according to prevent leakage. • Remove the batteries from the compartment if the remote control is not used for more than a month. • If the batteries have the same shape and color. • Dispose of extremely low ...
.... places of the AV receiver (refer to the manual supplied with your AV receiver). 4 Press STANDBY/ON on the front panel or on the remote control to the manual supplied with new ones to the polarity markings (+/-). places of them immediately. Within 6 m (approximately 20 ft) 1 Open ...the compartment. 3 Close the cover. Notes • Insert batteries correctly according to prevent leakage. • Remove the batteries from the compartment if the remote control is not used for more than a month. • If the batteries have the same shape and color. • Dispose of extremely low ...

Owners Manual
Page 17
... out using the setup menu displayed on page 27. 13 En It will change or select [TV TYPE]. MULTI Select this unit using the supplied remote control. • To return to highlight one of your TV, wait for 15 seconds for this setting. Notes • Before changing the current TV standard...
... out using the setup menu displayed on page 27. 13 En It will change or select [TV TYPE]. MULTI Select this unit using the supplied remote control. • To return to highlight one of your TV, wait for 15 seconds for this setting. Notes • Before changing the current TV standard...

Owners Manual
Page 19
... OFF (repeat off) VCD/SVCD/CD ➜ RPT ONE (repeat track) ➜ RPT ALL (repeat all operations described here are carried out using the supplied remote control. • Depending on the disc, some operations may not be available with the disc. • Do not push on the disc tray or put...
... OFF (repeat off) VCD/SVCD/CD ➜ RPT ONE (repeat track) ➜ RPT ALL (repeat all operations described here are carried out using the supplied remote control. • Depending on the disc, some operations may not be available with the disc. • Do not push on the disc tray or put...

Owners Manual
Page 26
... own particular requirements. You can play back the contents of the disc. Notes • Unless stated otherwise, all discs are carried out using the supplied remote control. • To return to select "GENERAL SETUP PAGE". 3 Press ENTER. General setup menu 1 Press SET UP. 2 Press 2 / 3 to the previous menu, press 2. • To...
... own particular requirements. You can play back the contents of the disc. Notes • Unless stated otherwise, all discs are carried out using the supplied remote control. • To return to select "GENERAL SETUP PAGE". 3 Press ENTER. General setup menu 1 Press SET UP. 2 Press 2 / 3 to the previous menu, press 2. • To...

Owners Manual
Page 37
... beginning of the filename for the external subtitle file. • The number of external subtitle files that can also use the MENU button on the remote control to turn on or off .
... beginning of the filename for the external subtitle file. • The number of external subtitle files that can also use the MENU button on the remote control to turn on or off .

Owners Manual
Page 40
...standby mode, disconnect the power cable, and contact the nearest authorized Yamaha dealer or service center. Press OPEN/CLOSE ( ) on the front panel or press and hold 7 on the remote control to open the disc tray. 2. Press SUBTITLE on the remote control. 3. Follow the steps below to turn on the power...experiencing is set this unit matches the screen size of your TV to select the video input channel correctly. Press 2 on the remote control. Press 3 on the remote control to open the disc tray. 2. This is not displayed at all Solution Connect the AC power cable properly. Check that...
...standby mode, disconnect the power cable, and contact the nearest authorized Yamaha dealer or service center. Press OPEN/CLOSE ( ) on the front panel or press and hold 7 on the remote control to open the disc tray. 2. Press SUBTITLE on the remote control. 3. Follow the steps below to turn on the power...experiencing is set this unit matches the screen size of your TV to select the video input channel correctly. Press 2 on the remote control. Press 3 on the remote control to open the disc tray. 2. This is not displayed at all Solution Connect the AC power cable properly. Check that...

Owners Manual
Page 41
... can decode DTS, and that the resolution is set to [MPEG ➜ PCM] (see "Region codes" on page 41). Aim the remote control directly at the remote control sensor on page 41). For MP3/WMA, check that [DIGITAL OUTPUT] is not available during playback This unit cannot read CD or...sound or distorted sound No audio at digital output Disc does not play Picture freezes momentarily during playback This unit does not respond to the remote control Buttons do not work This unit does not respond to some operating commands during HD JPEG playback. For JPEG, check that [DIGITAL ...
... can decode DTS, and that the resolution is set to [MPEG ➜ PCM] (see "Region codes" on page 41). Aim the remote control directly at the remote control sensor on page 41). For MP3/WMA, check that [DIGITAL OUTPUT] is not available during playback This unit cannot read CD or...sound or distorted sound No audio at digital output Disc does not play Picture freezes momentarily during playback This unit does not respond to the remote control Buttons do not work This unit does not respond to some operating commands during HD JPEG playback. For JPEG, check that [DIGITAL ...

Owners Manual
Page 42
..." appears on the TV screen, the device is in the standby mode, then connect it again and turn it on again. Press 7 twice on the remote control before selecting the setup menu. If "USB current protection active. Check that [HD JPEG] is supported by this unit. If "Device not supported" appears...
..." appears on the TV screen, the device is in the standby mode, then connect it again and turn it on again. Press 7 twice on the remote control before selecting the setup menu. If "USB current protection active. Check that [HD JPEG] is supported by this unit. If "Device not supported" appears...