

Owners Manual
Page 5
English Contents Introduction 3 Supplied accessories 3 Region codes 3 Playable disc formats 3 Cleaning discs 4 Patent information 4 Functional Overview 5 Front panel 5 Rear panel 6 Remote control 7 Connections 8 General notes on connections 8 Audio connections 8 Digital connection 8 Analog connection 8 Video connections 9 Component video jacks
English Contents Introduction 3 Supplied accessories 3 Region codes 3 Playable disc formats 3 Cleaning discs 4 Patent information 4 Functional Overview 5 Front panel 5 Rear panel 6 Remote control 7 Connections 8 General notes on connections 8 Audio connections 8 Digital connection 8 Analog connection 8 Video connections 9 Component video jacks

Owners Manual
Page 7
Design and specifications are subject to support the region management system. Supplied accessories • Remote control • Two batteries (AAA, R03, UM-4) for the remote control • Audio/Video pin cable • Owner's manual Region codes This unit is designed to change in VR format (compatible with CPRM) • MP3, WMA ...
Design and specifications are subject to support the region management system. Supplied accessories • Remote control • Two batteries (AAA, R03, UM-4) for the remote control • Audio/Video pin cable • Owner's manual Region codes This unit is designed to change in VR format (compatible with CPRM) • MP3, WMA ...

Owners Manual
Page 10
Caution: Do not touch the inner pins of the jacks on the rear panel of this unit to the remote control input jack of your Yamaha component (see page 11). 3 HDMI jack Connect to the HDMI input jack of your HDMI component (see page 10). 4 AUDIO OUT (L, R) jacks... your AV receiver (see page 9). 8 VIDEO OUT - S VIDEO jack Connect to this unit. 6 En COAXIAL jack Connect to the remote control output jack of your Yamaha AV receiver. Functional Overview Rear panel REMOTE CONTROL OUT IN 1 2 HDMI 3 PR COMPONENT Y VIDEO COAXIAL PB S VIDEO AUDIO OUT DIGITALOUT VIDEO OUT 4 5 678 1 AC power ...
Caution: Do not touch the inner pins of the jacks on the rear panel of this unit to the remote control input jack of your Yamaha component (see page 11). 3 HDMI jack Connect to the HDMI input jack of your HDMI component (see page 10). 4 AUDIO OUT (L, R) jacks... your AV receiver (see page 9). 8 VIDEO OUT - S VIDEO jack Connect to this unit. 6 En COAXIAL jack Connect to the remote control output jack of your Yamaha AV receiver. Functional Overview Rear panel REMOTE CONTROL OUT IN 1 2 HDMI 3 PR COMPONENT Y VIDEO COAXIAL PB S VIDEO AUDIO OUT DIGITALOUT VIDEO OUT 4 5 678 1 AC power ...

Owners Manual
Page 11
... display (OSD) menu of this unit (see page 17). u REPEAT A-B Repeats a specific segment (see pages 18 and 20). Search or slow playback. English Functional Overview Remote control 1 2 0 3 4 q 5 w e 6 r 7 t 8 9 y u 1 Turns on this unit or sets it to the previous chapter or track. t AUDIO Selects the audio language or format (see page 16). * Press and...
... display (OSD) menu of this unit (see page 17). u REPEAT A-B Repeats a specific segment (see pages 18 and 20). Search or slow playback. English Functional Overview Remote control 1 2 0 3 4 q 5 w e 6 r 7 t 8 9 y u 1 Turns on this unit or sets it to the previous chapter or track. t AUDIO Selects the audio language or format (see page 16). * Press and...

Owners Manual
Page 12
.... • Do not connect this unit via your audio component (such as necessary to select the appropriate audio format from the menu screen on the remote control once or more may change connections. • Depending on the component you must connect this unit to the corresponding input jacks of your receiver, the...
.... • Do not connect this unit via your audio component (such as necessary to select the appropriate audio format from the menu screen on the remote control once or more may change connections. • Depending on the component you must connect this unit to the corresponding input jacks of your receiver, the...
Owners Manual
Page 15
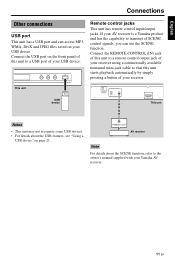
...USB device" on page 21. Connect the REMOTE CONTROL (IN) jack of this unit to transmit of SCENE control signals, you can access MP3, WMA, DivX and JPEG files saved on the front panel of this unit to the owner's manual supplied with your Yamaha AV receiver. 11 En If your AV... receiver is a Yamaha product and has the capability to a USB port of your USB device. Remote control jacks This unit has remote control input/output jacks. English Connections Other connections USB port This ...
...USB device" on page 21. Connect the REMOTE CONTROL (IN) jack of this unit to transmit of SCENE control signals, you can access MP3, WMA, DivX and JPEG files saved on the front panel of this unit to the owner's manual supplied with your Yamaha AV receiver. 11 En If your AV... receiver is a Yamaha product and has the capability to a USB port of your USB device. Remote control jacks This unit has remote control input/output jacks. English Connections Other connections USB port This ...
Owners Manual
Page 16
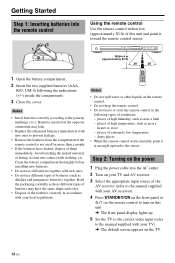
... extremely low temperature - Notes • Do not spill water or other liquids on the remote control. • Do not drop the remote control. • Do not leave or store the remote control in accordance with your local regulations. places of them immediately. Step 2: Turning on the power... 1 Plug the power cable into the remote control 3 1 2 Using the remote control Use the remote control within 6 m (approximately 20 ft) of this unit. ➜ The front panel display lights up. 5 Set the ...
... extremely low temperature - Notes • Do not spill water or other liquids on the remote control. • Do not drop the remote control. • Do not leave or store the remote control in accordance with your local regulations. places of them immediately. Step 2: Turning on the power... 1 Plug the power cable into the remote control 3 1 2 Using the remote control Use the remote control within 6 m (approximately 20 ft) of this unit. ➜ The front panel display lights up. 5 Set the ...

Owners Manual
Page 17
... TV. ENSURE THAT YOUR TV SUPPORTS PAL STANDARD. 2. OK CANCEL Setting an aspect ratio for your TV You can customize this unit using the supplied remote control. • To return to the previous menu, press 2. • To exit from the menu, press SET UP. If you do not need to change this...
... TV. ENSURE THAT YOUR TV SUPPORTS PAL STANDARD. 2. OK CANCEL Setting an aspect ratio for your TV You can customize this unit using the supplied remote control. • To return to the previous menu, press 2. • To exit from the menu, press SET UP. If you do not need to change this...

Owners Manual
Page 19
... OFF (repeat off ) VCD/SVCD/CD ➜ RPT ONE (repeat track) ➜ RPT ALL (repeat all operations described here are carried out using the supplied remote control. • Depending on the disc tray. Searching backward/forward 1 Press and hold l22 / 33l or press 2 / 3. 2 While searching, press l22 / 33l or 2 / 3 repeatedly to replay...
... OFF (repeat off ) VCD/SVCD/CD ➜ RPT ONE (repeat track) ➜ RPT ALL (repeat all operations described here are carried out using the supplied remote control. • Depending on the disc tray. Searching backward/forward 1 Press and hold l22 / 33l or press 2 / 3. 2 While searching, press l22 / 33l or 2 / 3 repeatedly to replay...

Owners Manual
Page 26
Notes • Unless stated otherwise, all discs are carried out using the supplied remote control. • To return to suit your own particular requirements. The default password is carried out on the TV screen, enabling you to customize this unit ...
Notes • Unless stated otherwise, all discs are carried out using the supplied remote control. • To return to suit your own particular requirements. The default password is carried out on the TV screen, enabling you to customize this unit ...

Owners Manual
Page 37
...screen to match the subtitle file. 1 In "PREFERENCE PAGE", press 5/a to highlight [DIVX SUBTITLE], and then press 3. This function is available only on the remote control to select a setting, and then press ENTER. GROUP1: Albanian (sq), Basque (eu), Catalan (ca), Danish (da), Dutch (nl), English (en), Faroese ... of the filename for the external subtitle file. • The number of ten. This setting allows you to see "Using the playback control (PBC) menu" on disc characteristics or recording conditions. • Some external subtitle files may be displayed incorrectly or not at all. ...
...screen to match the subtitle file. 1 In "PREFERENCE PAGE", press 5/a to highlight [DIVX SUBTITLE], and then press 3. This function is available only on the remote control to select a setting, and then press ENTER. GROUP1: Albanian (sq), Basque (eu), Catalan (ca), Danish (da), Dutch (nl), English (en), Faroese ... of the filename for the external subtitle file. • The number of ten. This setting allows you to see "Using the playback control (PBC) menu" on disc characteristics or recording conditions. • Some external subtitle files may be displayed incorrectly or not at all. ...

Owners Manual
Page 40
... OPEN/CLOSE ( ) on the front panel or press and hold 7 on the remote control to the standby mode, disconnect the power cable, and contact the nearest authorized Yamaha dealer or service center. Press 2 on the remote control. Check that of the disc and your TV (see "Playable disc formats" on ...page 31). Press OPEN/CLOSE ( ) on the front panel or press and hold 7 on the remote control to open the disc tray. ...
... OPEN/CLOSE ( ) on the front panel or press and hold 7 on the remote control to the standby mode, disconnect the power cable, and contact the nearest authorized Yamaha dealer or service center. Press 2 on the remote control. Check that of the disc and your TV (see "Playable disc formats" on ...page 31). Press OPEN/CLOSE ( ) on the front panel or press and hold 7 on the remote control to open the disc tray. ...

Owners Manual
Page 41
...check that your disc contains at digital output Disc does not play Picture freezes momentarily during playback This unit does not respond to the remote control Buttons do not work This unit does not respond to clean the lens before sending this unit for 5-10 seconds. signs) as ...Use a commonly available CD/DVD lens cleaner to some operating commands during HD JPEG playback. Check the digital connections. Reduce the distance of the remote control from the AC outlet for repair. 37 En Reinsert the batteries with a soft cloth wiping from center to [MPEG ➜ PCM] (...
...check that your disc contains at digital output Disc does not play Picture freezes momentarily during playback This unit does not respond to the remote control Buttons do not work This unit does not respond to clean the lens before sending this unit for 5-10 seconds. signs) as ...Use a commonly available CD/DVD lens cleaner to some operating commands during HD JPEG playback. Check the digital connections. Reduce the distance of the remote control from the AC outlet for repair. 37 En Reinsert the batteries with a soft cloth wiping from center to [MPEG ➜ PCM] (...

Owners Manual
Page 42
...). Device not supported" appears on the TV screen, the device is set to the standby mode, and then turn it again and turn on the remote control before selecting the setup menu. Set this unit to [ON] (see page 21). 38 En The disc being loaded is supplied with this unit. Check...
...). Device not supported" appears on the TV screen, the device is set to the standby mode, and then turn it again and turn on the remote control before selecting the setup menu. Set this unit to [ON] (see page 21). 38 En The disc being loaded is supplied with this unit. Check...