

Owners Manual
Page 5
English Contents Introduction Region codes 3 Supplied accessories 3 Notes about discs/content format 3 Cleaning discs 4 Patent information 4 Functional Overview Front panel 5 Rear panel 5 Remote control 6 Connections General notes on connections 7 Audio connections 7 Digital connection 7 Analog connection 7 Video connections 8 Component video jacks
English Contents Introduction Region codes 3 Supplied accessories 3 Notes about discs/content format 3 Cleaning discs 4 Patent information 4 Functional Overview Front panel 5 Rear panel 5 Remote control 6 Connections General notes on connections 7 Audio connections 7 Digital connection 7 Analog connection 7 Video connections 8 Component video jacks

Owners Manual
Page 7
...shaped discs (heart-shaped, etc.). - KODAK Picture CD - FUJICOLOR CD - Official DivX® Ultra Certified product - ISO 9660 Level1/Level2 for the remote control - Some discs cannot be played unless finalized. - This Owner's Manual explains the basic operation of this unit. - Do not attempt to 8 hierarchies ...Notes: - Introduction - Up to ALL play DVD-RW discs recorded in fs 48 kHz: 128 - 192 kbps (CBR only)) - Remote control - This unit can be labeled ALL regions or Region 1 in order to 298 folders per folder with the logos shown below. WMA (except ...
...shaped discs (heart-shaped, etc.). - KODAK Picture CD - FUJICOLOR CD - Official DivX® Ultra Certified product - ISO 9660 Level1/Level2 for the remote control - Some discs cannot be played unless finalized. - This Owner's Manual explains the basic operation of this unit. - Do not attempt to 8 hierarchies ...Notes: - Introduction - Up to ALL play DVD-RW discs recorded in fs 48 kHz: 128 - 192 kbps (CBR only)) - Remote control - This unit can be labeled ALL regions or Region 1 in order to 298 folders per folder with the logos shown below. WMA (except ...

Owners Manual
Page 10
... menu of this unit. e SETUP Accesses or exits from the on-screen display (OSD) menu of a disc (DVD). i ZOOM Enlarges the video image. Functional Overview Remote control 1 2 3 4 5 6 7 8 9 0 1 2 3 4 5 6 7 8 TOPMENU RETURN 0 MENU 9 ON SCREEN SETUP ENTER OK STOP PLAY PAUSE SUBTITLE ANGLE ZOOM AUDIO REPEAT A B SCAN MUTE DVD13 q w e r t y u i o p 1 Turns on this unit. rT Searches...
... menu of this unit. e SETUP Accesses or exits from the on-screen display (OSD) menu of a disc (DVD). i ZOOM Enlarges the video image. Functional Overview Remote control 1 2 3 4 5 6 7 8 9 0 1 2 3 4 5 6 7 8 TOPMENU RETURN 0 MENU 9 ON SCREEN SETUP ENTER OK STOP PLAY PAUSE SUBTITLE ANGLE ZOOM AUDIO REPEAT A B SCAN MUTE DVD13 q w e r t y u i o p 1 Turns on this unit. rT Searches...

Owners Manual
Page 11
... from www.Manualslib.com manuals search engine L R Audio pin cable L R CD/DVD L R Stereo amplifier Left Right speaker speaker This unit 7 En Pressing AUDIO on the remote control once or more may change connections. • Depending on page 25). Analog connection This unit has analog output jacks. The video quality could be distorted...
... from www.Manualslib.com manuals search engine L R Audio pin cable L R CD/DVD L R Stereo amplifier Left Right speaker speaker This unit 7 En Pressing AUDIO on the remote control once or more may change connections. • Depending on page 25). Analog connection This unit has analog output jacks. The video quality could be distorted...
Owners Manual
Page 14
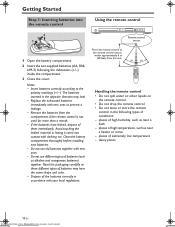
...this unit. 30° 30° Handling the remote control • Do not spill water or other liquids on the remote control. • Do not drop the remote control. • Do not leave or store the remote control in accordance with your local regulations. Avoid touching the ... stove - Do not use old batteries together with new ones to the polarity markings (+/-). Remote control sensor Point the remote control at the remote control sensor, within approximately 6 m (20 feet) from the compartment if the remote control is not used for more than a month. - places of batteries (such as near...
...this unit. 30° 30° Handling the remote control • Do not spill water or other liquids on the remote control. • Do not drop the remote control. • Do not leave or store the remote control in accordance with your local regulations. Avoid touching the ... stove - Do not use old batteries together with new ones to the polarity markings (+/-). Remote control sensor Point the remote control at the remote control sensor, within approximately 6 m (20 feet) from the compartment if the remote control is not used for more than a month. - places of batteries (such as near...
Owners Manual
Page 17
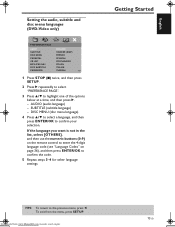
... 13 En SUBTITLE (subtitle language) - If the language you want is not in the list, select [OTHERS], and then use the numeric buttons (0-9) on the remote control to enter the 4-digit language code (see "Language Codes" on page 36), and then press ENTER/OK to the previous menu, press 1. Downloaded from the...
... 13 En SUBTITLE (subtitle language) - If the language you want is not in the list, select [OTHERS], and then use the numeric buttons (0-9) on the remote control to enter the 4-digit language code (see "Language Codes" on page 36), and then press ENTER/OK to the previous menu, press 1. Downloaded from the...

Owners Manual
Page 18
... 1 / 2 repeatedly to replay the same track/chapter. General operation Unless stated otherwise, all operations described here are carried out using the supplied remote control. Pausing playback 1 During playback, press PAUSE (;). ➜ Playback is paused and the sound is not available on the DVD or VIDEO CD ...disc, some discs. - Basic playback 1 Press STANDBY/ON on the front panel or on the remote control to open , the disc tray closes and playback starts automatically. Selecting track/chapter • Press S / T or use the numeric buttons...
... 1 / 2 repeatedly to replay the same track/chapter. General operation Unless stated otherwise, all operations described here are carried out using the supplied remote control. Pausing playback 1 During playback, press PAUSE (;). ➜ Playback is paused and the sound is not available on the DVD or VIDEO CD ...disc, some discs. - Basic playback 1 Press STANDBY/ON on the front panel or on the remote control to open , the disc tray closes and playback starts automatically. Selecting track/chapter • Press S / T or use the numeric buttons...
Owners Manual
Page 22
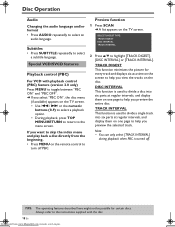
... list appears on one page to the menu screen. Note: - Special VCD/SVCD features Playback control (PBC) For VCD with the disc. 18 En Downloaded from the beginning, • Press MENU on the remote control to help you preview the selected track. SELECT DIGEST TYPE: TRACK DIGEST DISC INTERVAL TRACK INTERVAL ...INTERVAL] during playback when PBC is used to divide a single track into six parts at a time on the screen to the instructions supplied with playback control (PBC) feature (version 2.0 only) Press MENU to toggle between "PBC ON" and "PBC OFF". ➜ If you select "PBC ON", the...
... list appears on one page to the menu screen. Note: - Special VCD/SVCD features Playback control (PBC) For VCD with the disc. 18 En Downloaded from the beginning, • Press MENU on the remote control to help you preview the selected track. SELECT DIGEST TYPE: TRACK DIGEST DISC INTERVAL TRACK INTERVAL ...INTERVAL] during playback when PBC is used to divide a single track into six parts at a time on the screen to the instructions supplied with playback control (PBC) feature (version 2.0 only) Press MENU to toggle between "PBC ON" and "PBC OFF". ➜ If you select "PBC ON", the...
Owners Manual
Page 42
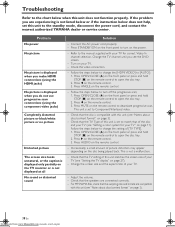
... you see "Notes about discs/content format" on the remote control to open the disc tray. 2. Troubleshooting Refer to the chart below when this unit to the standby mode, disconnect the power cord, and contact the nearest authorized YAMAHA dealer or service center. Connect the AC power cord properly...bit rate are compatible with your TV for your TV. - Follow the steps below to open the disc tray. 2. Press AUDIO on the remote control. - Adjust the volume. - Problem No power No picture No picture is displayed when you make HDMI connections (using the component video jacks)...
... you see "Notes about discs/content format" on the remote control to open the disc tray. 2. Troubleshooting Refer to the chart below when this unit to the standby mode, disconnect the power cord, and contact the nearest authorized YAMAHA dealer or service center. Connect the AC power cord properly...bit rate are compatible with your TV for your TV. - Follow the steps below to open the disc tray. 2. Press AUDIO on the remote control. - Adjust the volume. - Problem No power No picture No picture is displayed when you make HDMI connections (using the component video jacks)...

Owners Manual
Page 43
... the distance of the disc jacket. - Downloaded from center to "PCM ONLY" (see page 25). - English Troubleshooting Problem No audio at the remote control sensor on the front panel. - If you have recorded a JPEG, MP3 or WMA disc yourself, check that your receiver capabilities. - If you... permitted by trying another disc. - Check the digital connections. - Use a commonly available CD/DVD lens cleaner to the instructions of the remote control from the AC outlet for 5-10 seconds. - Check that the disc label is compatible (see "Region codes" on the disc availability, ...
... the distance of the disc jacket. - Downloaded from center to "PCM ONLY" (see page 25). - English Troubleshooting Problem No audio at the remote control sensor on the front panel. - If you have recorded a JPEG, MP3 or WMA disc yourself, check that your receiver capabilities. - If you... permitted by trying another disc. - Check the digital connections. - Use a commonly available CD/DVD lens cleaner to the instructions of the remote control from the AC outlet for 5-10 seconds. - Check that the disc label is compatible (see "Region codes" on the disc availability, ...