

Owners Manual
Page 4
... use this unit for any damage resulting from the wall outlet. 16 Be sure to read this unit, and/or personal injury. Contact qualified YAMAHA service personnel when any reason. 15 When not planning to set the unit in an environment with high humidity (i.e., a room with a newspaper,...) of the player are complete. 8 Do not operate this unit with a humidifier) to an amplification system. To avoid possible damage to the audio system, the consumer should never be exposed to beam. Keep it may be opened for adequate ventilation. 3 Locate this might damage the finish. away...
... use this unit for any damage resulting from the wall outlet. 16 Be sure to read this unit, and/or personal injury. Contact qualified YAMAHA service personnel when any reason. 15 When not planning to set the unit in an environment with high humidity (i.e., a room with a newspaper,...) of the player are complete. 8 Do not operate this unit with a humidifier) to an amplification system. To avoid possible damage to the audio system, the consumer should never be exposed to beam. Keep it may be opened for adequate ventilation. 3 Locate this might damage the finish. away...

Owners Manual
Page 5
English Contents Introduction Region Codes 3 Supplied accessories 3 Notes about discs 3 Cleaning discs 3 Patent information 3 Functional Overview Front Panel 4 Rear Panel 5 Remote Control 6 Preparation General Notes on connections 7 Digital Connections 7 Analog Connections 8 6ch discrete jacks 8 MIXED 2CH jacks 8 Video Connections 9 S-Video terminal
English Contents Introduction Region Codes 3 Supplied accessories 3 Notes about discs 3 Cleaning discs 3 Patent information 3 Functional Overview Front Panel 4 Rear Panel 5 Remote Control 6 Preparation General Notes on connections 7 Digital Connections 7 Analog Connections 8 6ch discrete jacks 8 MIXED 2CH jacks 8 Video Connections 9 S-Video terminal

Owners Manual
Page 6
... Programming disc tracks (not for Picture CD/MP3 24 OSD Language 24 Screen Saver 24 Sleep Timer 25 DivX® VOD registration code 25 Audio Setup Menu 25 Setting the analog output 25 Setting the Digital output 26 Speaker Setup 26 CD Upsampling 26 Night Mode 27 Video Setup Menu...27 TV Type 27 Setting the TV Display 27 Progressive 28 Picture Setting 28 Selecting the black level (U.S.A. model only 29 Preference Setup Menu 30 Audio, Subtitle, Disc Menu 30 Restricting playback by Parental Control 30 PBC (Playback Control 30 MP3/JPEG Menu 31 Playback of VR Format 31 Changing ...
... Programming disc tracks (not for Picture CD/MP3 24 OSD Language 24 Screen Saver 24 Sleep Timer 25 DivX® VOD registration code 25 Audio Setup Menu 25 Setting the analog output 25 Setting the Digital output 26 Speaker Setup 26 CD Upsampling 26 Night Mode 27 Video Setup Menu...27 TV Type 27 Setting the TV Display 27 Progressive 28 Picture Setting 28 Selecting the black level (U.S.A. model only 29 Preference Setup Menu 30 Audio, Subtitle, Disc Menu 30 Restricting playback by Parental Control 30 PBC (Playback Control 30 MP3/JPEG Menu 31 Playback of VR Format 31 Changing ...

Owners Manual
Page 7
... - Dual layer DVDs - Do not wipe in a circular motion. • Do not use with DVD video, Video CD, Super video CD, DVD-Audio, Super Audio CD (SA-CD), Audio CD, CD-R, CD-RW, DVD+RW, DVD+R, DVD-R, DVD-RW and DVDRW (VR format). "DTS" and "DTS Digital Surround" are trademarks of Dolby...Logic", and the double-D symbol are registered trademarks of DivXNetworks, Inc and are labeled for use solvents such as PC environment and application software. Audio pin cable - MP3, picture (Kodak, JPEG) files on this unit. Doing so may result in order to use any non standard shaped discs...
... - Dual layer DVDs - Do not wipe in a circular motion. • Do not use with DVD video, Video CD, Super video CD, DVD-Audio, Super Audio CD (SA-CD), Audio CD, CD-R, CD-RW, DVD+RW, DVD+R, DVD-R, DVD-RW and DVDRW (VR format). "DTS" and "DTS Digital Surround" are trademarks of Dolby...Logic", and the double-D symbol are registered trademarks of DivXNetworks, Inc and are labeled for use solvents such as PC environment and application software. Audio pin cable - MP3, picture (Kodak, JPEG) files on this unit. Doing so may result in order to use any non standard shaped discs...
Owners Manual
Page 8
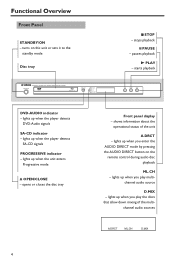
...information about the operational status of the multi- lights up when the player detects DVD-Audio signals SA-CD indicator - stops playback ; lights up when you enter the AUDIO DIRECT mode by pressing the AUDIO DIRECT button on this unit or sets it to the standby mode Disc tray 9... STOP - lights up when the player detects SA-CD signals PROGRESSIVE indicator - pauses playback B PLAY - channel audio source D.MIX - lights up when you play multi- channel audio sources A.DRCT ML.CH D.MIX lights up when the unit enters Progressive mode / OPEN/CLOSE - lights up when ...
...information about the operational status of the multi- lights up when the player detects DVD-Audio signals SA-CD indicator - stops playback ; lights up when you enter the AUDIO DIRECT mode by pressing the AUDIO DIRECT button on this unit or sets it to the standby mode Disc tray 9... STOP - lights up when the player detects SA-CD signals PROGRESSIVE indicator - pauses playback B PLAY - channel audio source D.MIX - lights up when you play multi- channel audio sources A.DRCT ML.CH D.MIX lights up when the unit enters Progressive mode / OPEN/CLOSE - lights up when ...

Owners Manual
Page 9
connects to a video input on your AV receiver Caution: Do not touch the inner pins of your AV receiver OPTICAL digital audio output - connect to a digital (optical) input on your AV receiver S VIDEO output - Electrostatic discharge may cause permanent damage to an AV receiver with Y PB/...your AV receiver or stereo system MIXED 2CH output - connects to a digital (coaxial) input of the jacks on the rear panel. connects to the audio jacks on your AV receiver or stereo system Functional Overview COMPONENT video outputs - connects to a standard AC outlet COAXIAL digital...
connects to a video input on your AV receiver Caution: Do not touch the inner pins of your AV receiver OPTICAL digital audio output - connect to a digital (optical) input on your AV receiver S VIDEO output - Electrostatic discharge may cause permanent damage to an AV receiver with Y PB/...your AV receiver or stereo system MIXED 2CH output - connects to a digital (coaxial) input of the jacks on the rear panel. connects to the audio jacks on your AV receiver or stereo system Functional Overview COMPONENT video outputs - connects to a standard AC outlet COAXIAL digital...

Owners Manual
Page 10
... pauses playback temporarily - accesses or clears the player's setup menu T - moves to the previous chapter or track STOP ( 9 ) - selects the audio language or format selector - changes the Hybrid SA-CD playback layer REPEAT - plays tracks in the currently displayed menu ON SCREEN - switches video output on... /off during audio disc playback PAGE - turns the pages of each track/chapter on this player or sets it to the standby mode numeric buttons - displays...
... pauses playback temporarily - accesses or clears the player's setup menu T - moves to the previous chapter or track STOP ( 9 ) - selects the audio language or format selector - changes the Hybrid SA-CD playback layer REPEAT - plays tracks in the currently displayed menu ON SCREEN - switches video output on... /off during audio disc playback PAGE - turns the pages of each track/chapter on this player or sets it to the standby mode numeric buttons - displays...

Owners Manual
Page 11
...in the following drawings. • Please refer to the manuals of other equipment as necessary to make or change not only audio languages but also audio formats, and the selected format appears for several seconds on the status window. - Digital Connections This unit has COAXIAL and ...OPTICAL digital out jacks. The video quality could connect this unit's audio out jack to ALL (see page 26 "DIGITAL OUTPUT"). 7 Preparation Note: - C O COAXIAL IN OPTICAL IN AV receiver Left front speaker ...
...in the following drawings. • Please refer to the manuals of other equipment as necessary to make or change not only audio languages but also audio formats, and the selected format appears for several seconds on the status window. - Digital Connections This unit has COAXIAL and ...OPTICAL digital out jacks. The video quality could connect this unit's audio out jack to ALL (see page 26 "DIGITAL OUTPUT"). 7 Preparation Note: - C O COAXIAL IN OPTICAL IN AV receiver Left front speaker ...

Owners Manual
Page 12
...Surround speaker back speaker Right surround speaker Stereo amplifier R L 1 CD/DVD R L Subwoofer Left Right speaker speaker 8 MIXED 2CH jacks Use the audio/video cable supplied with this player to connect the L (left) and R (right) jacks to the corresponding input jacks of analog output jacks.... 6ch discrete jacks To reproduce multi-channel Super Audio CD and DVD-Audio, connect these jacks to the SUBWOOFER jack. Preparation Analog Connections This player has two types of your AV receiver's multi channel...
...Surround speaker back speaker Right surround speaker Stereo amplifier R L 1 CD/DVD R L Subwoofer Left Right speaker speaker 8 MIXED 2CH jacks Use the audio/video cable supplied with this player to connect the L (left) and R (right) jacks to the corresponding input jacks of analog output jacks.... 6ch discrete jacks To reproduce multi-channel Super Audio CD and DVD-Audio, connect these jacks to the SUBWOOFER jack. Preparation Analog Connections This player has two types of your AV receiver's multi channel...

Owners Manual
Page 14
... on the TV and your AV receiver. 3 Select the appropriate input source at the sensor, within approximately 6 m (20 feet) of conditions: - EXT1, EXT2, AV1, AV2, AUDIO/ VIDEO, etc. VIDEO SETUP PAGE TV TYPE TV DISPLAY PROGRESSIVE PICTURE SETTING BLACK LEVEL CLOSED CAPTION PAL NTSC MULTI Handling the remote control • Do...
... on the TV and your AV receiver. 3 Select the appropriate input source at the sensor, within approximately 6 m (20 feet) of conditions: - EXT1, EXT2, AV1, AV2, AUDIO/ VIDEO, etc. VIDEO SETUP PAGE TV TYPE TV DISPLAY PROGRESSIVE PICTURE SETTING BLACK LEVEL CLOSED CAPTION PAL NTSC MULTI Handling the remote control • Do...

Owners Manual
Page 15
... NTSC system. IF THERE IS A DISTORTED PICTURE DISPLAYED ON THE TV, WAIT 15 SECONDS FOR AUTO RECOVER. Setting the OSD Language GENERAL SETUP PAGE DVD-AUDIO DISC LOCK DISPLAY DIM PROGRAM OSD LANGUAGE SCREEN SAVER SLEEP DIVX(R) VOD CODE ENGLISH ESPAÑOL FRANÇAIS 1 Press SETUP. 2 Press 1 2 to select...
... NTSC system. IF THERE IS A DISTORTED PICTURE DISPLAYED ON THE TV, WAIT 15 SECONDS FOR AUTO RECOVER. Setting the OSD Language GENERAL SETUP PAGE DVD-AUDIO DISC LOCK DISPLAY DIM PROGRAM OSD LANGUAGE SCREEN SAVER SLEEP DIVX(R) VOD CODE ENGLISH ESPAÑOL FRANÇAIS 1 Press SETUP. 2 Press 1 2 to select...

Owners Manual
Page 16
...code (see page 33 "Language Codes") and press ENTER/OK. 5 Repeat steps 3-4 for individual speakers. AUDIO SETUP PAGE ANALOG OUTPUT DIGITAL AUDIO SPEAKER SETUP CD UPSAMPLING NIGHT MODE SPEAKER SETUP PAGE FRONT SPEAKER LARGE CENTER SPEAKER SMALL SURROUND SP SUBWOOFER SPEAKERS ..., then press SETUP. 2 Press 2 repeatedly to select [PREFERENCE PAGE]. 3 Press 34 to highlight one of the options below at a time, then press 2. - 'AUDIO' (disc's soundtrack) - 'SUBTITLE' (disc's subtitles) - 'DISC MENU' (disc's menu) 4 Press 34 to select a language and press ENTER/OK. Speaker settings...
...code (see page 33 "Language Codes") and press ENTER/OK. 5 Repeat steps 3-4 for individual speakers. AUDIO SETUP PAGE ANALOG OUTPUT DIGITAL AUDIO SPEAKER SETUP CD UPSAMPLING NIGHT MODE SPEAKER SETUP PAGE FRONT SPEAKER LARGE CENTER SPEAKER SMALL SURROUND SP SUBWOOFER SPEAKERS ..., then press SETUP. 2 Press 2 repeatedly to select [PREFERENCE PAGE]. 3 Press 34 to highlight one of the options below at a time, then press 2. - 'AUDIO' (disc's soundtrack) - 'SUBTITLE' (disc's subtitles) - 'DISC MENU' (disc's menu) 4 Press 34 to select a language and press ENTER/OK. Speaker settings...

Owners Manual
Page 20
... Press PLAY ( B ) while the "LOADING" message is displayed. ➜ The disc will be possible for example, title or chapter number, elapsed playing time, audio/ subtitle language), a number of operations can be done without interrupting disc playback. 1 During playback, press ON SCREEN. ➜ A list of available disc information appears ...(for certain discs. TIPS: The operating features described here might not be played back from the last point. DVD MENU TITLE CHAPTER AUDIO SUBTITLE BITRATE 02/14 02/14 5.1CH ENG VCD/SVCD MENU TRACK DISC TIME TRACK TIME REPEAT BITRATE 02/14 0:49:17 0:...
... Press PLAY ( B ) while the "LOADING" message is displayed. ➜ The disc will be possible for example, title or chapter number, elapsed playing time, audio/ subtitle language), a number of operations can be done without interrupting disc playback. 1 During playback, press ON SCREEN. ➜ A list of available disc information appears ...(for certain discs. TIPS: The operating features described here might not be played back from the last point. DVD MENU TITLE CHAPTER AUDIO SUBTITLE BITRATE 02/14 02/14 5.1CH ENG VCD/SVCD MENU TRACK DISC TIME TRACK TIME REPEAT BITRATE 02/14 0:49:17 0:...

Owners Manual
Page 21
... highlight your selection and press ENTER/OK. Time display (CD) Each time you are playing. 1 Press 34 to select [AUDIO], [SUBTITLE] or [ANGLE]. 2 Press ENTER/OK. 3 For Audio and Subtitle, Press 34 to select different desired angle. OR For Angle, Select an angle using the numeric buttons. (e.g. ...here might not be possible for certain discs. Camera Angle • Press ANGLE repeatedly to highlight your selection and press ENTER/OK. Audio/Subtitle/Angle (DVD discs) You can change [AUDIO], [SUBTITLE] or [ANGLE] if it is available on the TV screen. 2 Use 1 234 or numeric buttons to select ...
... highlight your selection and press ENTER/OK. Time display (CD) Each time you are playing. 1 Press 34 to select [AUDIO], [SUBTITLE] or [ANGLE]. 2 Press ENTER/OK. 3 For Audio and Subtitle, Press 34 to select different desired angle. OR For Angle, Select an angle using the numeric buttons. (e.g. ...here might not be possible for certain discs. Camera Angle • Press ANGLE repeatedly to highlight your selection and press ENTER/OK. Audio/Subtitle/Angle (DVD discs) You can change [AUDIO], [SUBTITLE] or [ANGLE] if it is available on the TV screen. 2 Use 1 234 or numeric buttons to select ...

Owners Manual
Page 23
...six audiochannels. Each time you play regardless of the analog output settings in up to select a track, then press ENTER/OK. Moreover, many DVD-Audio discs offer slide show and page turn capabilities. • When you press PAGE on page 23). In this case, consult the disc jacket and... discs contain bonus groups that can be possible for the sole purpose of 192 kHz/ 24 bits are supported. DVD-Video mode Some DVD-Audio discs include DVDVideo contents that require a four-digit password to the instructions supplied with Linear PCM and Packed PCM (lossless coding) in Setup Menu...
...six audiochannels. Each time you play regardless of the analog output settings in up to select a track, then press ENTER/OK. Moreover, many DVD-Audio discs offer slide show and page turn capabilities. • When you press PAGE on page 23). In this case, consult the disc jacket and... discs contain bonus groups that can be possible for the sole purpose of 192 kHz/ 24 bits are supported. DVD-Video mode Some DVD-Audio discs include DVDVideo contents that require a four-digit password to the instructions supplied with Linear PCM and Packed PCM (lossless coding) in Setup Menu...

Owners Manual
Page 24
... 2 To stop automatically at any CD player High Density layer containing: 2 - You cannot change the Analog output setting during playback. Press AUDIO while playback is stopped to the second HD layer. - A single layer disc has one standard CD layer, making it playable on any ... hybrid SA-CD, the player will stop playback, press STOP ( 9 ). Always refer to begin playback. There are three types of conventional audio CD. Recorded information can be possible for certain discs. This new direct-stream digital format comprises a 1-bit system that has a digital sampling frequency...
... 2 To stop automatically at any CD player High Density layer containing: 2 - You cannot change the Analog output setting during playback. Press AUDIO while playback is stopped to the second HD layer. - A single layer disc has one standard CD layer, making it playable on any ... hybrid SA-CD, the player will stop playback, press STOP ( 9 ). Always refer to begin playback. There are three types of conventional audio CD. Recorded information can be possible for certain discs. This new direct-stream digital format comprises a 1-bit system that has a digital sampling frequency...

Owners Manual
Page 27
... dimming the display. 2 Press 34 to select a setting, then press ENTER/OK to highlight [DISC LOCK], then press 2. The DVD-AUDIO indicator lights up when a DVD-Audio disc is '000 000' (see page 32 "Changing the Password"). Locking/Unlocking the disc for viewing Not all discs are rated or coded... locked disc requires six-digit password. English Setup Menu The setup is carried out via the TV, enabling you select DVD-VIDEO MODE, the DVD-AUDIO indicator goes out. LOCK Select this to confirm your selection. DVD-VIDEO MODE Select this to lock the playback of the DVD-Video. 2 Press ...
... dimming the display. 2 Press 34 to select a setting, then press ENTER/OK to highlight [DISC LOCK], then press 2. The DVD-AUDIO indicator lights up when a DVD-Audio disc is '000 000' (see page 32 "Changing the Password"). Locking/Unlocking the disc for viewing Not all discs are rated or coded... locked disc requires six-digit password. English Setup Menu The setup is carried out via the TV, enabling you select DVD-VIDEO MODE, the DVD-AUDIO indicator goes out. LOCK Select this to confirm your selection. DVD-VIDEO MODE Select this to lock the playback of the DVD-Video. 2 Press ...

Owners Manual
Page 29
... change the channel output to stereo, which only delivers sound from 15, 30, 45 and 60 minutes. AUDIO SETUP PAGE ANALOG OUTPUT DIGITAL AUDIO SPEAKER SETUP CD UPSAMPLING NIGHT MODE DivX® VOD registration code Yamaha provides you with 2-channel sound tracks. STEREO Select this DVD player. Setup Menu English Sleep Timer This...
... change the channel output to stereo, which only delivers sound from 15, 30, 45 and 60 minutes. AUDIO SETUP PAGE ANALOG OUTPUT DIGITAL AUDIO SPEAKER SETUP CD UPSAMPLING NIGHT MODE DivX® VOD registration code Yamaha provides you with 2-channel sound tracks. STEREO Select this DVD player. Setup Menu English Sleep Timer This...

Owners Manual
Page 30
...) PCM data stream will be muted to comply with the standards. Discs are : 'Digital Output' and 'LPCM Output'. 1 In 'AUDIO SETUP PAGE', press 34 to highlight [DIGITAL AUDIO], then press 2. 2 Press the 34 to highlight an option. 3 Enter its submenu by pressing 2. 4 Move the cursor by pressing... 96kHz disc is copy protected, the digital output will automatically switch to stereo mode. 1 In 'AUDIO SETUP PAGE', press 34 to confirm your receiver is only applicable for audio output so that you have activated the upsampling, the player will be converted to reproduce high quality surround...
...) PCM data stream will be muted to comply with the standards. Discs are : 'Digital Output' and 'LPCM Output'. 1 In 'AUDIO SETUP PAGE', press 34 to highlight [DIGITAL AUDIO], then press 2. 2 Press the 34 to highlight an option. 3 Enter its submenu by pressing 2. 4 Move the cursor by pressing... 96kHz disc is copy protected, the digital output will automatically switch to stereo mode. 1 In 'AUDIO SETUP PAGE', press 34 to confirm your receiver is only applicable for audio output so that you have activated the upsampling, the player will be converted to reproduce high quality surround...

Owners Manual
Page 31
... to the TV you have a normal TV. If it is not, the setting for watching your favorite action movie without disturbing others at night. 1 In 'AUDIO SETUP PAGE', press 34 to highlight [NIGHT MODE], then press 2. It is only available for selecting the color system that matches the connected TV. TV...
... to the TV you have a normal TV. If it is not, the setting for watching your favorite action movie without disturbing others at night. 1 In 'AUDIO SETUP PAGE', press 34 to highlight [NIGHT MODE], then press 2. It is only available for selecting the color system that matches the connected TV. TV...
