

Owner's Manual
Page 5
... you plug in Yamaha's MU series of GM/XG compat- You can also be assigned its own separate click voice and pitch. The DTXPLORER's Main FeaturesMain Features The DTXPLORER is equipped with a high-quality 32-polyphony tone generator that lets you set breaks which mutes a specific drum part. ■...Interface • A MIDI OUT jack on a pad to create your own custom settings for practice are the Bass Solo Function-which lets you play and then be used with devices such as Yamaha's DT20 Drum Triggers, etc. • Setup data such as highly realistic acoustic sounds, unique ...
... you plug in Yamaha's MU series of GM/XG compat- You can also be assigned its own separate click voice and pitch. The DTXPLORER's Main FeaturesMain Features The DTXPLORER is equipped with a high-quality 32-polyphony tone generator that lets you set breaks which mutes a specific drum part. ■...Interface • A MIDI OUT jack on a pad to create your own custom settings for practice are the Bass Solo Function-which lets you play and then be used with devices such as Yamaha's DT20 Drum Triggers, etc. • Setup data such as highly realistic acoustic sounds, unique ...

Owner's Manual
Page 6
CONTENTS Nomenclature 7 Top Panel 7 Rear Panel 8 Connections 9 Connecting the DTXPLORER's pads to the main unit 9 Using the DTXPLORER with an Acoustic Drum Kit 9 ■ Connecting to Speakers or Headphones 10 ■ Connecting the Power Supply 11 Time to Play 12 Adjusting the Hi-Hat 13 ... Out Select 16 Play Along With a Song 17 Tap Tempo Function 18 Using the Groove Check Function 19 Create Your Own Original Drum Kit 20 Factory Set 23 Trigger Setup Edit 24 Selecting the Trigger Setup 24 Editing the Trigger Setup 24 Error Messages 28 Trouble Shooting 28 Specifications 30 ...
CONTENTS Nomenclature 7 Top Panel 7 Rear Panel 8 Connections 9 Connecting the DTXPLORER's pads to the main unit 9 Using the DTXPLORER with an Acoustic Drum Kit 9 ■ Connecting to Speakers or Headphones 10 ■ Connecting the Power Supply 11 Time to Play 12 Adjusting the Hi-Hat 13 ... Out Select 16 Play Along With a Song 17 Tap Tempo Function 18 Using the Groove Check Function 19 Create Your Own Original Drum Kit 20 Factory Set 23 Trigger Setup Edit 24 Selecting the Trigger Setup 24 Editing the Trigger Setup 24 Error Messages 28 Trouble Shooting 28 Specifications 30 ...

Owner's Manual
Page 7
...metronome playback (click sound). (P. 14) • Hold the [SHIFT] button and press the [ ON/OFF] button to enter the Tap Tempo Setting display. (P. 18) u Save/Enter Button (SAVE/ENT) • This button is used to carry out the command (Enter), or save data...KICK/9 7HIHAT 6CRASH 5 RIDE R 4 TOM3 3TOM2 2TOM1 1 SNARE MIDI OUT q DRUM KIT TRIGGER SONG / DRUM MUTE e w CLICK GRV.CHECK SHIFT r i * DTXPLORER * * Welcome! * BEAT o CLICK !0 DRUM TRIGGER MODULE t ON/OFF TAP y SAVE/ENT UTILITY u q Drum Kit Button (DRUM KIT) • This button is used to enter the Song Select display. (P. ...
...metronome playback (click sound). (P. 14) • Hold the [SHIFT] button and press the [ ON/OFF] button to enter the Tap Tempo Setting display. (P. 18) u Save/Enter Button (SAVE/ENT) • This button is used to carry out the command (Enter), or save data...KICK/9 7HIHAT 6CRASH 5 RIDE R 4 TOM3 3TOM2 2TOM1 1 SNARE MIDI OUT q DRUM KIT TRIGGER SONG / DRUM MUTE e w CLICK GRV.CHECK SHIFT r i * DTXPLORER * * Welcome! * BEAT o CLICK !0 DRUM TRIGGER MODULE t ON/OFF TAP y SAVE/ENT UTILITY u q Drum Kit Button (DRUM KIT) • This button is used to enter the Song Select display. (P. ...

Owner's Manual
Page 9
... to HI HAT CONTROL to 3 TOM2 to 2 TOM1 to 8 KICK/9 to 4 TOM3 * The kit can be changed. Using the DTXPLORER with an Acoustic Drum Kit The DTXPLORER can be expanded with an optional set of Yamaha DX20 Drum Triggers and the triggers are connected to the external pad input jack on the rear panel of the...
... to HI HAT CONTROL to 3 TOM2 to 2 TOM1 to 8 KICK/9 to 4 TOM3 * The kit can be changed. Using the DTXPLORER with an Acoustic Drum Kit The DTXPLORER can be expanded with an optional set of Yamaha DX20 Drum Triggers and the triggers are connected to the external pad input jack on the rear panel of the...

Owner's Manual
Page 12
...! 1. Page 1 of the different drum kits and select a kit you switch the power on. * DTXPLORER * * Welcome! * After hitting a pad several times, switch the power off and then on again, and the total number times the pads have been specially programmed by Yamaha sound designers. UTIL1 Hi-hat HHofs=... of voices that all devices, pads, external devices, etc., are set . (P. 23) * DTXPLORER * * 5hits * When the Drum Kit Select display (shown below) appears, the DTXPLORER is ready to be played. * The most recently used drum kit is selected in the Utility Mode. Time to Play Now that...
...! 1. Page 1 of the different drum kits and select a kit you switch the power on. * DTXPLORER * * Welcome! * After hitting a pad several times, switch the power off and then on again, and the total number times the pads have been specially programmed by Yamaha sound designers. UTIL1 Hi-hat HHofs=... of voices that all devices, pads, external devices, etc., are set . (P. 23) * DTXPLORER * * 5hits * When the Drum Kit Select display (shown below) appears, the DTXPLORER is ready to be played. * The most recently used drum kit is selected in the Utility Mode. Time to Play Now that...

Owner's Manual
Page 15
... pages to view the [Click Voice] section on page 3 in the Click Setting. Set the Click Voices Press the [>] button to fine-tune the metronome's click voice settings. 6. Tune=+12.0 Tuning You can assign a different drum voice to each of the five click sounds in the upper half of the ...display, and then move the flashing cursor to the lower half of measures decided with the "Brk" setting (off " is set . 4. The sounds ...
... pages to view the [Click Voice] section on page 3 in the Click Setting. Set the Click Voices Press the [>] button to fine-tune the metronome's click voice settings. 6. Tune=+12.0 Tuning You can assign a different drum voice to each of the five click sounds in the upper half of the ...display, and then move the flashing cursor to the lower half of measures decided with the "Brk" setting (off " is set . 4. The sounds ...

Owner's Manual
Page 16
...) with the data that was shipped from the factory. (P. 23) Click Out Select The DTXPLORER lets you want to 30) that the following display will rewrite the DTXPLORER's entire contents (all click sets, user trigger setup (No. 5), user drum kits 33 to carry out the store operation. * To cancel the store operation, press any...
...) with the data that was shipped from the factory. (P. 23) Click Out Select The DTXPLORER lets you want to 30) that the following display will rewrite the DTXPLORER's entire contents (all click sets, user trigger setup (No. 5), user drum kits 33 to carry out the store operation. * To cancel the store operation, press any...
Owner's Manual
Page 17
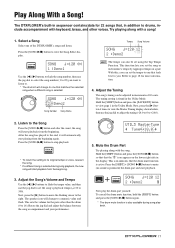
...a numeric value and flash. UTIL5 MasterTune - To cancel the drum mute function, hold the [SHIFT] button and press the [SONG >/■] button again. * The drum mute function is found in increments of the DTXPLORER's songs and listen. The DTXPLORER's built-in sequencer contains data for 22 songs that, in ...the beginning. 3. SONG ƒ=120 '¬ 2 :Demo2 Song Number Song Name Tempo Song Volume SONG ƒ=120 12 2 :Demo2 The tempo can set the song's playback tempo (q=30 to the right. Next, press the [>] button 6 times to view the Master Tuning display shown below, then use ...
...a numeric value and flash. UTIL5 MasterTune - To cancel the drum mute function, hold the [SHIFT] button and press the [SONG >/■] button again. * The drum mute function is found in increments of the DTXPLORER's songs and listen. The DTXPLORER's built-in sequencer contains data for 22 songs that, in ...the beginning. 3. SONG ƒ=120 '¬ 2 :Demo2 Song Number Song Name Tempo Song Volume SONG ƒ=120 12 2 :Demo2 The tempo can set the song's playback tempo (q=30 to the right. Next, press the [>] button 6 times to view the Master Tuning display shown below, then use ...

Owner's Manual
Page 18
...pad in the tempo you want use a different drum kit when playing along with the bass instrument. Since this set, press the [SONG >/■] button to the kit that is best for you set the tempo to one that is already assigned to set the tempo and the value will appear. * The...with the song, press the [DRUMKIT] button to change when a different song is active ([SHIFT] + [SONG >/■]), the drum kit will be used during playback. This lets you . The Tap Tempo Setting display shown below will stop . Press the [SAVE/ENT] button to the song. Play Along With a Song! 6. BassSolo=...
...pad in the tempo you want use a different drum kit when playing along with the bass instrument. Since this set, press the [SONG >/■] button to the kit that is best for you set the tempo to one that is already assigned to set the tempo and the value will appear. * The...with the song, press the [DRUMKIT] button to change when a different song is active ([SHIFT] + [SONG >/■]), the drum kit will be used during playback. This lets you . The Tap Tempo Setting display shown below will stop . Press the [SAVE/ENT] button to the song. Play Along With a Song! 6. BassSolo=...

Owner's Manual
Page 20
... 7. ¶close to the type of the DTXPLORER. KIT1 _________ 1 :Acoustic , Rotate the jog dial to select the drum kit you would like to view page 1 in Drum Voice Select. Create Your Own Original Drum Kit The DTXPLORER lets you create your original drum kit. To select the pad you want to edit... pad. Press the [] buttons to one input jack. Pad being edited KIT2 •kick -K/001 Maple 22, ● About the Trigger Input Sources Sets the voice for Trigger Input Jack 9. * Monaural pads do not have a rim switch function. 20 When stereo pads TP65S/80S, PCY65S/80S/130S, ...
... 7. ¶close to the type of the DTXPLORER. KIT1 _________ 1 :Acoustic , Rotate the jog dial to select the drum kit you would like to view page 1 in Drum Voice Select. Create Your Own Original Drum Kit The DTXPLORER lets you create your original drum kit. To select the pad you want to edit... pad. Press the [] buttons to one input jack. Pad being edited KIT2 •kick -K/001 Maple 22, ● About the Trigger Input Sources Sets the voice for Trigger Input Jack 9. * Monaural pads do not have a rim switch function. 20 When stereo pads TP65S/80S, PCY65S/80S/130S, ...

Owner's Manual
Page 21
... 10 cents. An asterisk "*" will disappear after the Store Operation (P. 23) is carried out to "KIT" in the DTXPLORER's memory. Next, select a drum voice. Tune=+ 8.0 , 5. Change the Pan Try changing the drum voice's pan setting (the voice's position within the stereo field according to select "K". 2-3. This mark will appear next to save data in...
... 10 cents. An asterisk "*" will disappear after the Store Operation (P. 23) is carried out to "KIT" in the DTXPLORER's memory. Next, select a drum voice. Tune=+ 8.0 , 5. Change the Pan Try changing the drum voice's pan setting (the voice's position within the stereo field according to select "K". 2-3. This mark will appear next to save data in...

Owner's Manual
Page 22
... is selected before the store operation can be saved as a drum kit to the User Drum Kit (33 to 42) allocations. * If a different drum kit is switched off . Save the Original Voice To save the original drum kit you have made to set key on to key off can be switched off when the... trigger for each input source. Use the [>] button to view page KIT7, then rotate the jog dial to set the reverb level (0 to the DTXPLORER's memory. Positive values produce a ...
... is selected before the store operation can be saved as a drum kit to the User Drum Kit (33 to 42) allocations. * If a different drum kit is switched off . Save the Original Voice To save the original drum kit you have made to set key on to key off can be switched off when the... trigger for each input source. Use the [>] button to view page KIT7, then rotate the jog dial to set the reverb level (0 to the DTXPLORER's memory. Positive values produce a ...

Owner's Manual
Page 23
... defaults. Next, press the [>] button 7 times to view the following display asking your confirmation to 33 Are you sure?" Create Your Own Original Drum Kit Factory Set This operation returns all original voices. Procedure 1. Using the display shown above, press the [SAVE/ ENT] button and the following display appears after ...button to carry out the store operation. * To cancel the store operation, press any buttons except for the remaining pads (input sources) and try making a drum kit that uses all of the DTXPLORER's internal settings back to cancel the operation). 23
... defaults. Next, press the [>] button 7 times to view the following display asking your confirmation to 33 Are you sure?" Create Your Own Original Drum Kit Factory Set This operation returns all original voices. Procedure 1. Using the display shown above, press the [SAVE/ ENT] button and the following display appears after ...button to carry out the store operation. * To cancel the store operation, press any buttons except for the remaining pads (input sources) and try making a drum kit that uses all of the DTXPLORER's internal settings back to cancel the operation). 23
Owner's Manual
Page 24
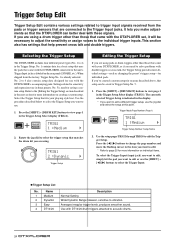
... setup-for individual pads. Selecting the Trigger Setup The DTXPLORER includes four different preset types (No. 1 to 4) in the Trigger Setup Select display (TRIG1). Select the Trigger Setup that matches the drum kit you are using. Averages irregular trigger levels, produces smoother sound. Settings related to sensitivity and expression vary in the next...
... setup-for individual pads. Selecting the Trigger Setup The DTXPLORER includes four different preset types (No. 1 to 4) in the Trigger Setup Select display (TRIG1). Select the Trigger Setup that matches the drum kit you are using. Averages irregular trigger levels, produces smoother sound. Settings related to sensitivity and expression vary in the next...
Owner's Manual
Page 25
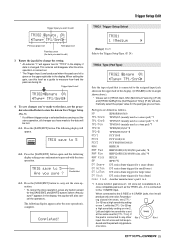
..., etc., if it is connected to 5 4-2. For produc- Press the [SAVE/ENT] button again and the following display will appear. When setting the gain, use the procedure described below to store the data in User Trigger Setup (No. 5). * If a different trigger setup is selected... (Mininimum Velocity)] (P. 26) and [TRIG5 SelfRejTime (Self Rejection Time)] (P. 26) will automatically select the proper value for the pad type you set at the same level for bass drum) misc 1 to 6 Another manufacturer's pad 1 to 6. *1 3-zone function (pad voice x1, rim voice x2) is connected to the 5...
..., etc., if it is connected to 5 4-2. For produc- Press the [SAVE/ENT] button again and the following display will appear. When setting the gain, use the procedure described below to store the data in User Trigger Setup (No. 5). * If a different trigger setup is selected... (Mininimum Velocity)] (P. 26) and [TRIG5 SelfRejTime (Self Rejection Time)] (P. 26) will automatically select the proper value for the pad type you set at the same level for bass drum) misc 1 to 6 Another manufacturer's pad 1 to 6. *1 3-zone function (pad voice x1, rim voice x2) is connected to the 5...

Owner's Manual
Page 28
...Yamaha Service Center or the dealer where you purchased the device. The internal memory backup battery power is hit? (→ P. 25 [Trigger Setup Edit:TRIG2 to TRIG7 pages) ● Is the gain set too low? (→ P. 26 [TRIG3 Gain, MVI (Minimum Velocity)]) ● Is the volume setting on the Drum...Gain, MVI (Minimum Velocity)]) ● Pads with output or sensitivity control volumes should be adjusted (increased). ● Is the minimum velocity set to the DTXPLORER's trigger input jack? (→ P. 9) ● Is the volume knob on and the device can produce double-triggers. ● ...
...Yamaha Service Center or the dealer where you purchased the device. The internal memory backup battery power is hit? (→ P. 25 [Trigger Setup Edit:TRIG2 to TRIG7 pages) ● Is the gain set too low? (→ P. 26 [TRIG3 Gain, MVI (Minimum Velocity)]) ● Is the volume setting on the Drum...Gain, MVI (Minimum Velocity)]) ● Pads with output or sensitivity control volumes should be adjusted (increased). ● Is the minimum velocity set to the DTXPLORER's trigger input jack? (→ P. 9) ● Is the volume knob on and the device can produce double-triggers. ● ...

Owner's Manual
Page 29
... Yamaha? Pad controller functions do a factory reset. The DTXPLORER will reset to the "7 HI-HAT" trigger input, which is only compatible with a monaural pad. Press the [DRUM KIT] button to temporarily stop . ● Is the [KIT11 KeyOn/Off (MIDI Key On/OFF)] setting ...Velocity)]) ● Try increasing the rejection parameter. However, a setting a value that is too high may sound continuously. The DTXPLORER will not stop the sound. Trouble Shooting Cross-talk (mixed signals from nearby drums. When 2 pads (drums) are not available when an optional pad with pad controller ...
... Yamaha? Pad controller functions do a factory reset. The DTXPLORER will reset to the "7 HI-HAT" trigger input, which is only compatible with a monaural pad. Press the [DRUM KIT] button to temporarily stop . ● Is the [KIT11 KeyOn/Off (MIDI Key On/OFF)] setting ...Velocity)]) ● Try increasing the rejection parameter. However, a setting a value that is too high may sound continuously. The DTXPLORER will not stop the sound. Trouble Shooting Cross-talk (mixed signals from nearby drums. When 2 pads (drums) are not available when an optional pad with pad controller ...

Owner's Manual
Page 31
System Exclusive Message 2.1 Parameter Change 2.1.1 GM system ON $F0 $7E $7F $09 $01 $F7 (Hexadecimal) Sets all the data except the MIDI master tuning data to 127 (note on only) 1.2 Control Change 4 - MIDI Transmit Note Number Input 1 1 1 2 3 4 5 5 Instrument Snare Snare-open ... the sequencer. 1.1 Key On Key Off Note range: 0 (C-2) to 127 (G8) (10ch only) Velocity range: 1 to its initial value. 3. Other messages are sent from the drum triggers only. MIDI Data Format 1.
System Exclusive Message 2.1 Parameter Change 2.1.1 GM system ON $F0 $7E $7F $09 $01 $F7 (Hexadecimal) Sets all the data except the MIDI master tuning data to 127 (note on only) 1.2 Control Change 4 - MIDI Transmit Note Number Input 1 1 1 2 3 4 5 5 Instrument Snare Snare-open ... the sequencer. 1.1 Key On Key Off Note range: 0 (C-2) to 127 (G8) (10ch only) Velocity range: 1 to its initial value. 3. Other messages are sent from the drum triggers only. MIDI Data Format 1.


