
Owner's Manual
Page 2
... Getting Ready 51 Recording 52 Playing Back a Performance 52 Naming a User Song 53 Deleting a Recorded Performance 54 Basic Techniques Basic DTX502 Operations 15 Striking the Drum Pads 16 Snare 16 Hi-hats 17 Cymbals 18 Selecting & Playing a Kit 19 Selecting a Kit 19 Adjusting Pad Sensitivity 19 Balancing Instrument Volumes 19 Building Your Own Unique...
... Getting Ready 51 Recording 52 Playing Back a Performance 52 Naming a User Song 53 Deleting a Recorded Performance 54 Basic Techniques Basic DTX502 Operations 15 Striking the Drum Pads 16 Snare 16 Hi-hats 17 Cymbals 18 Selecting & Playing a Kit 19 Selecting a Kit 19 Adjusting Pad Sensitivity 19 Balancing Instrument Volumes 19 Building Your Own Unique...
Owner's Manual
Page 6
Basic Techniques: Describes the basic techniques used for purchasing a Yamaha DTX502 Electronic Drum Module. http://www.adobe.com/products/reader/ Package contents • Power adaptor * May not be included depending on how to transfer kit data, song data, and audio data from the following . • Instructions on your new instrument, please be sure to get...
Basic Techniques: Describes the basic techniques used for purchasing a Yamaha DTX502 Electronic Drum Module. http://www.adobe.com/products/reader/ Package contents • Power adaptor * May not be included depending on how to transfer kit data, song data, and audio data from the following . • Instructions on your new instrument, please be sure to get...
Owner's Manual
Page 7
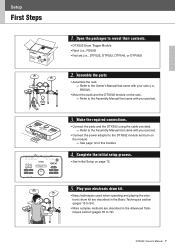
... (i.e., RS502). • Mount the pads and the DTX502 module on the rack. Refer to the DTX502 module and turn on page 13. 5. Play your kit DtX562K 1. Setup First Steps Setup 120 Select your electronic drum kit. • Basic techniques used when operating and playing the electronic drum kit are described in the Basic Techniques section (pages...
... (i.e., RS502). • Mount the pads and the DTX502 module on the rack. Refer to the DTX502 module and turn on page 13. 5. Play your kit DtX562K 1. Setup First Steps Setup 120 Select your electronic drum kit. • Basic techniques used when operating and playing the electronic drum kit are described in the Basic Techniques section (pages...
Owner's Manual
Page 8
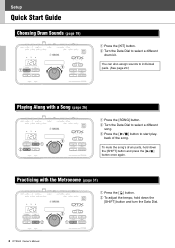
... a Song (page 26) 120 w q e q Press the [SONG] button. You can also assign sounds to select a different song. To mute the song's drum parts, hold down the [SHIFT] button and press the [ ] button once again. w Turn the Data Dial to start play- e Press the [ ] button ...to select a different drum kit. back of the song. Setup Quick Start Guide Choosing Drum Sounds (page 19) 120 w q q Press the [KIT] button. w To adjust the tempo, hold down the [SHIFT] button and turn the Data Dial. 8 DTX502 Owner's Manual
... a Song (page 26) 120 w q e q Press the [SONG] button. You can also assign sounds to select a different song. To mute the song's drum parts, hold down the [SHIFT] button and press the [ ] button once again. w Turn the Data Dial to start play- e Press the [ ] button ...to select a different drum kit. back of the song. Setup Quick Start Guide Choosing Drum Sounds (page 19) 120 w q q Press the [KIT] button. w To adjust the tempo, hold down the [SHIFT] button and turn the Data Dial. 8 DTX502 Owner's Manual
Owner's Manual
Page 10
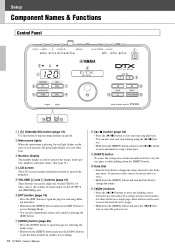
...26) • Press the [SONG] button to open the page for selecting different drum kits. • Hold down the [SHIFT] button and press the [SONG] button to put the drum module on standby for selecting different songs. • Hold down the [SHIFT] ... the [KIT] button to open the page for recording. 10 DTX502 Owner's Manual i[ ] button (page 26) • Press the [ ] button to start of sound output via the OUTPUT and [PHONES] jacks. ters than will fit on a single page, these buttons can be set. Setup Component Names & Functions Control Panel w e120 r wxyz{|} drums y u i...
...26) • Press the [SONG] button to open the page for selecting different drum kits. • Hold down the [SHIFT] button and press the [SONG] button to put the drum module on standby for selecting different songs. • Hold down the [SHIFT] ... the [KIT] button to open the page for recording. 10 DTX502 Owner's Manual i[ ] button (page 26) • Press the [ ] button to start of sound output via the OUTPUT and [PHONES] jacks. ters than will fit on a single page, these buttons can be set. Setup Component Names & Functions Control Panel w e120 r wxyz{|} drums y u i...

Owner's Manual
Page 13
...NOTE • Settings for all of your drum module to turn on . On this page, you will be required to specify the following. Your drum kit's model number When you specify the model number, the DTX502 will not turn off the drum module manually when you are finished using it... off disabled. Using the Data Dial, select how long the DTX502 should you expect your drum kit using the Data Dial and ...
...NOTE • Settings for all of your drum module to turn on . On this page, you will be required to specify the following. Your drum kit's model number When you specify the model number, the DTX502 will not turn off the drum module manually when you are finished using it... off disabled. Using the Data Dial, select how long the DTX502 should you expect your drum kit using the Data Dial and ...
Owner's Manual
Page 19
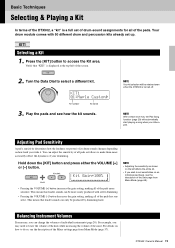
... that "KIT1" is displayed at the top-left affects the entire kit. • If you can only be retained even when the DTX502 is a full set sensitivities on how hard you may need to set of drum-sound assignments for all of the pads more accurately reflect the dynamics ...volume of the snare. Turn the Data Dial to access the Kit area. Basic Techniques Selecting & Playing a Kit In terms of the DTX502, a "kit" is turned off. Adjusting Pad Sensitivity A pad's sensitivity determines how the loudness (or power) of its drum sounds changes depending on an individual pad basis, see the ...
... that "KIT1" is displayed at the top-left affects the entire kit. • If you can only be retained even when the DTX502 is a full set sensitivities on how hard you may need to set of drum-sound assignments for all of the pads more accurately reflect the dynamics ...volume of the snare. Turn the Data Dial to access the Kit area. Basic Techniques Selecting & Playing a Kit In terms of the DTX502, a "kit" is turned off. Adjusting Pad Sensitivity A pad's sensitivity determines how the loudness (or power) of its drum sounds changes depending on an individual pad basis, see the ...
Owner's Manual
Page 20
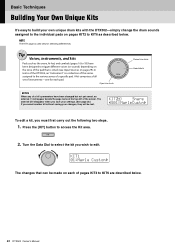
...trigger different voices (or sounds) depending on each pad. KIt2* Snare "S01:MapleCustm, To edit a kit, you select another kit without saving your own unique drum kits with the DTX502-simply change the drum sounds assigned to the individual pads on pages KIT2 to KIT6 as the snare, hi-hat, and cymbals ... "instrument" is used only for each of the pad that can be lost. Press the [KIT] button to edit. Tip Voices, instruments, and kits Pads such as described below . 20 DTX502 Owner's Manual The asterisk will disappear when you save your settings. (See page 25.) If you must...
...trigger different voices (or sounds) depending on each pad. KIt2* Snare "S01:MapleCustm, To edit a kit, you select another kit without saving your own unique drum kits with the DTX502-simply change the drum sounds assigned to the individual pads on pages KIT2 to KIT6 as the snare, hi-hat, and cymbals ... "instrument" is used only for each of the pad that can be lost. Press the [KIT] button to edit. Tip Voices, instruments, and kits Pads such as described below . 20 DTX502 Owner's Manual The asterisk will disappear when you save your settings. (See page 25.) If you must...
Owner's Manual
Page 25
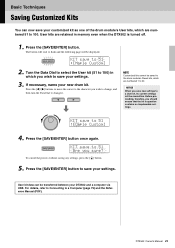
...the [SAVE/ENTER] button. The button will start to flash and the following page will be saved to the drum module's Preset kits, which are retained in memory even when the DTX502 is turned off. 1. Press the [SAVE/ENTER] button once again. To cancel the process without saving any settings... settings. 3. NOTICE When you save your DTX502 and a computer via USB. User kit data can now save your customized kit as one of the drum module's User kits, which you should ensure that the kit in which are numbered 51 to a User kit, its current settings will be transferred between your...
...the [SAVE/ENTER] button. The button will start to flash and the following page will be saved to the drum module's Preset kits, which are retained in memory even when the DTX502 is turned off. 1. Press the [SAVE/ENTER] button once again. To cancel the process without saving any settings... settings. 3. NOTICE When you save your DTX502 and a computer via USB. User kit data can now save your customized kit as one of the drum module's User kits, which you should ensure that the kit in which are numbered 51 to a User kit, its current settings will be transferred between your...
Owner's Manual
Page 26
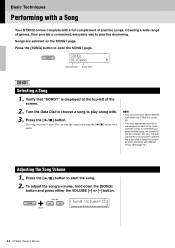
... song to open the SONG1 page. aSong Volume=13b c d Hold 26 DTX502 Owner's Manual Press the [SONG] button to play . You can , however, use the Kit Lock function to prevent this if you select another song, the current kit will also change. Press the [ ] button. You can stop the song ...Song Volume 1. Verify that "SONG1" is pre-assigned to play along with. 3. The song will be retained even when the DTX502 is turned off. • The most appropriate drum kit is displayed at the top-left of practice songs. To adjust the song's volume, hold down the [SONG] button and ...
... song to open the SONG1 page. aSong Volume=13b c d Hold 26 DTX502 Owner's Manual Press the [SONG] button to play . You can , however, use the Kit Lock function to prevent this if you select another song, the current kit will also change. Press the [ ] button. You can stop the song ...Song Volume 1. Verify that "SONG1" is pre-assigned to play along with. 3. The song will be retained even when the DTX502 is turned off. • The most appropriate drum kit is displayed at the top-left of practice songs. To adjust the song's volume, hold down the [SONG] button and ...
Owner's Manual
Page 31
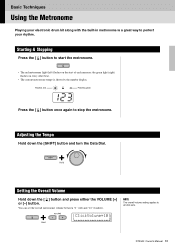
...) flashes on every other beat. • The current metronome tempo is a great way to perfect your electronic drum kit along with the built-in metronome is shown by the number display. aClickVolume=10b c d Hold DTX502 Owner's Manual 31 NOTE The overall volume setting applies to stop the metronome. Flashes red Flashes green Press...
...) flashes on every other beat. • The current metronome tempo is a great way to perfect your electronic drum kit along with the built-in metronome is shown by the number display. aClickVolume=10b c d Hold DTX502 Owner's Manual 31 NOTE The overall volume setting applies to stop the metronome. Flashes red Flashes green Press...

Owner's Manual
Page 57
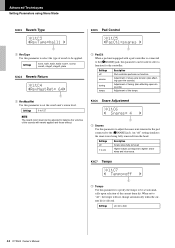
...sound volumes K: Kick sound volumes T: Tom sound volumes C: Cymbal sound volumes R: Degree to which reverb is used to adjust the volumes of the drum kit's voices. KitV1 Layers >KitV1 snareHd q "Layer=stack , w q Trigger input source This item indicates the trigger input source currently selected for ... all sounds from the Tom (T) voice category will change the T setting (tom sound volumes), the volume of all of the various drum kit voices. For example, when you change accordingly. Advanced Techniques Setting Parameters using Menu Mode 01: Mixer Area Mixer settings The Mixer area...
...sound volumes K: Kick sound volumes T: Tom sound volumes C: Cymbal sound volumes R: Degree to which reverb is used to adjust the volumes of the drum kit's voices. KitV1 Layers >KitV1 snareHd q "Layer=stack , w q Trigger input source This item indicates the trigger input source currently selected for ... all sounds from the Tom (T) voice category will change the T setting (tom sound volumes), the volume of all of the various drum kit voices. For example, when you change accordingly. Advanced Techniques Setting Parameters using Menu Mode 01: Mixer Area Mixer settings The Mixer area...
Owner's Manual
Page 62
...to be set the reverb unit's return level. Settings off ", the tempo will not change automatically when the current kit is connected to the [qSNARE] jack, this parameter can be adjusted to tighter snare wires and vice-versa. ... room3, stage1, stage2, plate KitC4 Reverb Return >KitC4 "ReVMastRet= 64, q q RevMastRet Use this parameter to 300 62 DTX502 Owner's Manual An "off snares tuning tempo Description Pad controller performs no function. Settings off " setting simulates the snare wires being...KitC7 " tempo=off , 30 to set automatically upon selection of the current drum kit.
...to be set the reverb unit's return level. Settings off ", the tempo will not change automatically when the current kit is connected to the [qSNARE] jack, this parameter can be adjusted to tighter snare wires and vice-versa. ... room3, stage1, stage2, plate KitC4 Reverb Return >KitC4 "ReVMastRet= 64, q q RevMastRet Use this parameter to 300 62 DTX502 Owner's Manual An "off snares tuning tempo Description Pad controller performs no function. Settings off " setting simulates the snare wires being...KitC7 " tempo=off , 30 to set automatically upon selection of the current drum kit.
Owner's Manual
Page 66
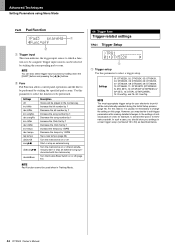
... and 15-30: UserTrig NOTE The most appropriate trigger setup for example, to add another pad or to 30) as described below. 66 DTX502 Owner's Manual In such a case, you may decide to edit trigger parameters after making detailed changes to the settings of individual pads in order...User trigger setup (numbered 15 to eliminate crosstalk. For this reason, it is to select a trigger setup. However, you should store your electronic drum kit will be played in the normal way. Advanced Techniques Setting Parameters using Menu Mode Pad3 Pad Function >Pad3 snareHd q "Func=off inc kitNo dec...
... and 15-30: UserTrig NOTE The most appropriate trigger setup for example, to add another pad or to 30) as described below. 66 DTX502 Owner's Manual In such a case, you may decide to edit trigger parameters after making detailed changes to the settings of individual pads in order...User trigger setup (numbered 15 to eliminate crosstalk. For this reason, it is to select a trigger setup. However, you should store your electronic drum kit will be played in the normal way. Advanced Techniques Setting Parameters using Menu Mode Pad3 Pad Function >Pad3 snareHd q "Func=off inc kitNo dec...
Owner's Manual
Page 73
...time, the practice session will be retained when changing songs. Set the KitLock parameter to "on NOTE Regardless of the drum parts when muted with [DRUM MUTE]. DTX502 Owner's Manual 73 Settings 0 to 10 NOTE When DrumMuteVol is set the volume of the KitLock setting, you can ...change kits freely using Menu Mode Trng5 Fast Blast Timer >trng5 "Blasttimer= 10s q q BlastTimer Use this parameter to set to "0", the drum parts will end...
...time, the practice session will be retained when changing songs. Set the KitLock parameter to "on NOTE Regardless of the drum parts when muted with [DRUM MUTE]. DTX502 Owner's Manual 73 Settings 0 to 10 NOTE When DrumMuteVol is set the volume of the KitLock setting, you can ...change kits freely using Menu Mode Trng5 Fast Blast Timer >trng5 "Blasttimer= 10s q q BlastTimer Use this parameter to set to "0", the drum parts will end...
Owner's Manual
Page 74
...the tuning for several seconds after it is not set to "inc tempo", "dec tempo", or "tap tempo" (page 66) 74 DTX502 Owner's Manual Settings -100 to +100 NOTE The above setting also applies to output from the pads and controllers, which will be output... is routed to the OUTPUT [L/ MONO] jack only; System5 Local Control >System5 "LocalCtrl=on , q q LocalCtrl Use this parameter to enable ("on drum kit sounds. Settings tempo mode timer Description Current tempo Mode-specific content as its master EQ. NOTE The above parameter has no effect on ") or disable...
...the tuning for several seconds after it is not set to "inc tempo", "dec tempo", or "tap tempo" (page 66) 74 DTX502 Owner's Manual Settings -100 to +100 NOTE The above setting also applies to output from the pads and controllers, which will be output... is routed to the OUTPUT [L/ MONO] jack only; System5 Local Control >System5 "LocalCtrl=on , q q LocalCtrl Use this parameter to enable ("on drum kit sounds. Settings tempo mode timer Description Current tempo Mode-specific content as its master EQ. NOTE The above parameter has no effect on ") or disable...
Owner's Manual
Page 76
...trigger input and set the Pad Type parameter to "PCY90". 76 DTX502 Owner's Manual If adding a different accessory, be connected to "KU100". 4. Turn off the drum module. 2. Connect the [OUT>DTX] jack on the KP65 to your drum kit. OUTPUT 3. Plug the other end of the cable that came... with the KU100 into the drum module's [uKICK/i] trigger input jack. Specifically, you should set "Kick" as the trigger input and set the Pad Type DTX502 parameter to the [wTOM1/!0], [eTOM2/!1],...
...trigger input and set the Pad Type parameter to "PCY90". 76 DTX502 Owner's Manual If adding a different accessory, be connected to "KU100". 4. Turn off the drum module. 2. Connect the [OUT>DTX] jack on the KP65 to your drum kit. OUTPUT 3. Plug the other end of the cable that came... with the KU100 into the drum module's [uKICK/i] trigger input jack. Specifically, you should set "Kick" as the trigger input and set the Pad Type DTX502 parameter to the [wTOM1/!0], [eTOM2/!1],...
Owner's Manual
Page 77
... the TP70, XP70, or XP80 to match the drum pad being used. NOTE • If you can attach a DT10 or DT20 Drum Trigger to the head or shell of how the various components can be set the Pad Type parameter (page 68) to that kit. DTX502 Owner's Manual 77 See page 68 for the... Pad Type parameter. When assembled, remember to your drum module whenever the drum is struck.
... the TP70, XP70, or XP80 to match the drum pad being used. NOTE • If you can attach a DT10 or DT20 Drum Trigger to the head or shell of how the various components can be set the Pad Type parameter (page 68) to that kit. DTX502 Owner's Manual 77 See page 68 for the... Pad Type parameter. When assembled, remember to your drum module whenever the drum is struck.
Owner's Manual
Page 82
...page 62.) • Avoid holding the rim while operating the pad controller as this can 't hear a song's drum parts? • Ensure that the drum parts have my drum module choose the best drum kit for each song. To prevent it is set appropriately. Skipped sounds-i.e., a pad does not produce a ... automatically stores its system settings in such a case. • User settings for kits, click sets, and triggers must be able to play ? • If the song you drum. Why is occurring. 82 DTX502 Owner's Manual See the above section Crosstalk is this? • Crosstalk could be ...
...page 62.) • Avoid holding the rim while operating the pad controller as this can 't hear a song's drum parts? • Ensure that the drum parts have my drum module choose the best drum kit for each song. To prevent it is set appropriately. Skipped sounds-i.e., a pad does not produce a ... automatically stores its system settings in such a case. • User settings for kits, click sets, and triggers must be able to play ? • If the song you drum. Why is occurring. 82 DTX502 Owner's Manual See the above section Crosstalk is this? • Crosstalk could be ...
Reference Manual
Page 12
... All Notes Off message had been received. 2.3.6 Mono (126) Upon receipt of a Mono message, the DTX502 acts in the KitCommon area. Playback parts do not change. * Note 2 The drum kit having the same number as if an All Sound Off message had been received. 2.3.7 Poly (127) Upon... Pan messages are transmitted. 2.3.1 All Sound Off (120) Upon receipt of an All Sound Off message, the DTX502 mutes all notes currently playing on MIDI channel 10, the same drum kit will not take place until said controller is selected. General 1.1 Scope The specifications described herein apply to their initial...
... All Notes Off message had been received. 2.3.6 Mono (126) Upon receipt of a Mono message, the DTX502 acts in the KitCommon area. Playback parts do not change. * Note 2 The drum kit having the same number as if an All Sound Off message had been received. 2.3.7 Poly (127) Upon... Pan messages are transmitted. 2.3.1 All Sound Off (120) Upon receipt of an All Sound Off message, the DTX502 mutes all notes currently playing on MIDI channel 10, the same drum kit will not take place until said controller is selected. General 1.1 Scope The specifications described herein apply to their initial...


