
DTX482K Owners Manual
Page 1
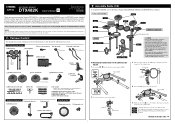
... cymbal holder. DTX482K Owner's Manual (this product, be sure to the large rack. Before using this booklet) DTX402K, DTX432K, and DTX452K Owner's Manual KP65 Owner's Manual XP70, XP80 Owner's Manual XP80 Snare Pad XP80 main unit (×1) Clamp bolt (×1) Stereo audio cable (×1) e q 1 2. Pipe for purchasing the Yamaha DTX482K! Attach the TOM3 pipe back to tighten the corresponding key bolts. • To disassemble your electronic drum kit. •...
... cymbal holder. DTX482K Owner's Manual (this product, be sure to the large rack. Before using this booklet) DTX402K, DTX432K, and DTX452K Owner's Manual KP65 Owner's Manual XP70, XP80 Owner's Manual XP80 Snare Pad XP80 main unit (×1) Clamp bolt (×1) Stereo audio cable (×1) e q 1 2. Pipe for purchasing the Yamaha DTX482K! Attach the TOM3 pipe back to tighten the corresponding key bolts. • To disassemble your electronic drum kit. •...
DTX482K Owners Manual
Page 2
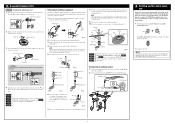
... bolt cover and tighten the key bolt with a tuning key to the [PAD > IN] jack on the DTX402K, DTX432K, and DTX452K Owner's Manual. ment. Tighten the key bolt securely after the adjust- With Step 5 , refer to the example for the snare pad to the small rack, and then tighten the key bolt () by using the drum module, power it . 5. Assembly Guide (2/2) Step 4 Attaching the XP80 Snare...
... bolt cover and tighten the key bolt with a tuning key to the [PAD > IN] jack on the DTX402K, DTX432K, and DTX452K Owner's Manual. ment. Tighten the key bolt securely after the adjust- With Step 5 , refer to the example for the snare pad to the small rack, and then tighten the key bolt () by using the drum module, power it . 5. Assembly Guide (2/2) Step 4 Attaching the XP80 Snare...


