

DTX402K/DTX432K/DTX452K Owners Manual
Page 7
... and foot pedals as a lubricant, which in use excessive force on the rack. Yamaha cannot be damaged if the instrument is not taken during electrical storms. Assembly •... 2/2 DTX402K DTX432K DTX452K Owner's Manual 5 In order to avoid injury, therefore, you or others , or damage to other property. If this can damage it , use the electronic drum kit's rack to ...not connect the instrument to injury. • Mind your clothes when carrying or setting up them . • When setting up cables. Pulling by sharp tips if these components. • Securely tighten fixing...
... and foot pedals as a lubricant, which in use excessive force on the rack. Yamaha cannot be damaged if the instrument is not taken during electrical storms. Assembly •... 2/2 DTX402K DTX432K DTX452K Owner's Manual 5 In order to avoid injury, therefore, you or others , or damage to other property. If this can damage it , use the electronic drum kit's rack to ...not connect the instrument to injury. • Mind your clothes when carrying or setting up them . • When setting up cables. Pulling by sharp tips if these components. • Securely tighten fixing...
DTX402K/DTX432K/DTX452K Owners Manual
Page 9
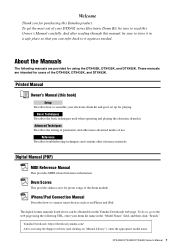
... MIDI-related reference information. DTX402K DTX432K DTX452K Owner's Manual 7 iPhone/iPad Connection Manual Describes how to the web page using the DTX402K, DTX432K, and DTX452K. About the Manuals The following URL, enter your DTX402 series Electronic Drum Kit, be sure to read this... for playing. Welcome Thank you can be obtained from the Yamaha Downloads web page. Basic Techniques Describes the basic techniques used when operating and playing the electronic drum kit. Advanced Techniques Describes the setting of parameters and other reference materials. To get it in ...
... MIDI-related reference information. DTX402K DTX432K DTX452K Owner's Manual 7 iPhone/iPad Connection Manual Describes how to the web page using the DTX402K, DTX432K, and DTX452K. About the Manuals The following URL, enter your DTX402 series Electronic Drum Kit, be sure to read this... for playing. Welcome Thank you can be obtained from the Yamaha Downloads web page. Basic Techniques Describes the basic techniques used when operating and playing the electronic drum kit. Advanced Techniques Describes the setting of parameters and other reference materials. To get it in ...

DTX402K/DTX432K/DTX452K Owners Manual
Page 22
No sound will be placed differently from being pulled out. Congratulations-You have finished assembling your electronic drum kit! Wrap the cables for the snare pads, the tom pads, and the cymbal/hi-hat pads around the cord clip. 4. Using the cable bands, ... the kit rack at the positions in the DTX432K and DTX452K, use the OUT>DTX jack. Right-handed Left-handed 20 DTX402K DTX432K DTX452K Owner's Manual Setup Assembly Guide Step 14 Connecting the pads to KICK/ PAD) on the drum module. (*: The smaller set of the joints should be played when the PAD>IN...
No sound will be placed differently from being pulled out. Congratulations-You have finished assembling your electronic drum kit! Wrap the cables for the snare pads, the tom pads, and the cymbal/hi-hat pads around the cord clip. 4. Using the cable bands, ... the kit rack at the positions in the DTX432K and DTX452K, use the OUT>DTX jack. Right-handed Left-handed 20 DTX402K DTX432K DTX452K Owner's Manual Setup Assembly Guide Step 14 Connecting the pads to KICK/ PAD) on the drum module. (*: The smaller set of the joints should be played when the PAD>IN...
DTX402K/DTX432K/DTX452K Owners Manual
Page 51
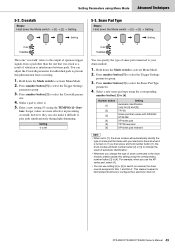
... Snare Pad Type parameter. 4. This makes it . 5. Press number button [2] to configure their electronic drum kit. Hold down the Mode switch [5] [3] Setting Setting The term "crosstalk" refers to the output of spurious trigger signals from occurring. 1. Press number button... during light drumming. Hold down the Mode switch [5] [2] Setting Setting 5-3. For example, when you change the type of snare pad that comes with your drum module. 1. Press number button [3] to Rim 1 and Rim 2. DTX402K DTX432K DTX452K Owner's Manual...
... Snare Pad Type parameter. 4. This makes it . 5. Press number button [2] to configure their electronic drum kit. Hold down the Mode switch [5] [3] Setting Setting The term "crosstalk" refers to the output of spurious trigger signals from occurring. 1. Press number button... during light drumming. Hold down the Mode switch [5] [2] Setting Setting 5-3. For example, when you change the type of snare pad that comes with your drum module. 1. Press number button [3] to Rim 1 and Rim 2. DTX402K DTX432K DTX452K Owner's Manual...
DTX402K/DTX432K/DTX452K Owners Manual
Page 52
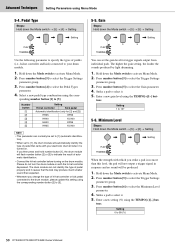
... may produce much smaller sound than this setting using the TEMPO[+]/[-] but - The higher the gain setting, the louder the sounds produced by light drumming. 1. Strike a pad to your electronic drum kit when it is turned on. If...DTX452K Owner's Manual Gain Steps: Hold down the Mode switch [5] [6] Setting Setting When the strength with which you then press and hold number button [1], the drum module will be set to 127 5-6. tons. Setting 0 to select the Minimum Level parameter. 4. Setting 1 to [1] (automatic identification). • When set...
... may produce much smaller sound than this setting using the TEMPO[+]/[-] but - The higher the gain setting, the louder the sounds produced by light drumming. 1. Strike a pad to your electronic drum kit when it is turned on. If...DTX452K Owner's Manual Gain Steps: Hold down the Mode switch [5] [6] Setting Setting When the strength with which you then press and hold number button [1], the drum module will be set to 127 5-6. tons. Setting 0 to select the Minimum Level parameter. 4. Setting 1 to [1] (automatic identification). • When set...
DTX402K/DTX432K/DTX452K Owners Manual
Page 59
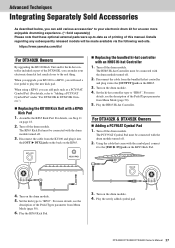
...using a KP65, you can make your electronic drum kit feel much closer to the real thing. Disconnect the cable from Menu Mode (page 50). 5. For DTX432K & DTX452K Owners Adding a PCY95AT Cymbal ...OUTPUT] jack on the HH65. 3. Disconnect the cable from Menu Mode (page 50). 6. Set the kick type to "HH65". For details, see the description of the DTX402K, you can...electronic drum kit for an even more enjoyable drumming experience. (*: Sold separately) Please note that came with the cymbal pad, connect it to the [PAD > IN] jack on the KP65 Kick Pad. 4. https://www.yamaha...
...using a KP65, you can make your electronic drum kit feel much closer to the real thing. Disconnect the cable from Menu Mode (page 50). 5. For DTX432K & DTX452K Owners Adding a PCY95AT Cymbal ...OUTPUT] jack on the HH65. 3. Disconnect the cable from Menu Mode (page 50). 6. Set the kick type to "HH65". For details, see the description of the DTX402K, you can...electronic drum kit for an even more enjoyable drumming experience. (*: Sold separately) Please note that came with the cymbal pad, connect it to the [PAD > IN] jack on the KP65 Kick Pad. 4. https://www.yamaha...
DTX402K/DTX432K/DTX452K Owners Manual
Page 70
...Drum Shells, Finish, Drum Hardware, Freestanding Hardware, Pedals, Hardware Accessories Electronic Drums Modules, Pads, Accessories, Hardware, Pedals 5 Years 1 Year Coverage: YAMAHA will be performed using new or refurbished parts that meet or exceed YAMAHA...Yamaha Corporation of Purchase by the warranty. Type of Damages: ANY IMPLIED WARRANTIES, INCLUDING WARRANTIES OF MERCHANTABILITY AND FITNESS FOR A PARTICULAR PURPOSE SHALL BE LIMITED IN DURATION TO THE APPLICABLE PERIOD OF TIME SET... (Interference/noise) caused by YAMAHA. 68 DTX402K DTX432K DTX452K Owner's Manual Warranty Term Duration...
...Drum Shells, Finish, Drum Hardware, Freestanding Hardware, Pedals, Hardware Accessories Electronic Drums Modules, Pads, Accessories, Hardware, Pedals 5 Years 1 Year Coverage: YAMAHA will be performed using new or refurbished parts that meet or exceed YAMAHA...Yamaha Corporation of Purchase by the warranty. Type of Damages: ANY IMPLIED WARRANTIES, INCLUDING WARRANTIES OF MERCHANTABILITY AND FITNESS FOR A PARTICULAR PURPOSE SHALL BE LIMITED IN DURATION TO THE APPLICABLE PERIOD OF TIME SET... (Interference/noise) caused by YAMAHA. 68 DTX402K DTX432K DTX452K Owner's Manual Warranty Term Duration...


