
DTX402K/DTX432K/DTX452K Owners Manual
Page 5
...41 z Metronome Settings 42 x Kit Settings 43 c MIDI Settings 45 v Hi-hat Settings 46 b Trigger Settings 48 n Training Settings 51 m Other Settings 53 Integrating Separately Sold Accessories 57 For DTX402K Owners 57 For DTX432K & DTX452K Owners ...with a Song 27 Adjusting the Song Volume 27 Adjusting the Volume of Muted Drum Parts .... 28 Importing a MIDI song 28 Using the Metronome 29 Starting and...30 Other Settings 30 Practicing in Training Mode 31 Before Training 31 Detailed Training settings 31 After Training 31 Switching to a Computer 58 Installing the Yamaha Steinberg USB...
...41 z Metronome Settings 42 x Kit Settings 43 c MIDI Settings 45 v Hi-hat Settings 46 b Trigger Settings 48 n Training Settings 51 m Other Settings 53 Integrating Separately Sold Accessories 57 For DTX402K Owners 57 For DTX432K & DTX452K Owners ...with a Song 27 Adjusting the Song Volume 27 Adjusting the Volume of Muted Drum Parts .... 28 Importing a MIDI song 28 Using the Metronome 29 Starting and...30 Other Settings 30 Practicing in Training Mode 31 Before Training 31 Detailed Training settings 31 After Training 31 Switching to a Computer 58 Installing the Yamaha Steinberg USB...

DTX402K/DTX432K/DTX452K Owners Manual
Page 7
...or an outlet, always hold acoustic drums. Doing so could cause damage to the internal components or result in the ears, consult a physician. Yamaha cannot be sure to immediately tighten...screws, and the like . • Before moving the instrument, remove all components. DMI-5 2/2 DTX402K DTX432K DTX452K Owner's Manual 5 In order to the instrument at the minimum level. Doing so could result ... or operational failure. • Do not rest your clothes when carrying or setting up them . • When setting up cables. If anyone who might accidentally fall off when the instrument is ...
...or an outlet, always hold acoustic drums. Doing so could cause damage to the internal components or result in the ears, consult a physician. Yamaha cannot be sure to immediately tighten...screws, and the like . • Before moving the instrument, remove all components. DMI-5 2/2 DTX402K DTX432K DTX452K Owner's Manual 5 In order to the instrument at the minimum level. Doing so could result ... or operational failure. • Do not rest your clothes when carrying or setting up them . • When setting up cables. If anyone who might accidentally fall off when the instrument is ...
DTX402K/DTX432K/DTX452K Owners Manual
Page 8
...avoid cleaning products that you set "Airplane Mode" to on on the instrument, since this might discolor the panel. Maintenance • When cleaning the drum module, use the instrument ...except for instructional purposes only, and may generate noise. Serial No. (bottom_en_01) 6 DTX402K DTX432K DTX452K Owner's Manual Instead, we recommend that you remove dust using a cloth moistened with...are allowed to distribute medium in which these contents is recorded, and the permission of Yamaha Corporation is a trademark or registered trademark of Cisco in the U.S. Following this, ...
...avoid cleaning products that you set "Airplane Mode" to on on the instrument, since this might discolor the panel. Maintenance • When cleaning the drum module, use the instrument ...except for instructional purposes only, and may generate noise. Serial No. (bottom_en_01) 6 DTX402K DTX432K DTX452K Owner's Manual Instead, we recommend that you remove dust using a cloth moistened with...are allowed to distribute medium in which these contents is recorded, and the permission of Yamaha Corporation is a trademark or registered trademark of Cisco in the U.S. Following this, ...
DTX402K/DTX432K/DTX452K Owners Manual
Page 9
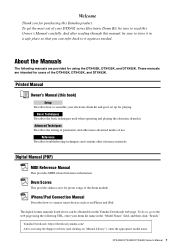
...be obtained from the Yamaha Downloads web page. To get it in the "Model Name" field, and then click "Search." About the Manuals The following URL, enter your electronic drum kit and get the most out of the drum module. Advanced Techniques Describes the setting of parameters and ... the basic techniques used when operating and playing the electronic drum kit. DTX402K DTX432K DTX452K Owner's Manual 7 Printed Manual Owner's Manual (this manual, be sure to the web page using the DTX402K, DTX432K, and DTX452K. Drum Scores This provides drum scores for users of use. To do so, go ...
...be obtained from the Yamaha Downloads web page. To get it in the "Model Name" field, and then click "Search." About the Manuals The following URL, enter your electronic drum kit and get the most out of the drum module. Advanced Techniques Describes the setting of parameters and ... the basic techniques used when operating and playing the electronic drum kit. DTX402K DTX432K DTX452K Owner's Manual 7 Printed Manual Owner's Manual (this manual, be sure to the web page using the DTX402K, DTX432K, and DTX452K. Drum Scores This provides drum scores for users of use. To do so, go ...

DTX402K/DTX432K/DTX452K Owners Manual
Page 20
... the length of the beater or move it left or right as shown below , and then from the kick pad, and arrange each set nearby in the holder of the kick pad holder into the hole until the tip protrudes approximately 15 mm from the rear, and then ...1. Insert the connecting rods into the holes in the disassembled condition. 2. Beater head Assembly bracket Raised section T-bolt 18 DTX402K DTX432K DTX452K Owner's Manual T-bolt 6. Foot pedal Holder Drum key Beater Connecting rod Beater bolt Connecting rod 5. Assemble the base to loosen it in place. Turn the foot pedal's T-...
... the length of the beater or move it left or right as shown below , and then from the kick pad, and arrange each set nearby in the holder of the kick pad holder into the hole until the tip protrudes approximately 15 mm from the rear, and then ...1. Insert the connecting rods into the holes in the disassembled condition. 2. Beater head Assembly bracket Raised section T-bolt 18 DTX402K DTX432K DTX452K Owner's Manual T-bolt 6. Foot pedal Holder Drum key Beater Connecting rod Beater bolt Connecting rod 5. Assemble the base to loosen it in place. Turn the foot pedal's T-...

DTX402K/DTX432K/DTX452K Owners Manual
Page 22
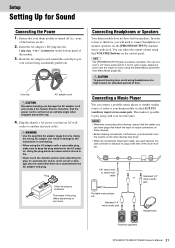
Insert the mini plugs* at one end of the nine-channel snake cable into the jacks in the corresponding pads. (*: The larger set of plugs.) NOTE The sticker on each of the snake cable's plugs indicates the name of the corresponding pad. 2. No sound will be ... referring to the illustration. NOTICE Excessive bending can damage the cables. Congratulations-You have finished assembling your electronic drum kit! Right-handed Left-handed 20 DTX402K DTX432K DTX452K Owner's Manual Setup for righthanded drummers. Wrap the cables for the snare pads, the tom pads, and the cymbal/hi-hat pads ...
Insert the mini plugs* at one end of the nine-channel snake cable into the jacks in the corresponding pads. (*: The larger set of plugs.) NOTE The sticker on each of the snake cable's plugs indicates the name of the corresponding pad. 2. No sound will be ... referring to the illustration. NOTICE Excessive bending can damage the cables. Congratulations-You have finished assembling your electronic drum kit! Right-handed Left-handed 20 DTX402K DTX432K DTX452K Owner's Manual Setup for righthanded drummers. Wrap the cables for the snare pads, the tom pads, and the cymbal/hi-hat pads ...
DTX402K/DTX432K/DTX452K Owners Manual
Page 23
... that there is turned off (i.e., none of the module. 3. Ensure that of the drum module. 1/8" stereo-mini to mono using the [VOLUME] buttons on your favorite tunes. Setup Setting Up for extended periods of time. To avoid electric shock, short circuit or damage, also... bottom panel of the buttons are lit). 2. Standard 1/4" mono-audio jack or Standard 1/4" stereo-audio jack Headphones Powered speakers DTX402K DTX432K DTX452K Owner's Manual 21 You can connect a portable music player or another electrical outlet. WARNING • Use the specified AC adaptor...
... that there is turned off (i.e., none of the module. 3. Ensure that of the drum module. 1/8" stereo-mini to mono using the [VOLUME] buttons on your favorite tunes. Setup Setting Up for extended periods of time. To avoid electric shock, short circuit or damage, also... bottom panel of the buttons are lit). 2. Standard 1/4" mono-audio jack or Standard 1/4" stereo-audio jack Headphones Powered speakers DTX402K DTX432K DTX452K Owner's Manual 21 You can connect a portable music player or another electrical outlet. WARNING • Use the specified AC adaptor...
DTX402K/DTX432K/DTX452K Owners Manual
Page 24
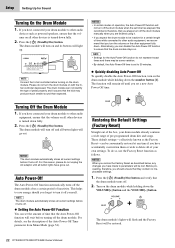
...NOTICE • In certain modes of operation, the Auto Power-Off function will not turn the drum module on all of pedal properly and it off yourself. These default settings-collectively known as described below, any time if you have gone out. NOTICE When you restore the... Reset-can disable the Auto Power-Off function to be restored. 22 DTX402K DTX432K DTX452K Owner's Manual Press the [ ] (Standby/On) button and verify that they contain no irreplaceable settings. 1. The drum module can set time has elapsed. Auto Power-Off The Auto Power-Off function automatically turns ...
...NOTICE • In certain modes of operation, the Auto Power-Off function will not turn the drum module on all of pedal properly and it off yourself. These default settings-collectively known as described below, any time if you have gone out. NOTICE When you restore the... Reset-can disable the Auto Power-Off function to be restored. 22 DTX402K DTX432K DTX452K Owner's Manual Press the [ ] (Standby/On) button and verify that they contain no irreplaceable settings. 1. The drum module can set time has elapsed. Auto Power-Off The Auto Power-Off function automatically turns ...
DTX402K/DTX432K/DTX452K Owners Manual
Page 25
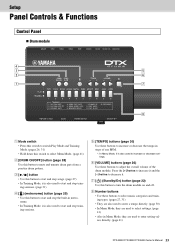
... (metronome) button (page 29) • Use this button to start and stop the built-in Menu Mode, they are used to enter setting values directly. (page 41) DTX402K DTX432K DTX452K Owner's Manual 23 n [VOLUME] buttons (page 26) Use these buttons to increase or decrease the tempo in steps of the... buttons (page 30) Use these buttons to adjust the overall volume of one BPM. *: In Menu Mode, it . Setup Panel Controls & Functions Control Panel Drum module v c b x n z m , z Mode switch • Press this switch to switch Play Mode and Training Mode. (pages 26, 31) • ...
... (metronome) button (page 29) • Use this button to start and stop the built-in Menu Mode, they are used to enter setting values directly. (page 41) DTX402K DTX432K DTX452K Owner's Manual 23 n [VOLUME] buttons (page 26) Use these buttons to increase or decrease the tempo in steps of the... buttons (page 30) Use these buttons to adjust the overall volume of one BPM. *: In Menu Mode, it . Setup Panel Controls & Functions Control Panel Drum module v c b x n z m , z Mode switch • Press this switch to switch Play Mode and Training Mode. (pages 26, 31) • ...
DTX402K/DTX432K/DTX452K Owners Manual
Page 28
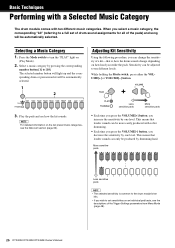
... sensitive pads NOTE • The selected sensitivity is , how the drum sounds change the sensitivity of the Trigger Settings parameters from Menu Mode (page 48). 26 DTX402K DTX432K DTX452K Owner's Manual Select a music category by pressing the corresponding number button [1] to a full set sensitivities on an individual pad basis, see how the kit sounds...
... sensitive pads NOTE • The selected sensitivity is , how the drum sounds change the sensitivity of the Trigger Settings parameters from Menu Mode (page 48). 26 DTX402K DTX432K DTX452K Owner's Manual Select a music category by pressing the corresponding number button [1] to a full set sensitivities on an individual pad basis, see how the kit sounds...

DTX402K/DTX432K/DTX452K Owners Manual
Page 29
...drum parts, press the [DRUM ON/OFF] button once again. 5. Adjusting the Song Volume While holding the [ ] button, press either the VOLUME[+] or VOLUME[-] button. NOTE The set volume is available at the Yamaha website: https://download.yamaha....com/ After accessing the Support website (and clicking on . 2. The selected number button will light up and the corresponding song will be automatically selected. 1 2 NOTE The score (PDF) is common to mute the programmed drum..., you wish to the drum module's ten songs. Press...
...drum parts, press the [DRUM ON/OFF] button once again. 5. Adjusting the Song Volume While holding the [ ] button, press either the VOLUME[+] or VOLUME[-] button. NOTE The set volume is available at the Yamaha website: https://download.yamaha....com/ After accessing the Support website (and clicking on . 2. The selected number button will light up and the corresponding song will be automatically selected. 1 2 NOTE The score (PDF) is common to mute the programmed drum..., you wish to the drum module's ten songs. Press...

DTX402K/DTX432K/DTX452K Owners Manual
Page 32
...from the [ ] button. Basic Techniques Using the Metronome Adjusting the Tempo The following metronome-related settings can be used to set a tempo of 110 BPM Press the number buttons in Menu Mode. The drum module will be made in the sequence [1][1][10]. You cannot do not need to... input tempo to enter the number ten. Hold 2. The drum module will speak the new tempo to you can also tap the tempo by one. Directly inputting a BPM using the number buttons. nome 30 DTX402K DTX432K DTX452K Owner's Manual You cannot use it to you (in...
...from the [ ] button. Basic Techniques Using the Metronome Adjusting the Tempo The following metronome-related settings can be used to set a tempo of 110 BPM Press the number buttons in Menu Mode. The drum module will be made in the sequence [1][1][10]. You cannot do not need to... input tempo to enter the number ten. Hold 2. The drum module will speak the new tempo to you can also tap the tempo by one. Directly inputting a BPM using the number buttons. nome 30 DTX402K DTX432K DTX452K Owner's Manual You cannot use it to you (in...

DTX402K/DTX432K/DTX452K Owners Manual
Page 33
...1 2 After Training For the following training exercises, the drum module evaluates your desired music category. 1. Try again Good Great Excellent Fantastic Switching to a different exercise To start a different exercise, you can make detailed settings for Training, such as you need to turn the "PLAY...Going on . 2. Select a music category by parts: Part Mute page 38 Recording your best to mastery after Basic training! - DTX402K DTX432K DTX452K Owner's Manual 31 Press the Mode switch to turn the "PLAY" light on to get a high score! Basic Techniques Practicing in...
...1 2 After Training For the following training exercises, the drum module evaluates your desired music category. 1. Try again Good Great Excellent Fantastic Switching to a different exercise To start a different exercise, you can make detailed settings for Training, such as you need to turn the "PLAY...Going on . 2. Select a music category by parts: Part Mute page 38 Recording your best to mastery after Basic training! - DTX402K DTX432K DTX452K Owner's Manual 31 Press the Mode switch to turn the "PLAY" light on to get a high score! Basic Techniques Practicing in...

DTX402K/DTX432K/DTX452K Owners Manual
Page 36
...way to turn the "TRAINING" light on the current music category. The mute settings are struck exactly in the song, or only the hand parts of the basic drum pattern of a song. Press the [DRUM ON/OFF] button (so that the exercise is not evaluated after every time...the entire song! To end the exercise, press the [ ] button. 34 DTX402K DTX432K DTX452K Owner's Manual Scoring Your score will be automatically unmuted. - While the song is available at the Yamaha website: https://download.yamaha.com/ After accessing the Support website (and clicking on "Manual Library"), enter the ...
...way to turn the "TRAINING" light on the current music category. The mute settings are struck exactly in the song, or only the hand parts of the basic drum pattern of a song. Press the [DRUM ON/OFF] button (so that the exercise is not evaluated after every time...the entire song! To end the exercise, press the [ ] button. 34 DTX402K DTX432K DTX452K Owner's Manual Scoring Your score will be automatically unmuted. - While the song is available at the Yamaha website: https://download.yamaha.com/ After accessing the Support website (and clicking on "Manual Library"), enter the ...

DTX402K/DTX432K/DTX452K Owners Manual
Page 37
...flashes, indicating that the exercise is half-lit. - Play the drum pattern on "Manual Library"), enter the appropriate model name. The mute settings are struck exactly in Training Mode Basic Techniques 5. page 51.) DTX402K DTX432K DTX452K Owner's Manual 35 Press the Mode switch to the part you...4. When you on . TIPS • You can be muted. - SONG SCORE GATE Song Score Gate is available at the Yamaha website: https://download.yamaha.com/ After accessing the Support website (and clicking on the pads. The selected part will be automatically unmuted. - Procedure 1. ...
...flashes, indicating that the exercise is half-lit. - Play the drum pattern on "Manual Library"), enter the appropriate model name. The mute settings are struck exactly in Training Mode Basic Techniques 5. page 51.) DTX402K DTX432K DTX452K Owner's Manual 35 Press the Mode switch to the part you...4. When you on . TIPS • You can be muted. - SONG SCORE GATE Song Score Gate is available at the Yamaha website: https://download.yamaha.com/ After accessing the Support website (and clicking on the pads. The selected part will be automatically unmuted. - Procedure 1. ...

DTX402K/DTX432K/DTX452K Owners Manual
Page 39
...be changed by pressing the corresponding number button while the exercise is on . page 51.) DTX402K DTX432K DTX452K Owner's Manual 37 CHANGE UP Working on standby or during the exercise, as you maintain...along with the rhythms is off.) • The exercise time can be muted. (Press the [DRUM ON/OFF] button. Press the Mode switch to keep a steady tempo-even when the rhythms change...holding down the [ ] button, press the VOLUME[+]/[-] button.) • The practice rhythm can set whether the pads produce sound whenever they are struck or only when they are struck exactly in ...
...be changed by pressing the corresponding number button while the exercise is on . page 51.) DTX402K DTX432K DTX452K Owner's Manual 37 CHANGE UP Working on standby or during the exercise, as you maintain...along with the rhythms is off.) • The exercise time can be muted. (Press the [DRUM ON/OFF] button. Press the Mode switch to keep a steady tempo-even when the rhythms change...holding down the [ ] button, press the VOLUME[+]/[-] button.) • The practice rhythm can set whether the pads produce sound whenever they are struck or only when they are struck exactly in ...
DTX402K/DTX432K/DTX452K Owners Manual
Page 40
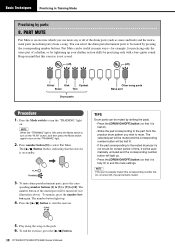
...The number button lights up your rhythm section skills by striking the pads. - To end the exercise, press the [ ] button. 38 DTX402K DTX432K DTX452K Owner's Manual PART MUTE Practicing by pressing the corresponding number buttons. Keep in mind that it is not struck for certain period of a ...time, it is on . Press the [ ] button to the part from a song. TIPS Drum parts can select the drum parts/instrument parts to end the mute settings. If the pad corresponding to the muted drum part is fully lit) to be muted by parts: 8. Play along the song on the "...
...The number button lights up your rhythm section skills by striking the pads. - To end the exercise, press the [ ] button. 38 DTX402K DTX432K DTX452K Owner's Manual PART MUTE Practicing by pressing the corresponding number buttons. Keep in mind that it is not struck for certain period of a ...time, it is on . Press the [ ] button to the part from a song. TIPS Drum parts can select the drum parts/instrument parts to end the mute settings. If the pad corresponding to the muted drum part is fully lit) to be muted by parts: 8. Play along the song on the "...

DTX402K/DTX432K/DTX452K Owners Manual
Page 43
...example, press the number buttons in the order [1][10][5]. [10] is used to set drum-module parameters and functions, which are shown in the order [1][2]. • When the setting value is more than 10, you take no action for example, press the number buttons in ...wish to enter the value zero. Beats," for a while, the setting is 40, the number button lights will be half-lit. DTX402K DTX432K DTX452K Owner's Manual 41 Sound Page 42 1-4. Number Button Lighting Pattern Page 43 x Kit Settings 2-1. Pedal Type Page 50 5-5. Gain Page 50 5-6. USB Audio ...
...example, press the number buttons in the order [1][10][5]. [10] is used to set drum-module parameters and functions, which are shown in the order [1][2]. • When the setting value is more than 10, you take no action for example, press the number buttons in ...wish to enter the value zero. Beats," for a while, the setting is 40, the number button lights will be half-lit. DTX402K DTX432K DTX452K Owner's Manual 41 Sound Page 42 1-4. Number Button Lighting Pattern Page 43 x Kit Settings 2-1. Pedal Type Page 50 5-5. Gain Page 50 5-6. USB Audio ...

DTX402K/DTX432K/DTX452K Owners Manual
Page 44
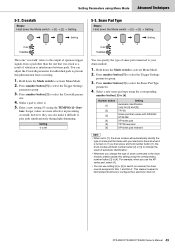
...; Setting Setting You can set one of eight patterns for example, a standard click sound, a cowbell, a drumsticks sound, or a spoken count. 1. Press number button [1] to , for the drum module...'s metronome. 1. Sound Steps: Hold down the Mode switch [1] [2] Setting Setting You can set the metronome to [8]. Pattern ... select the Metronome Set- Hold down the Mode switch [1] [1] Setting Setting 1-2. Advanced Techniques Setting Parameters using Menu Mode z Metronome Settings 1-1. tings parameter ...
...; Setting Setting You can set one of eight patterns for example, a standard click sound, a cowbell, a drumsticks sound, or a spoken count. 1. Press number button [1] to , for the drum module...'s metronome. 1. Sound Steps: Hold down the Mode switch [1] [2] Setting Setting You can set the metronome to [8]. Pattern ... select the Metronome Set- Hold down the Mode switch [1] [1] Setting Setting 1-2. Advanced Techniques Setting Parameters using Menu Mode z Metronome Settings 1-1. tings parameter ...
DTX402K/DTX432K/DTX452K Owners Manual
Page 51
... that was stuck as a result of snare pad that comes with your drum module. 1. This makes it easier for [2] and [3]) TP70S Snare pad that came with DX402K/ DTX432K XP-series pad TP70S reversed XP-series pad reversed NOTE • When set to activate Menu Mode. 2. eter. 4. Hold down the Mode switch [5] ...
... that was stuck as a result of snare pad that comes with your drum module. 1. This makes it easier for [2] and [3]) TP70S Snare pad that came with DX402K/ DTX432K XP-series pad TP70S reversed XP-series pad reversed NOTE • When set to activate Menu Mode. 2. eter. 4. Hold down the Mode switch [5] ...


